
Clover Designer Lab Guide
Introduction
Welcome to the Clover Designer Lab Guide. This guide will help you explore the features of the Clover Designer tool, understand its functionalities, and see how it can simplify the design and creation process of a data centre fabric. This lab should take approximately 30 minutes.
In this lab, you will create a data centre fabric design, configure the necessary settings, and generate output files including the Bill of Materials (BoM), PowerPoint (PPT) presentation, and Terraform configuration for Apstra. By the end of this lab, you will understand how to use Clover to design efficient data centre fabrics and export essential documentation.
Objectives
By the end of this lab, you will be able to:
Create a simple Data Centre (DC) design.
Export the Bill of Materials (BoM) and PowerPoint (PPT) files.
Use Terraform for Apstra.
Understand the value of the Clover tool.
Prerequisites
Access to the Clover Designer tool: Clover URL
Juniper ID for single sign-on (SSO) access.
Terrafrom Installed on Laptop (Install walkthought in this guide)
Apstra Instance (Provided in this lab)
What is the Clover Tool?
Clover is a SaaS product developed by Juniper Networks designed to assist Sales Engineers (SEs) and Partner Sales Engineers in building Data Centre Fabric designs for various customer use cases. By collecting simple requirements from the customers, Clover generates comprehensive designs, including a Bill of Materials (BoM) with the necessary Juniper equipment and presentations. This tool enables SEs to have quality conversations with customers quickly, leveraging best practices built into the system.
What is Clover For?
Designing Data Centre Fabrics: Clover helps in creating scalable and efficient data centre fabric designs tailored to customer needs.
Generating Bills of Materials: Automatically generates detailed BoMs to simplify procurement and budgeting processes.
Creating Presentations: Produces presentation materials that SEs can use to communicate designs and value propositions to customers.
Exporting Configurations: Allows exporting designs into various formats, including Terraform for automated deployments.
Who is Clover For?
Juniper Sales Engineers: To enhance pre-sales engagements and provide quick, accurate data centre designs.
Partner Sales Engineers: To collaborate with Juniper and deliver customised solutions to end customers.
Table of Contents
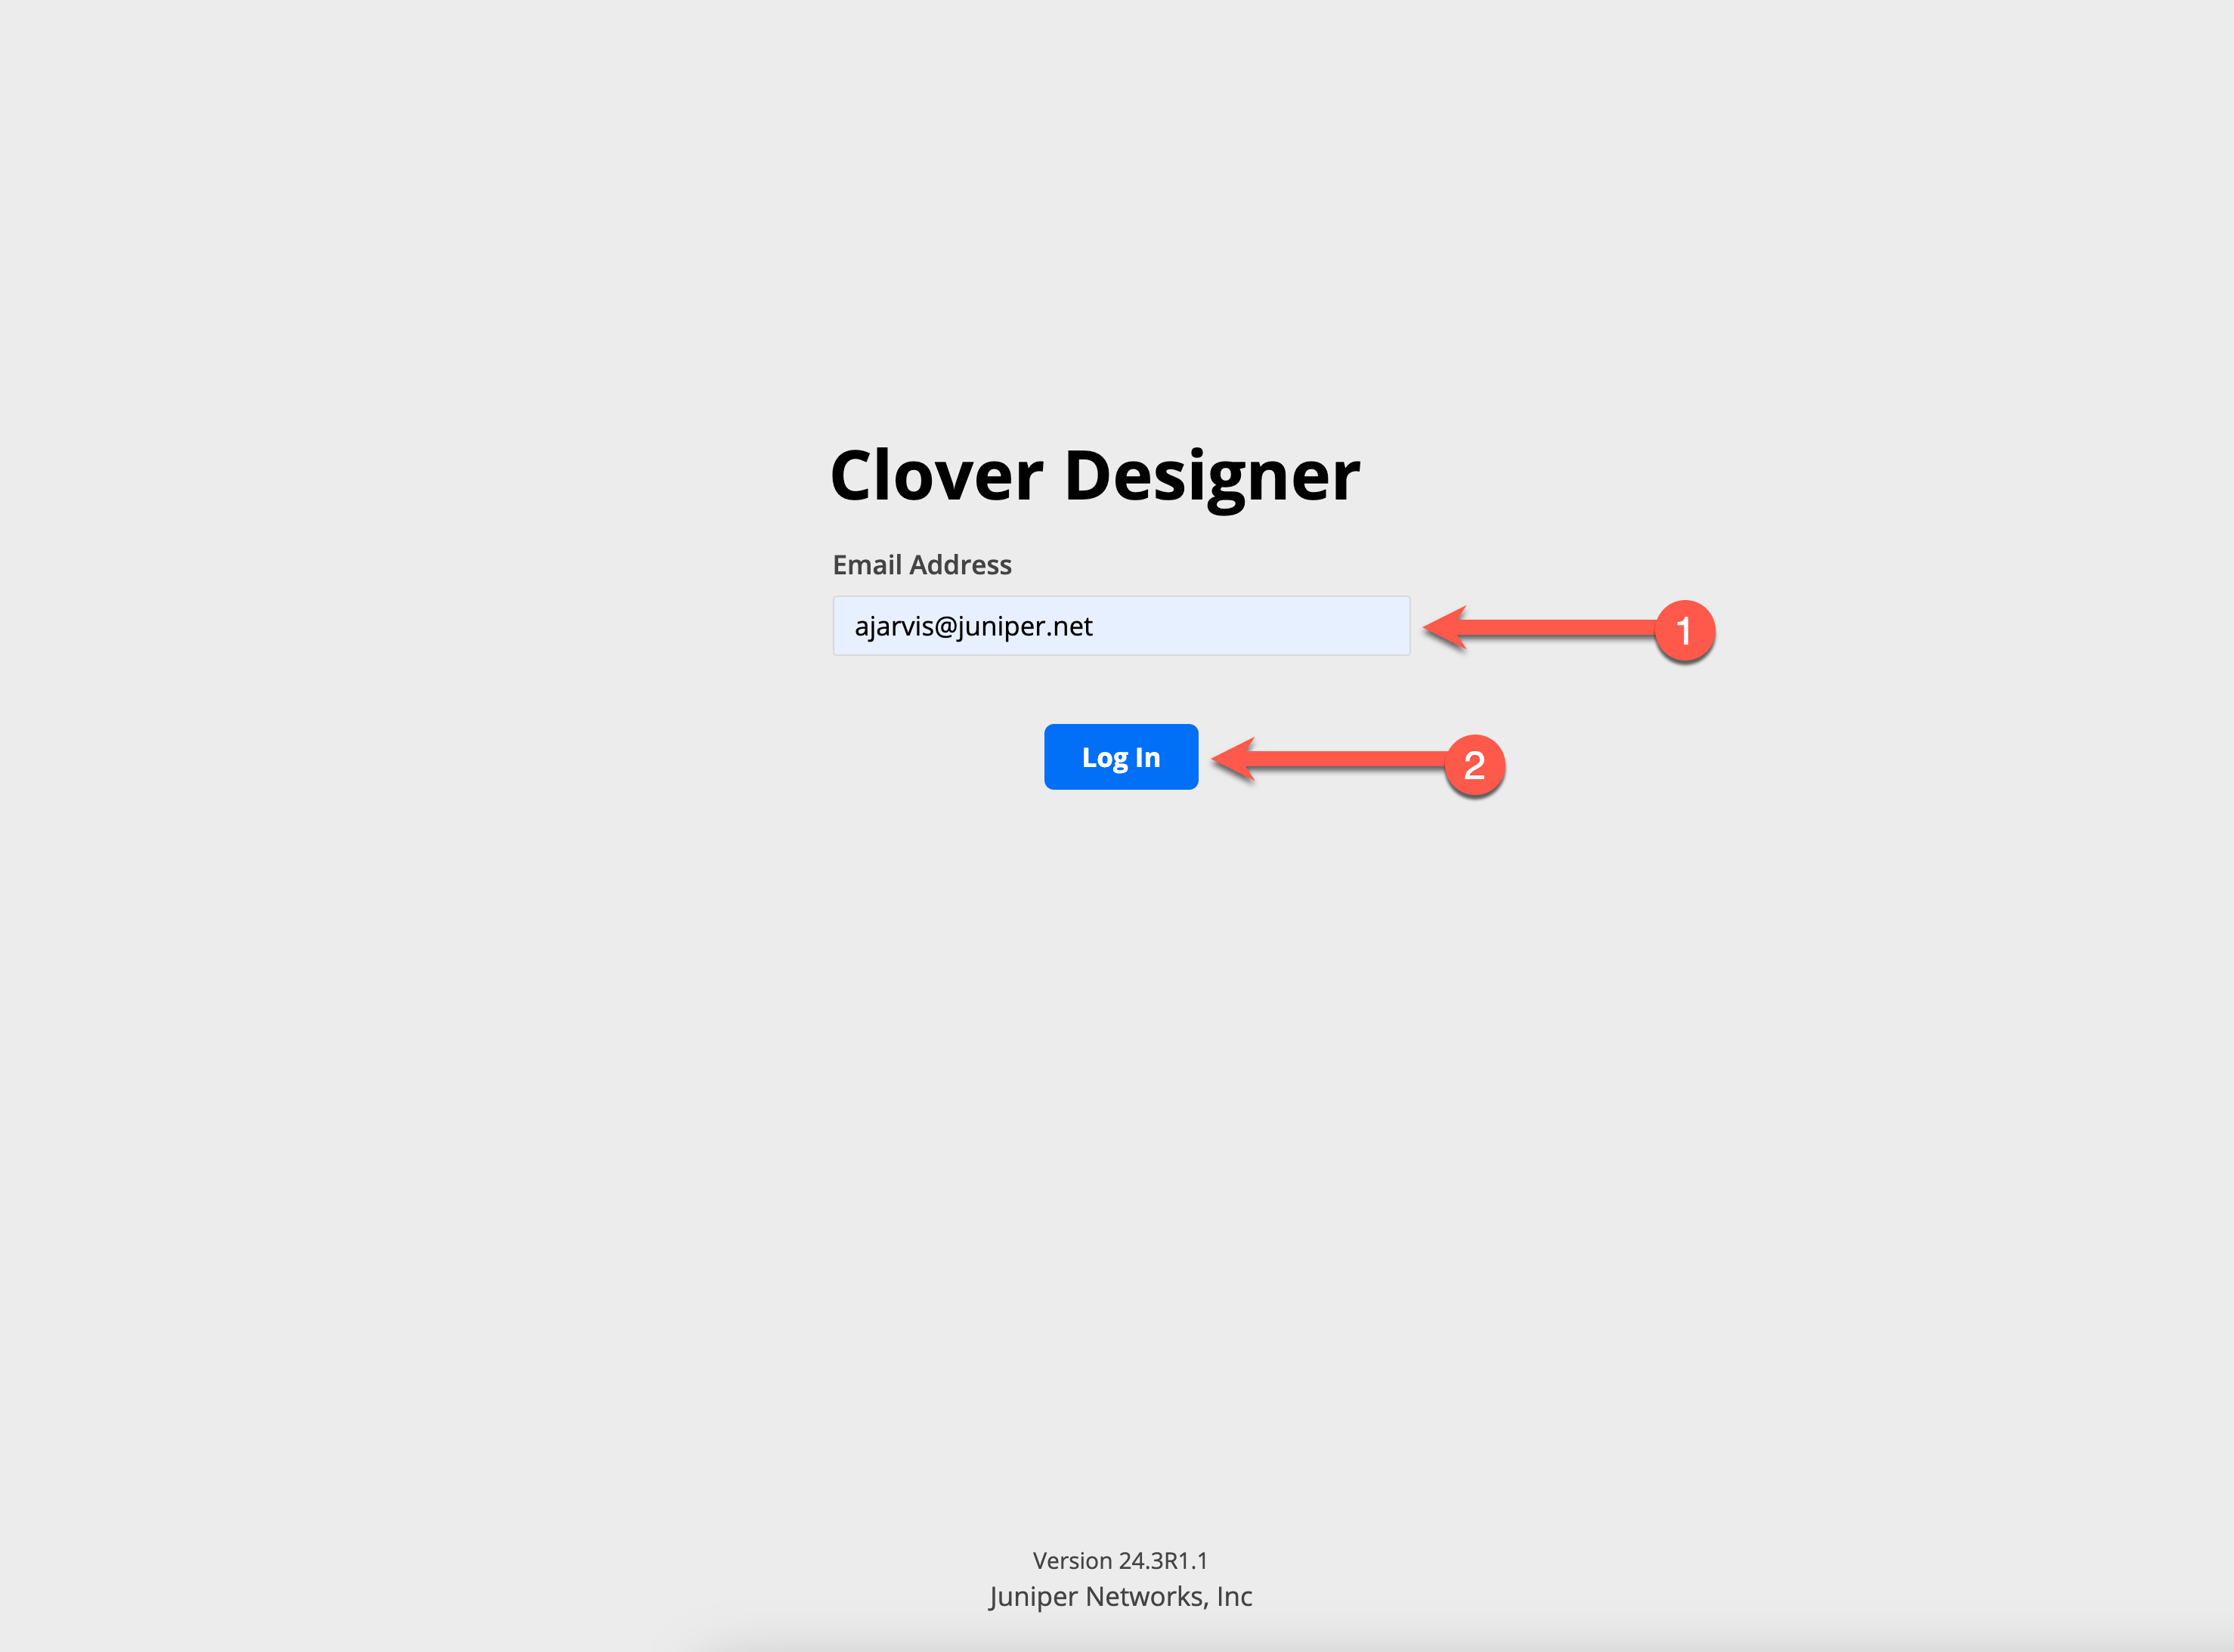
1. Logging in to Clover
To access the Clover Designer tool:
Open your web browser and navigate to https://clover.juniperinfra.net/.
Login using your Juniper SSO credientials.
:warning: If you do not have access, request it via clover-support-group@juniper.net.
:exclamation: If you encounter any issues while logging in, try refreshing the page or clearing your browser cache. Ensure that your Juniper ID is active and you have been granted the necessary permissions.
2. Creating a Data Centre Fabric Design
This section will walk you through how to create your DC design in Clover tool.
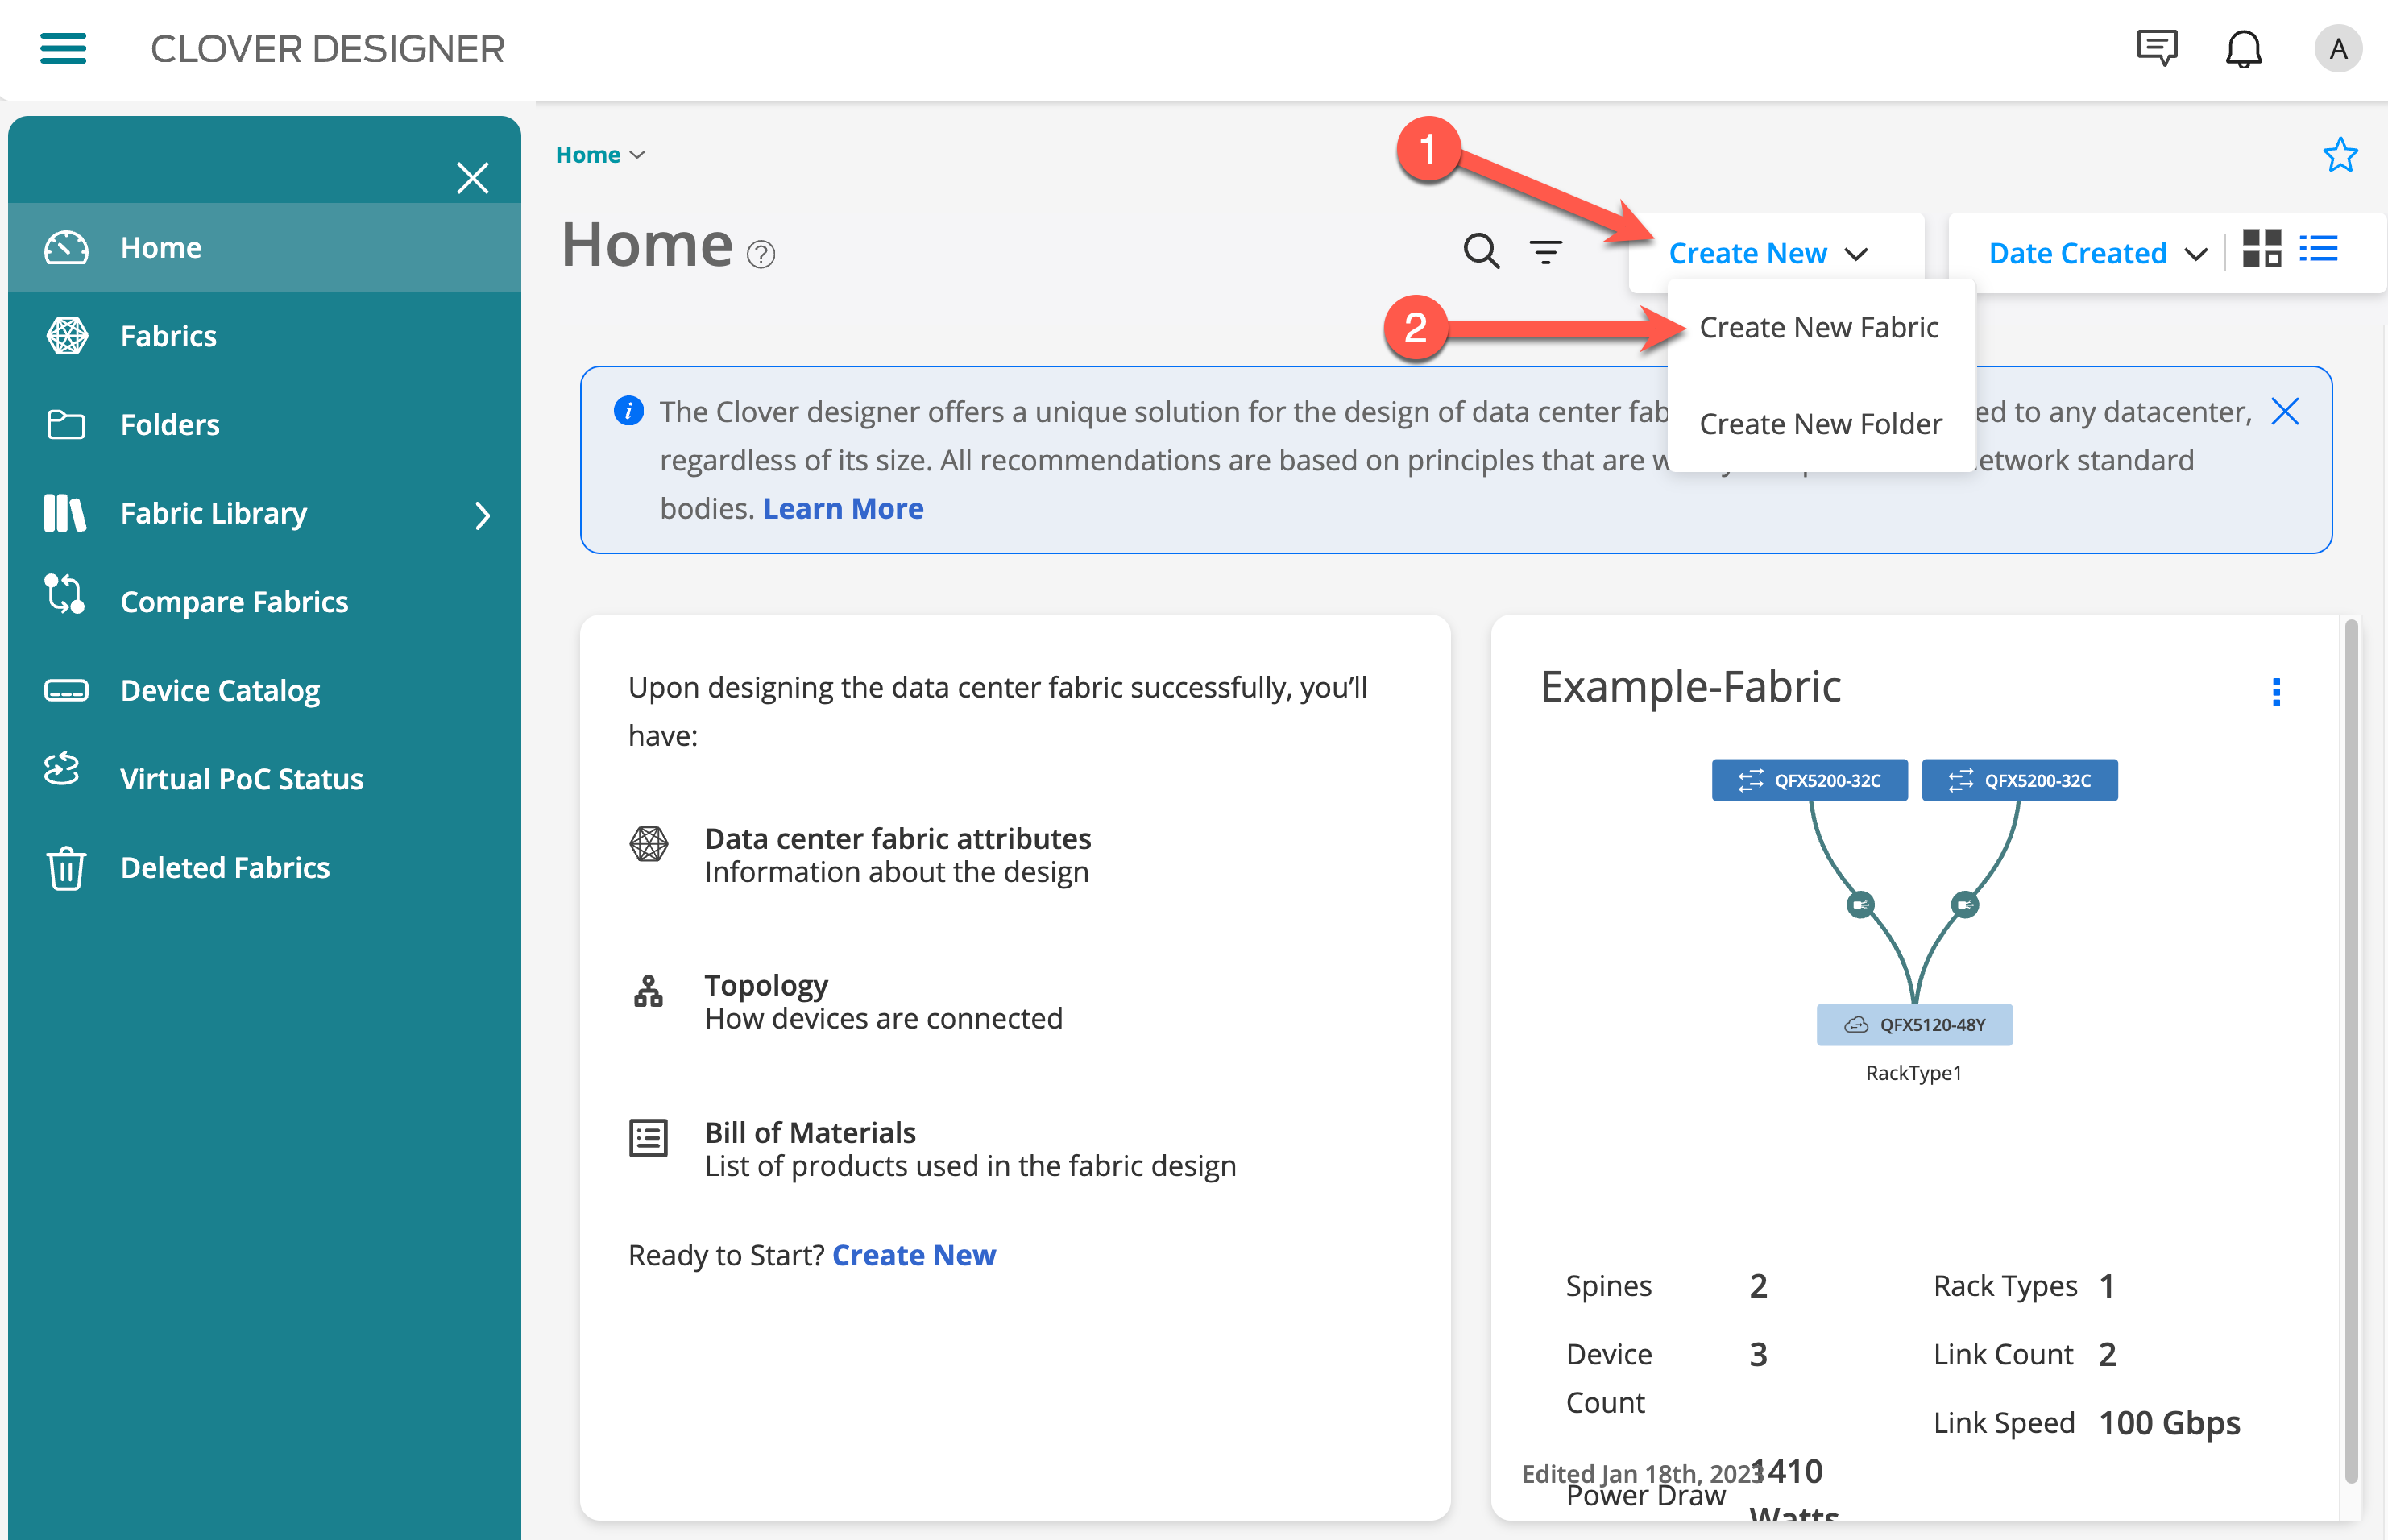
Start a New Design
Click on the Create New button on the home page.
Click on the Create New Fabric.
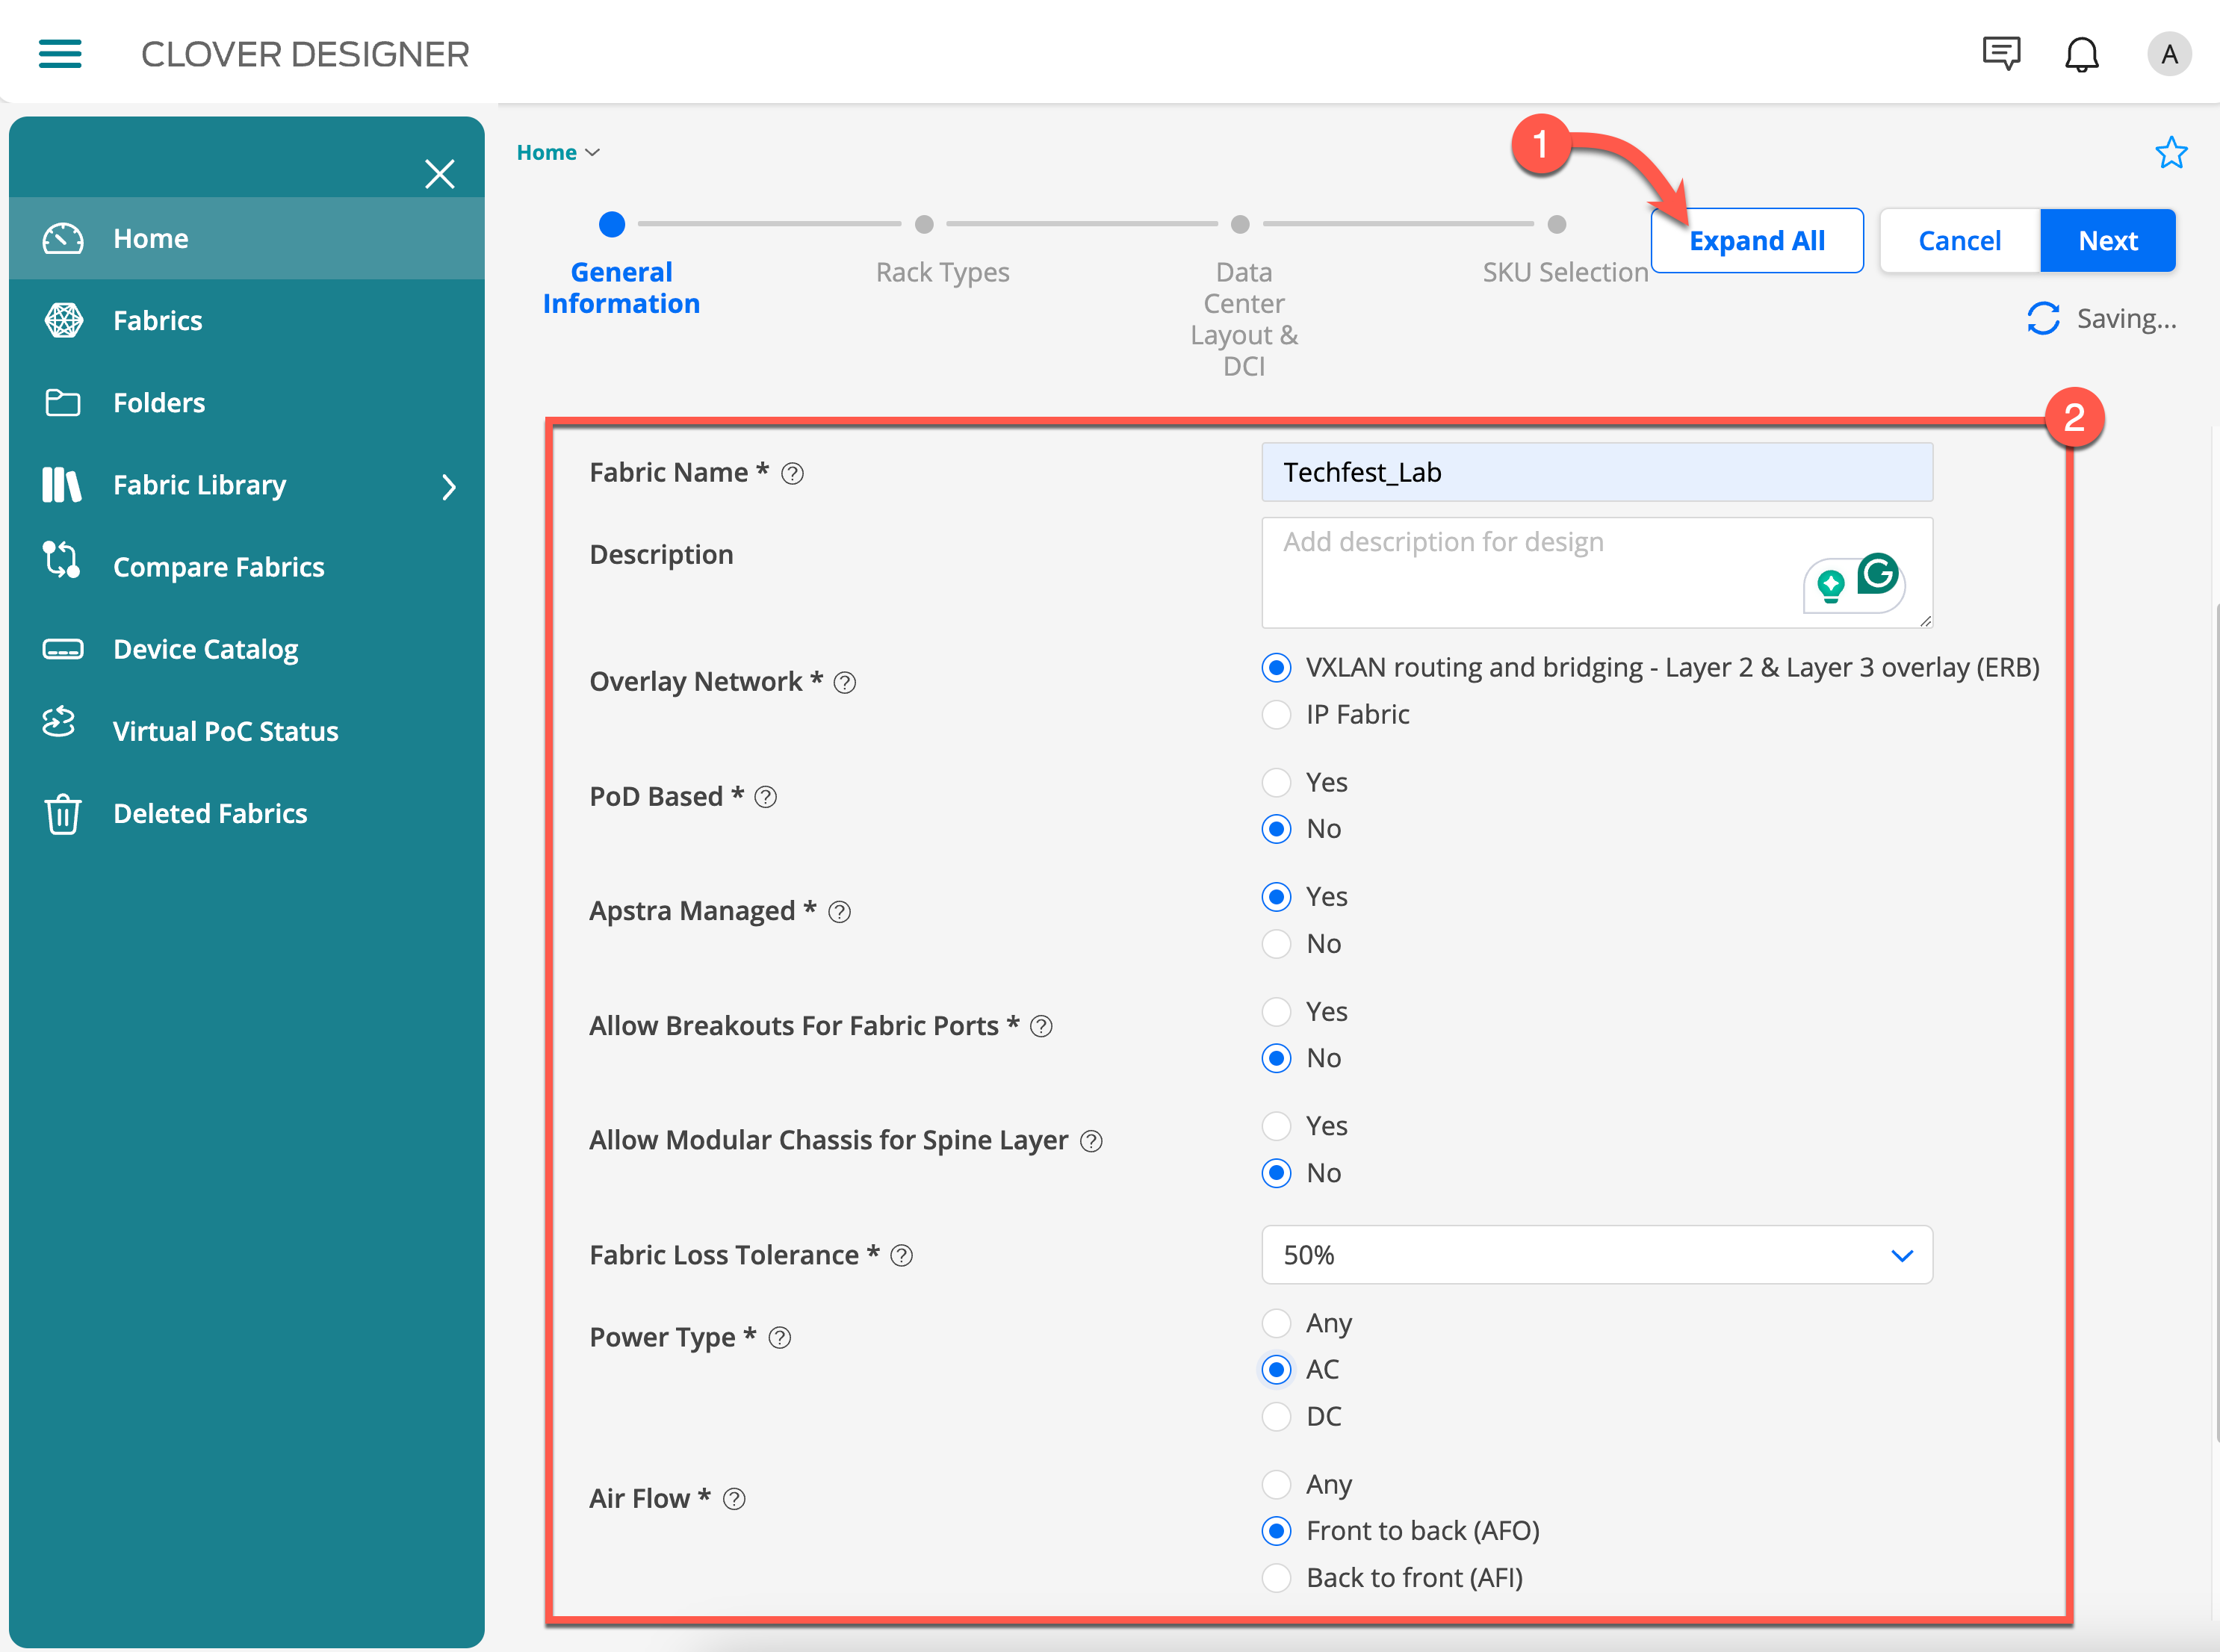
Configure General Information
Many of these are the default selection in Clover, only a few need changing.
Click on the Expand All button to expand all subsequent sections.
Enter the Fabric Name as “Techfest Lab”.
Leave the Description blank.
Select VXLAN routing and bridging as the overlay network.
Set Pod Based to No.
Set Apstra Managed to Yes.
Set Allow Breakout for Optic Ports to No.
Set Allow Modular Chassis for Spine Layer to No.
Set Fabric Loss Tolerance to 50% (default).
Select AC as the power type.
Select Front to Back for airflow.
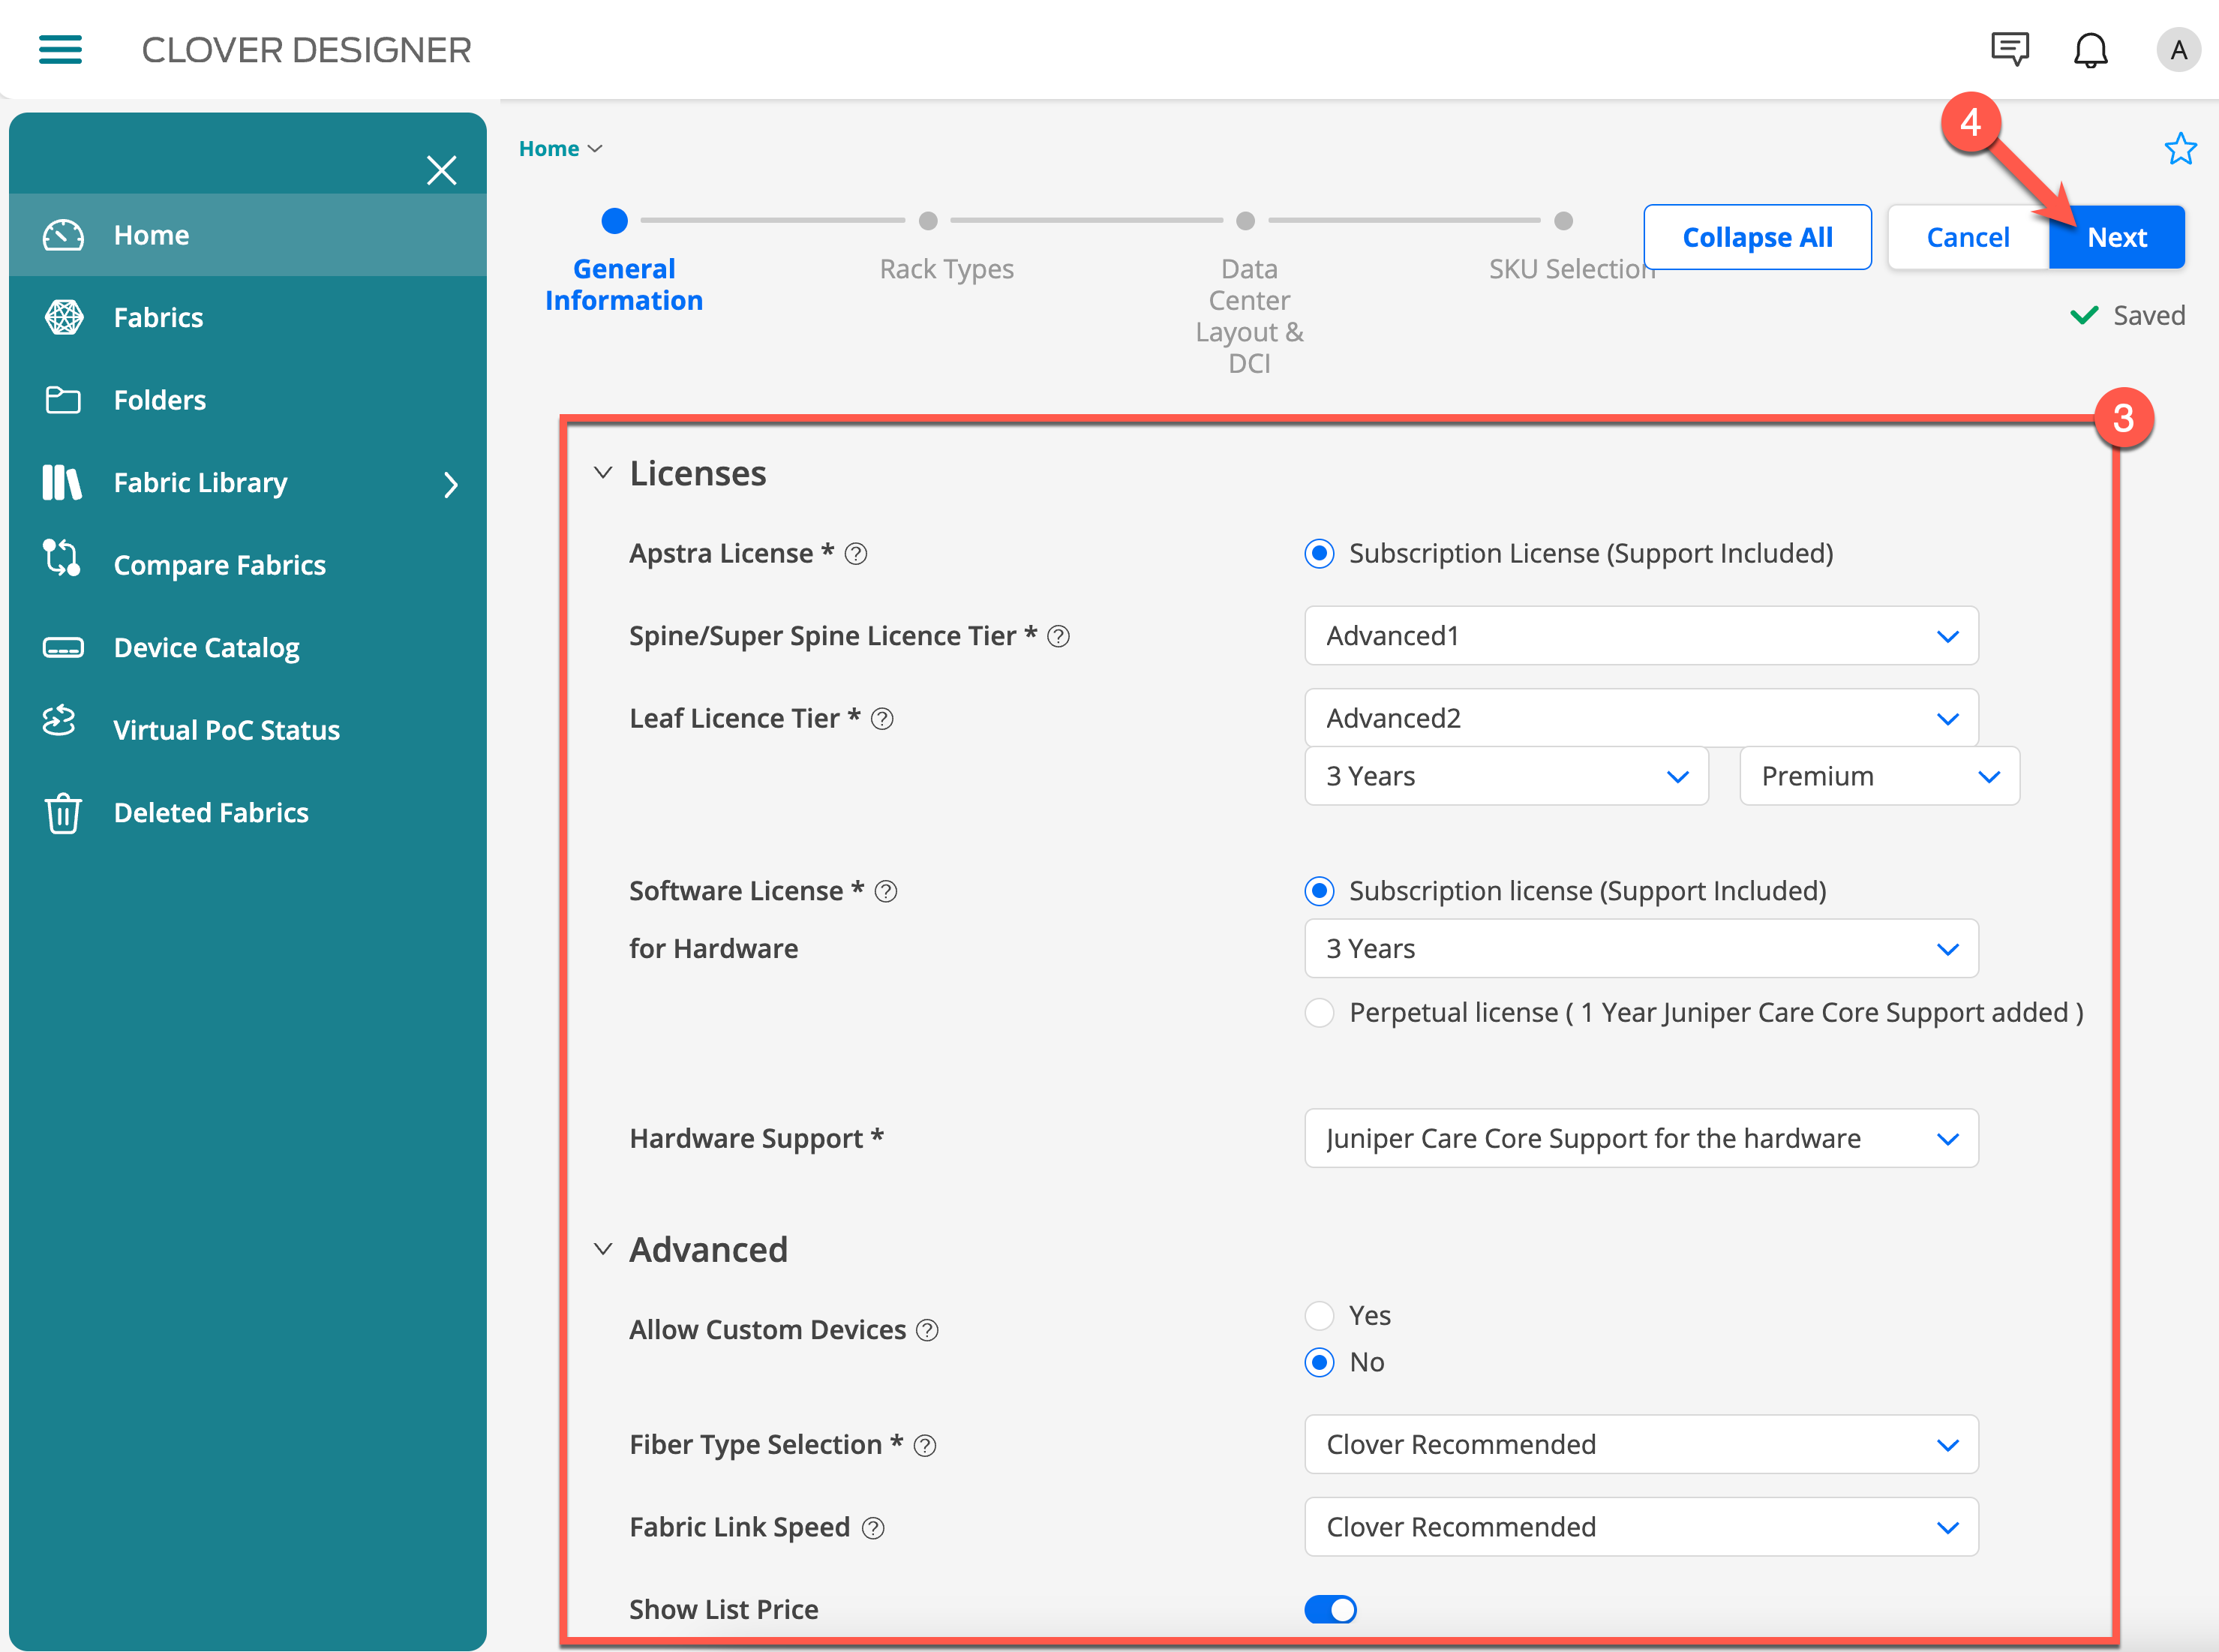
Select Premium for the Appstra license.
Set the spine layer to Advanced 1.
Set the leaf layer to Advanced 2 for three years.
Set the Software Licenses for Hardware to three years.
Set Allow Custom Devices to No.
Set Fiber Type Selection to Clover Recommended.
Set Fabric Link Speed to Clover Recommended.
Deselect Show List Price if you do not want to share pricing with customers.
Click Next.
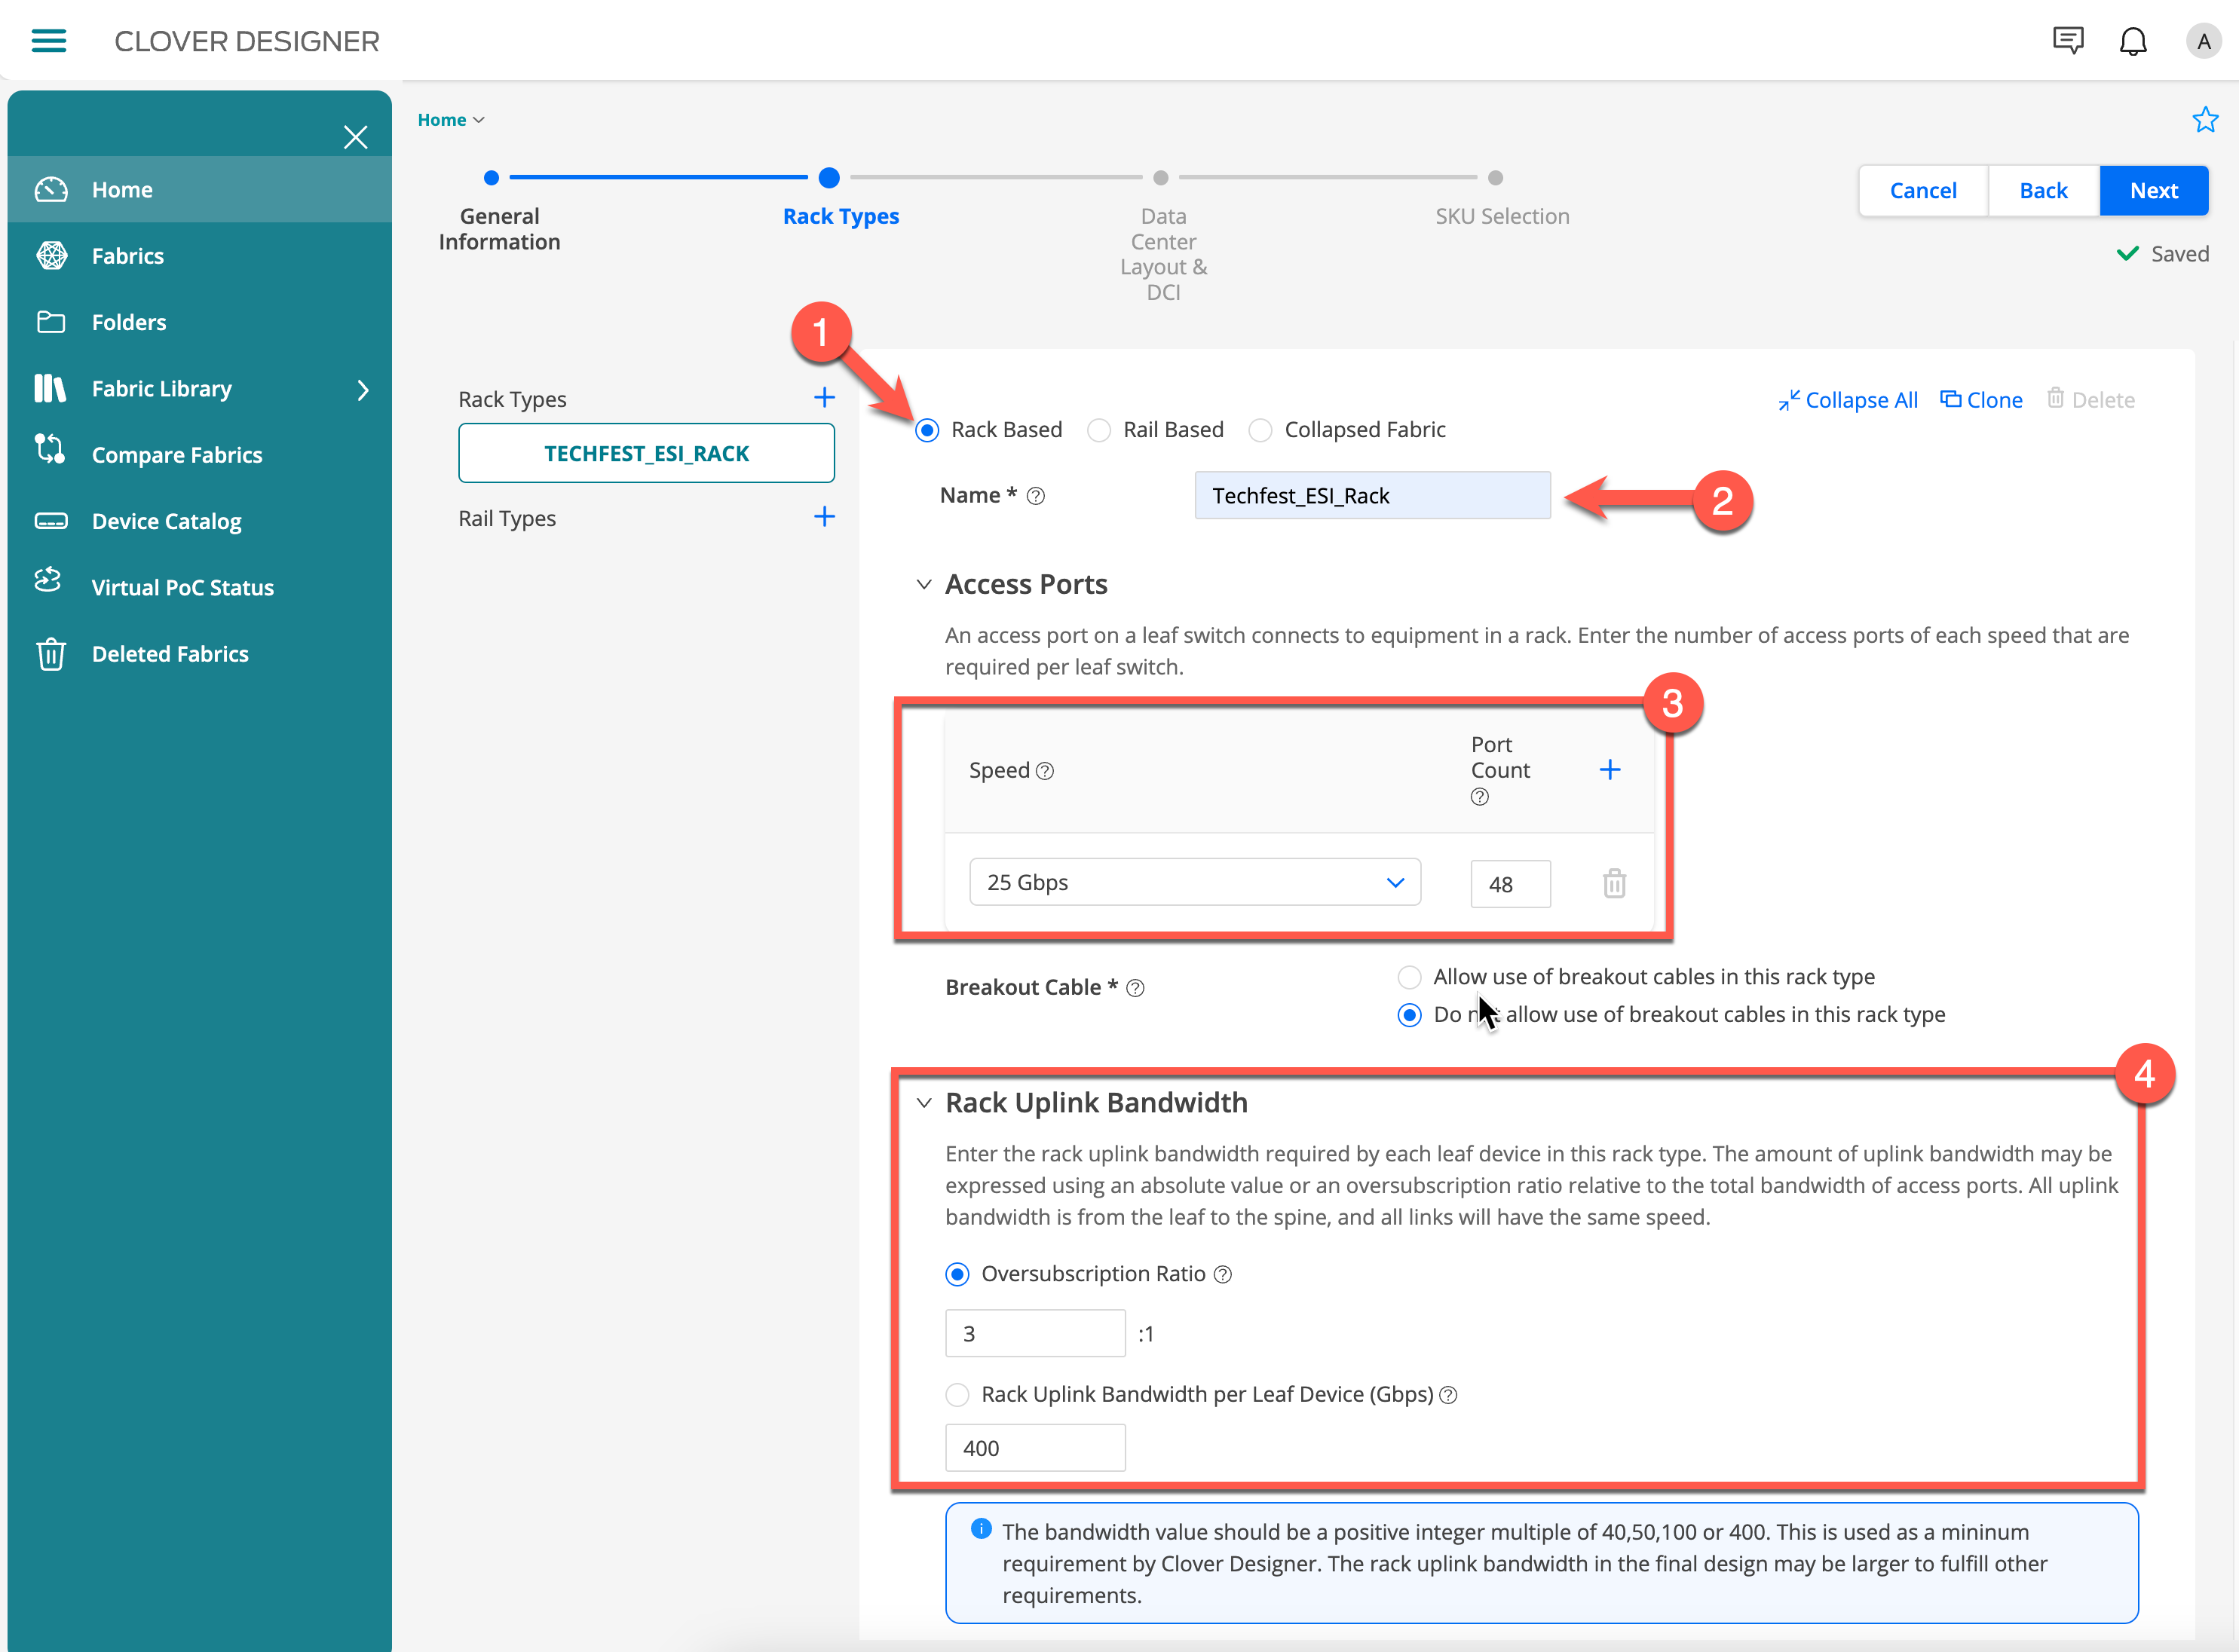
Define Rack Types
Select Rack Based at the top of the page.
Name the rack Techfest ESI Rack.
Set Access Ports to 25 Gbps and 48 ports.
Select Do Not Allow the Use of Breakout Cables.
Set Oversubscription Ratio to 3 to 1 for rack uplink bandwidth.
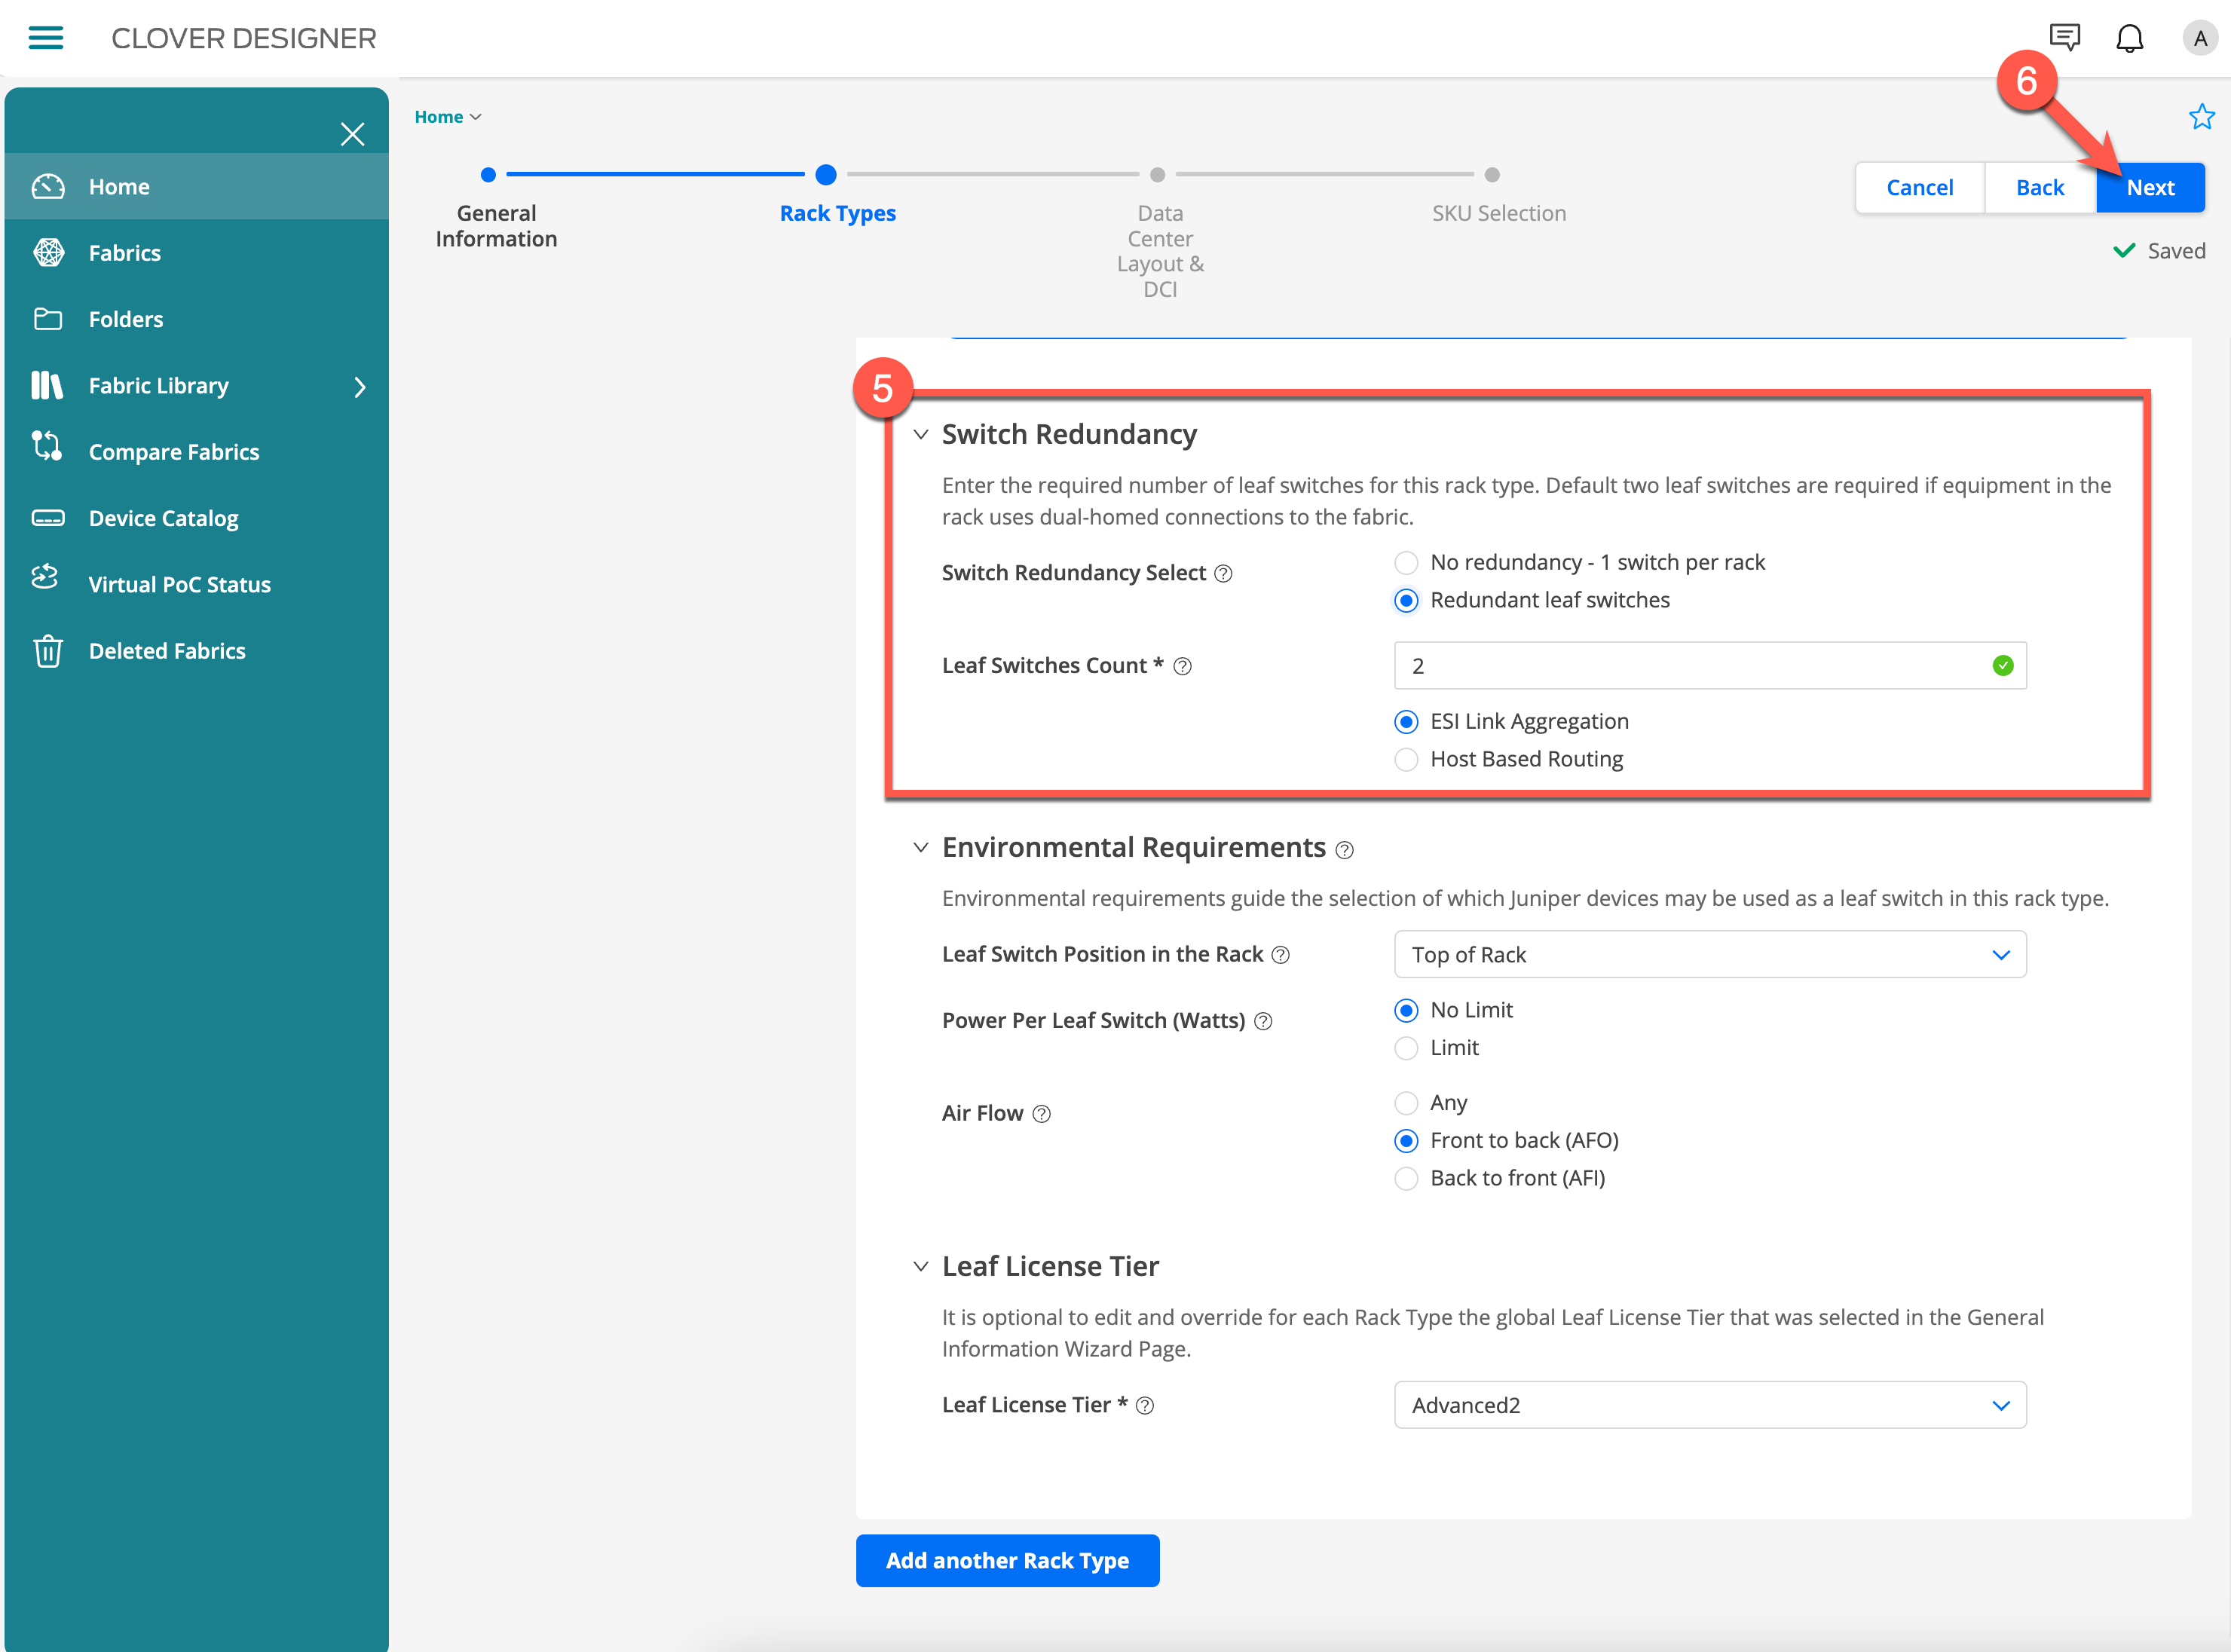
Select Redundant Leaf Switches and set the leaf count to 2.
Select ESI Link Aggregation as the redundancy protocol.
Set Leaf Switch Position to Top of Rack.
Set Power per Leaf Switch to No Limit.
Ensure Front to Back airflow is selected.
Set License Tier to Advanced 2.
Click Next.
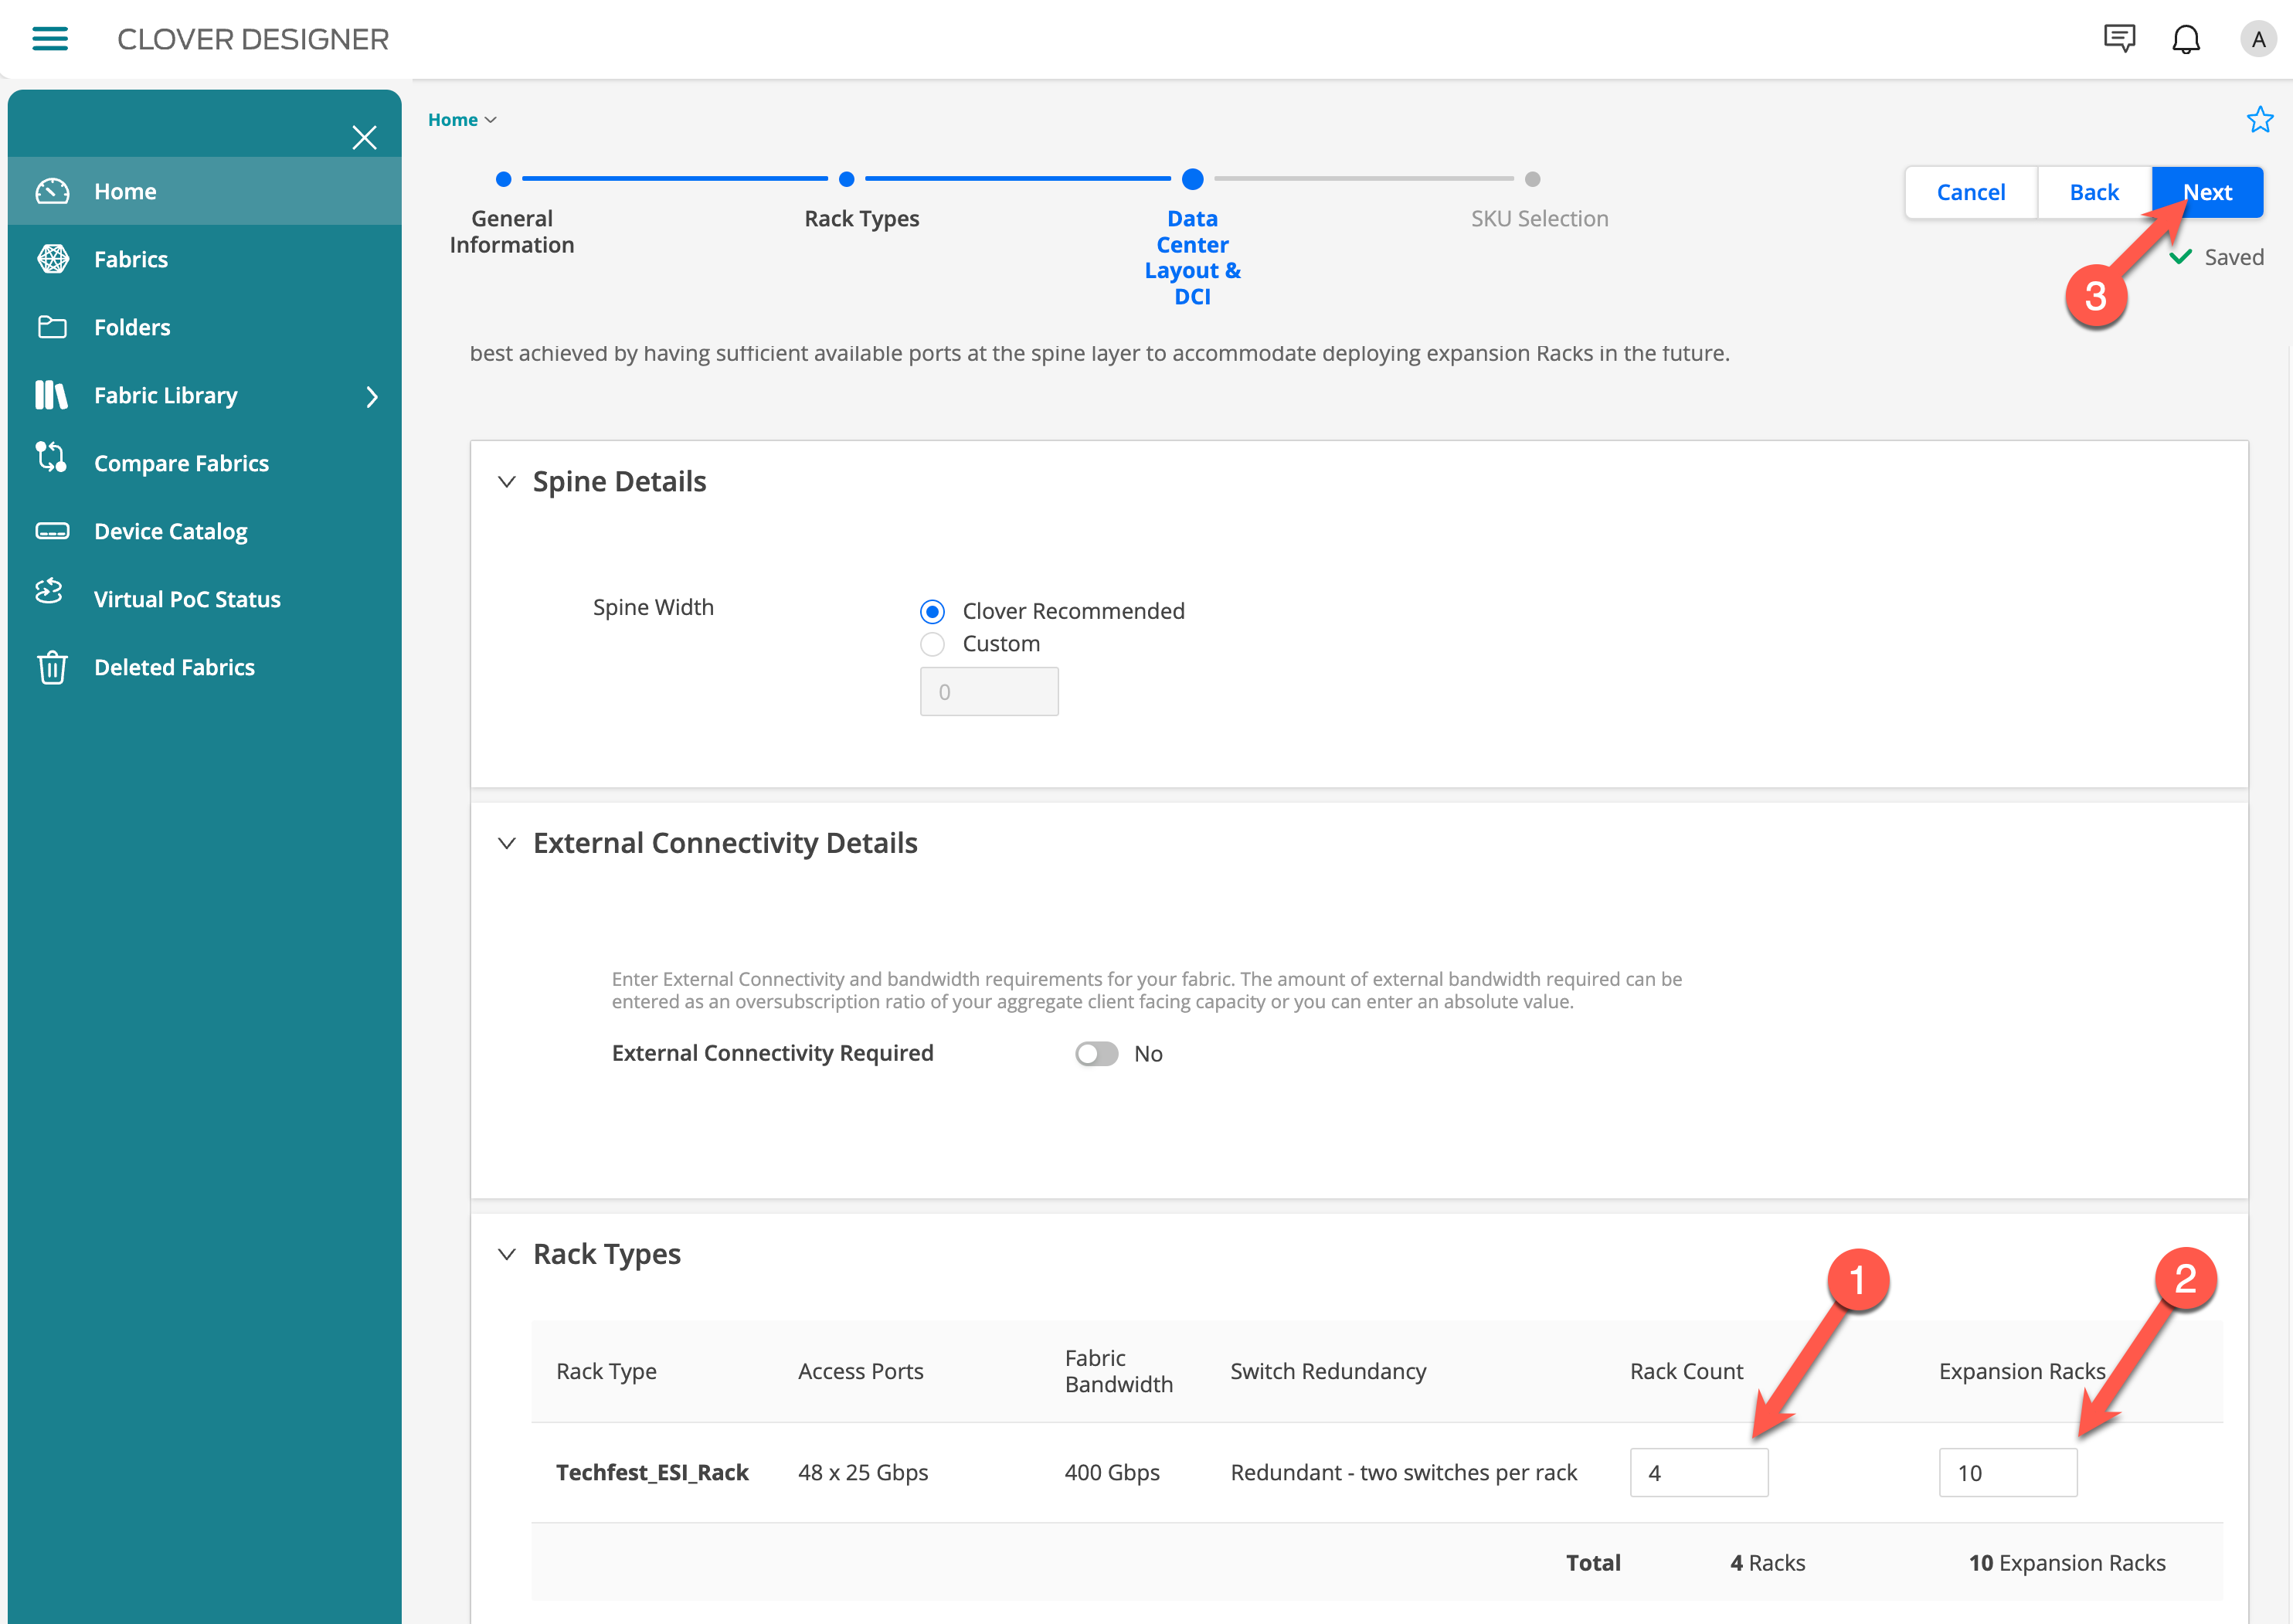
Data Centre Layout
Set Spine Width to Clover Recommended.
Review the recommended spine switch count Clover has chosen.
Set External Connectivity to No.
In this example we will not add any external connectivirty but feel free to play around.
Final step is add the number of racks you require and then how many racks your customer beleives they will eventually expand to.
Set Rack Count to 4.
Set Expansion Racks to 10.
Click Next.
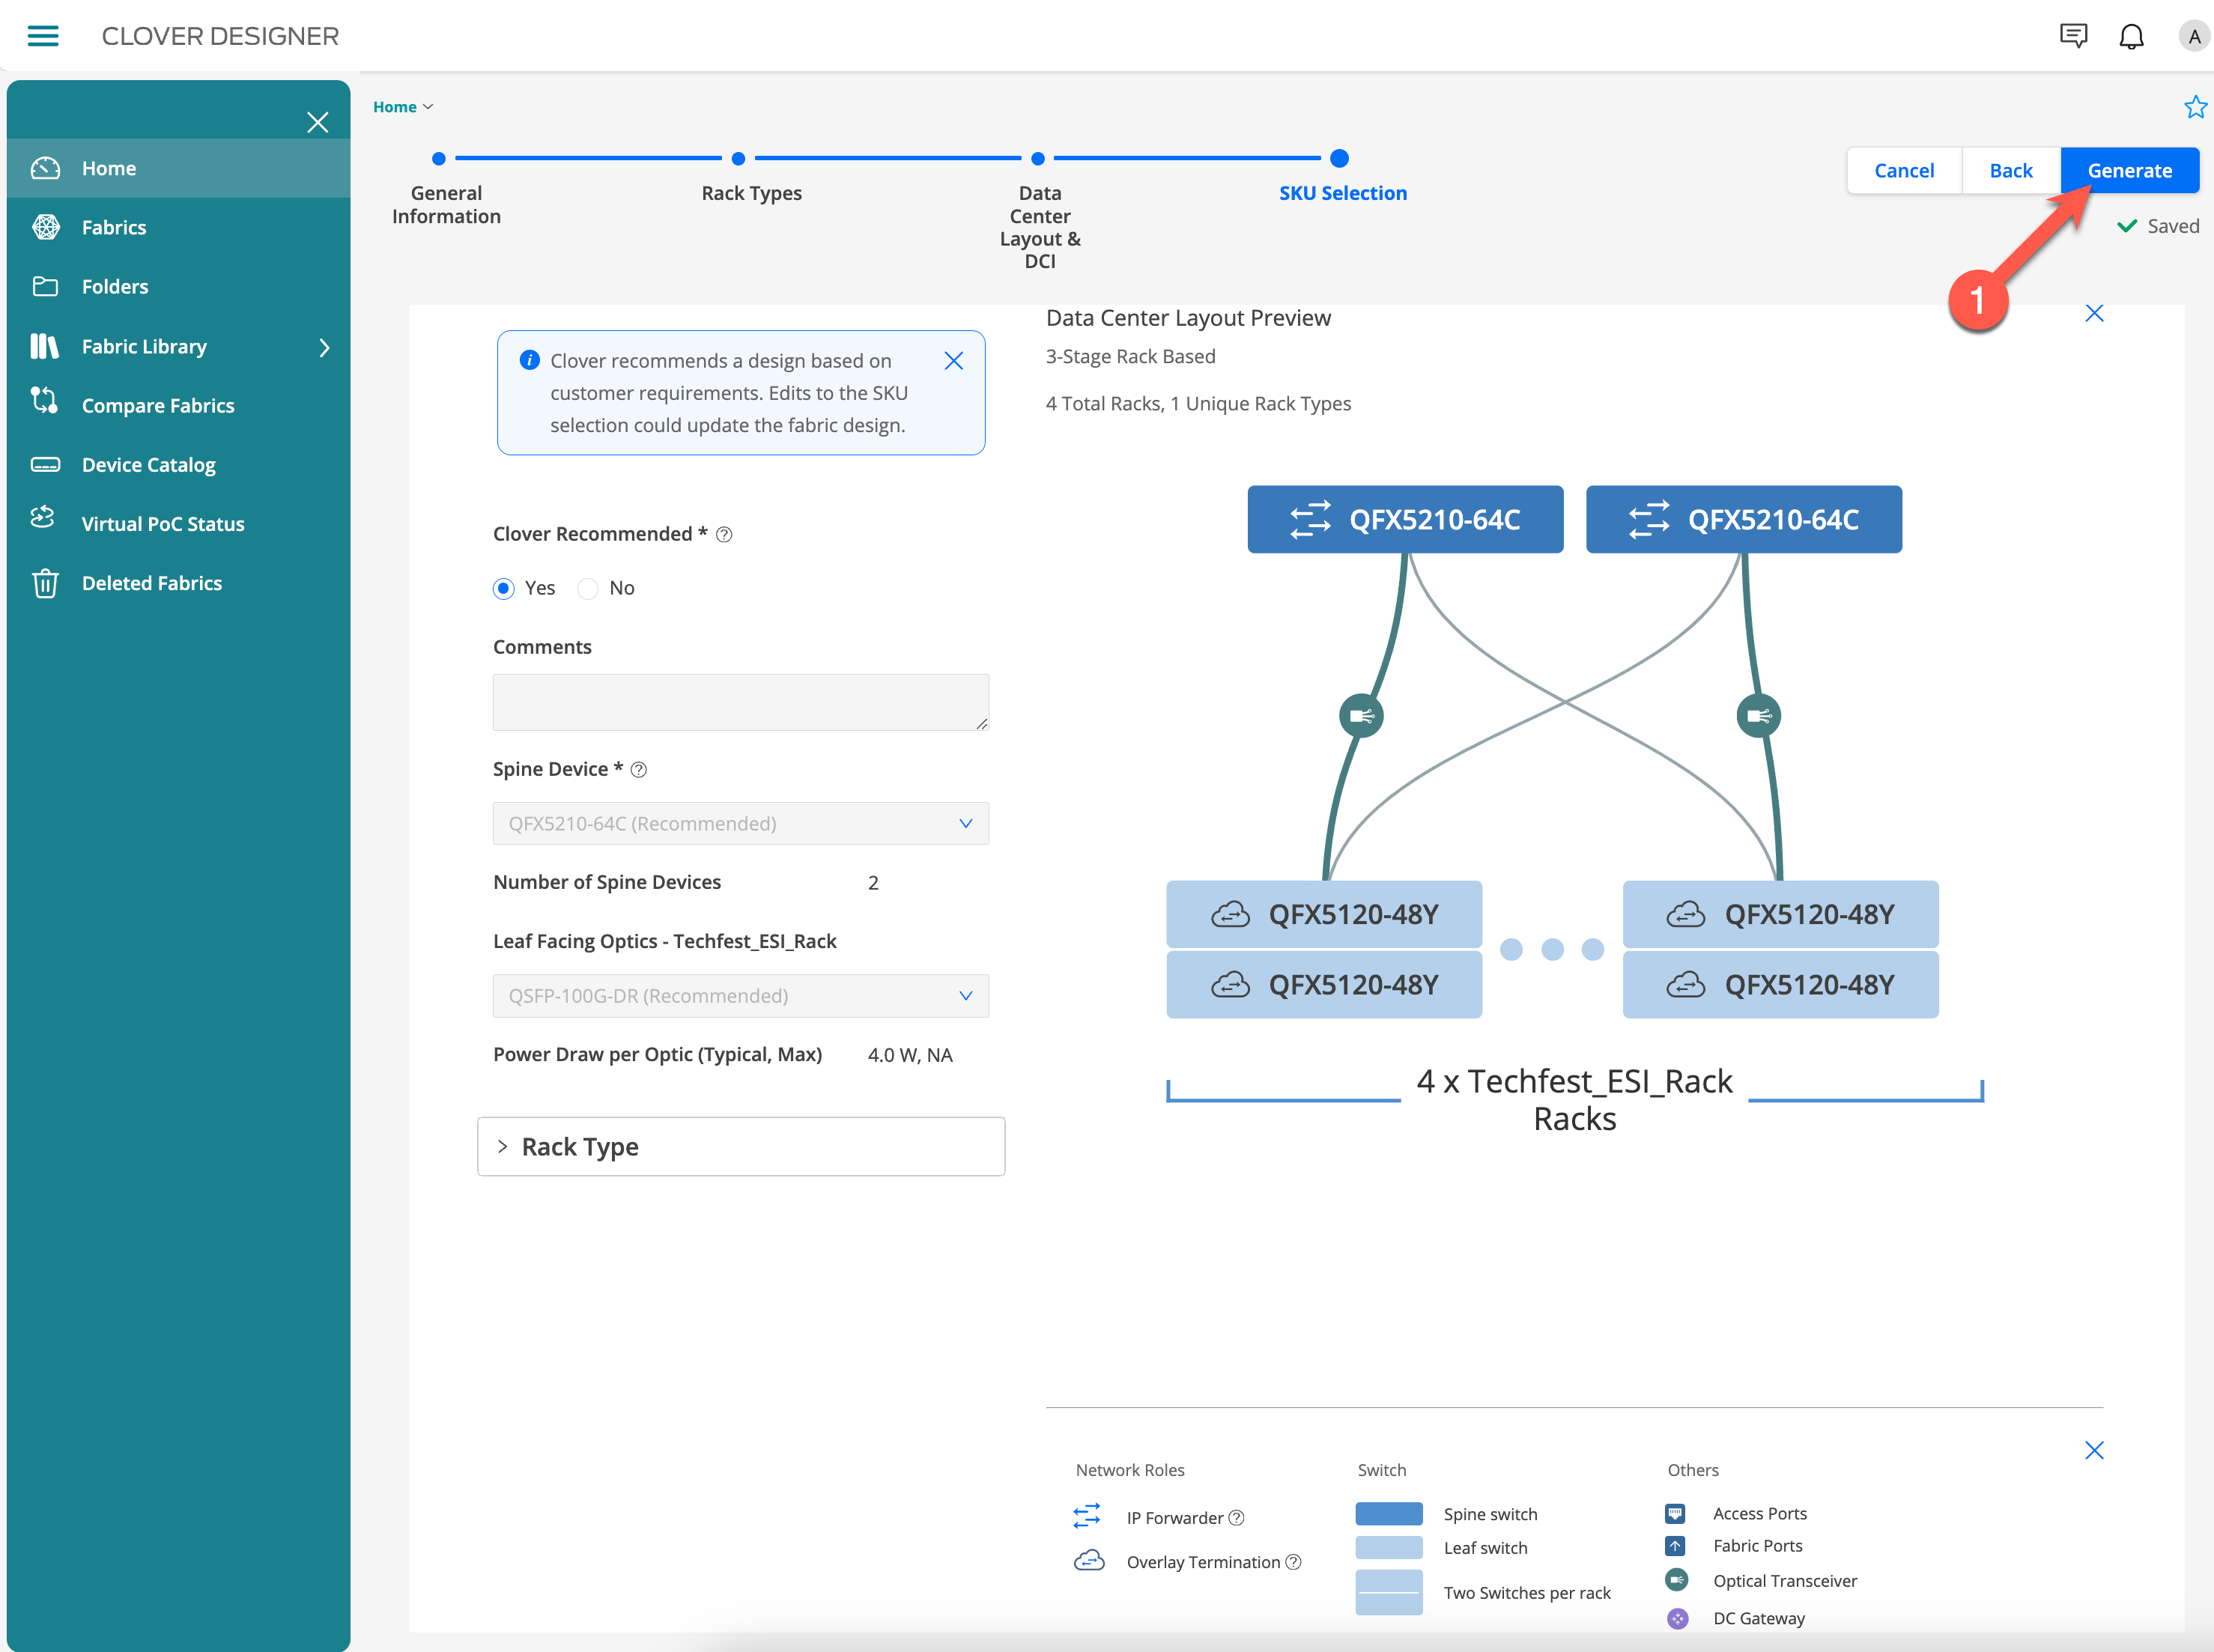
SKU Selection
Review the recommended spine switch Clover has chosen.
In this example we will just leave the Clover
Click Generate to create the design.
3. Exporting Bill of Materials and PPT Files
Now you have generated the final design you can exportBoM and PPT files which users can share detailed design specifications and associated costs with customers. These exports facilitate budget planning and project presentations, streamlining the decision-making process.
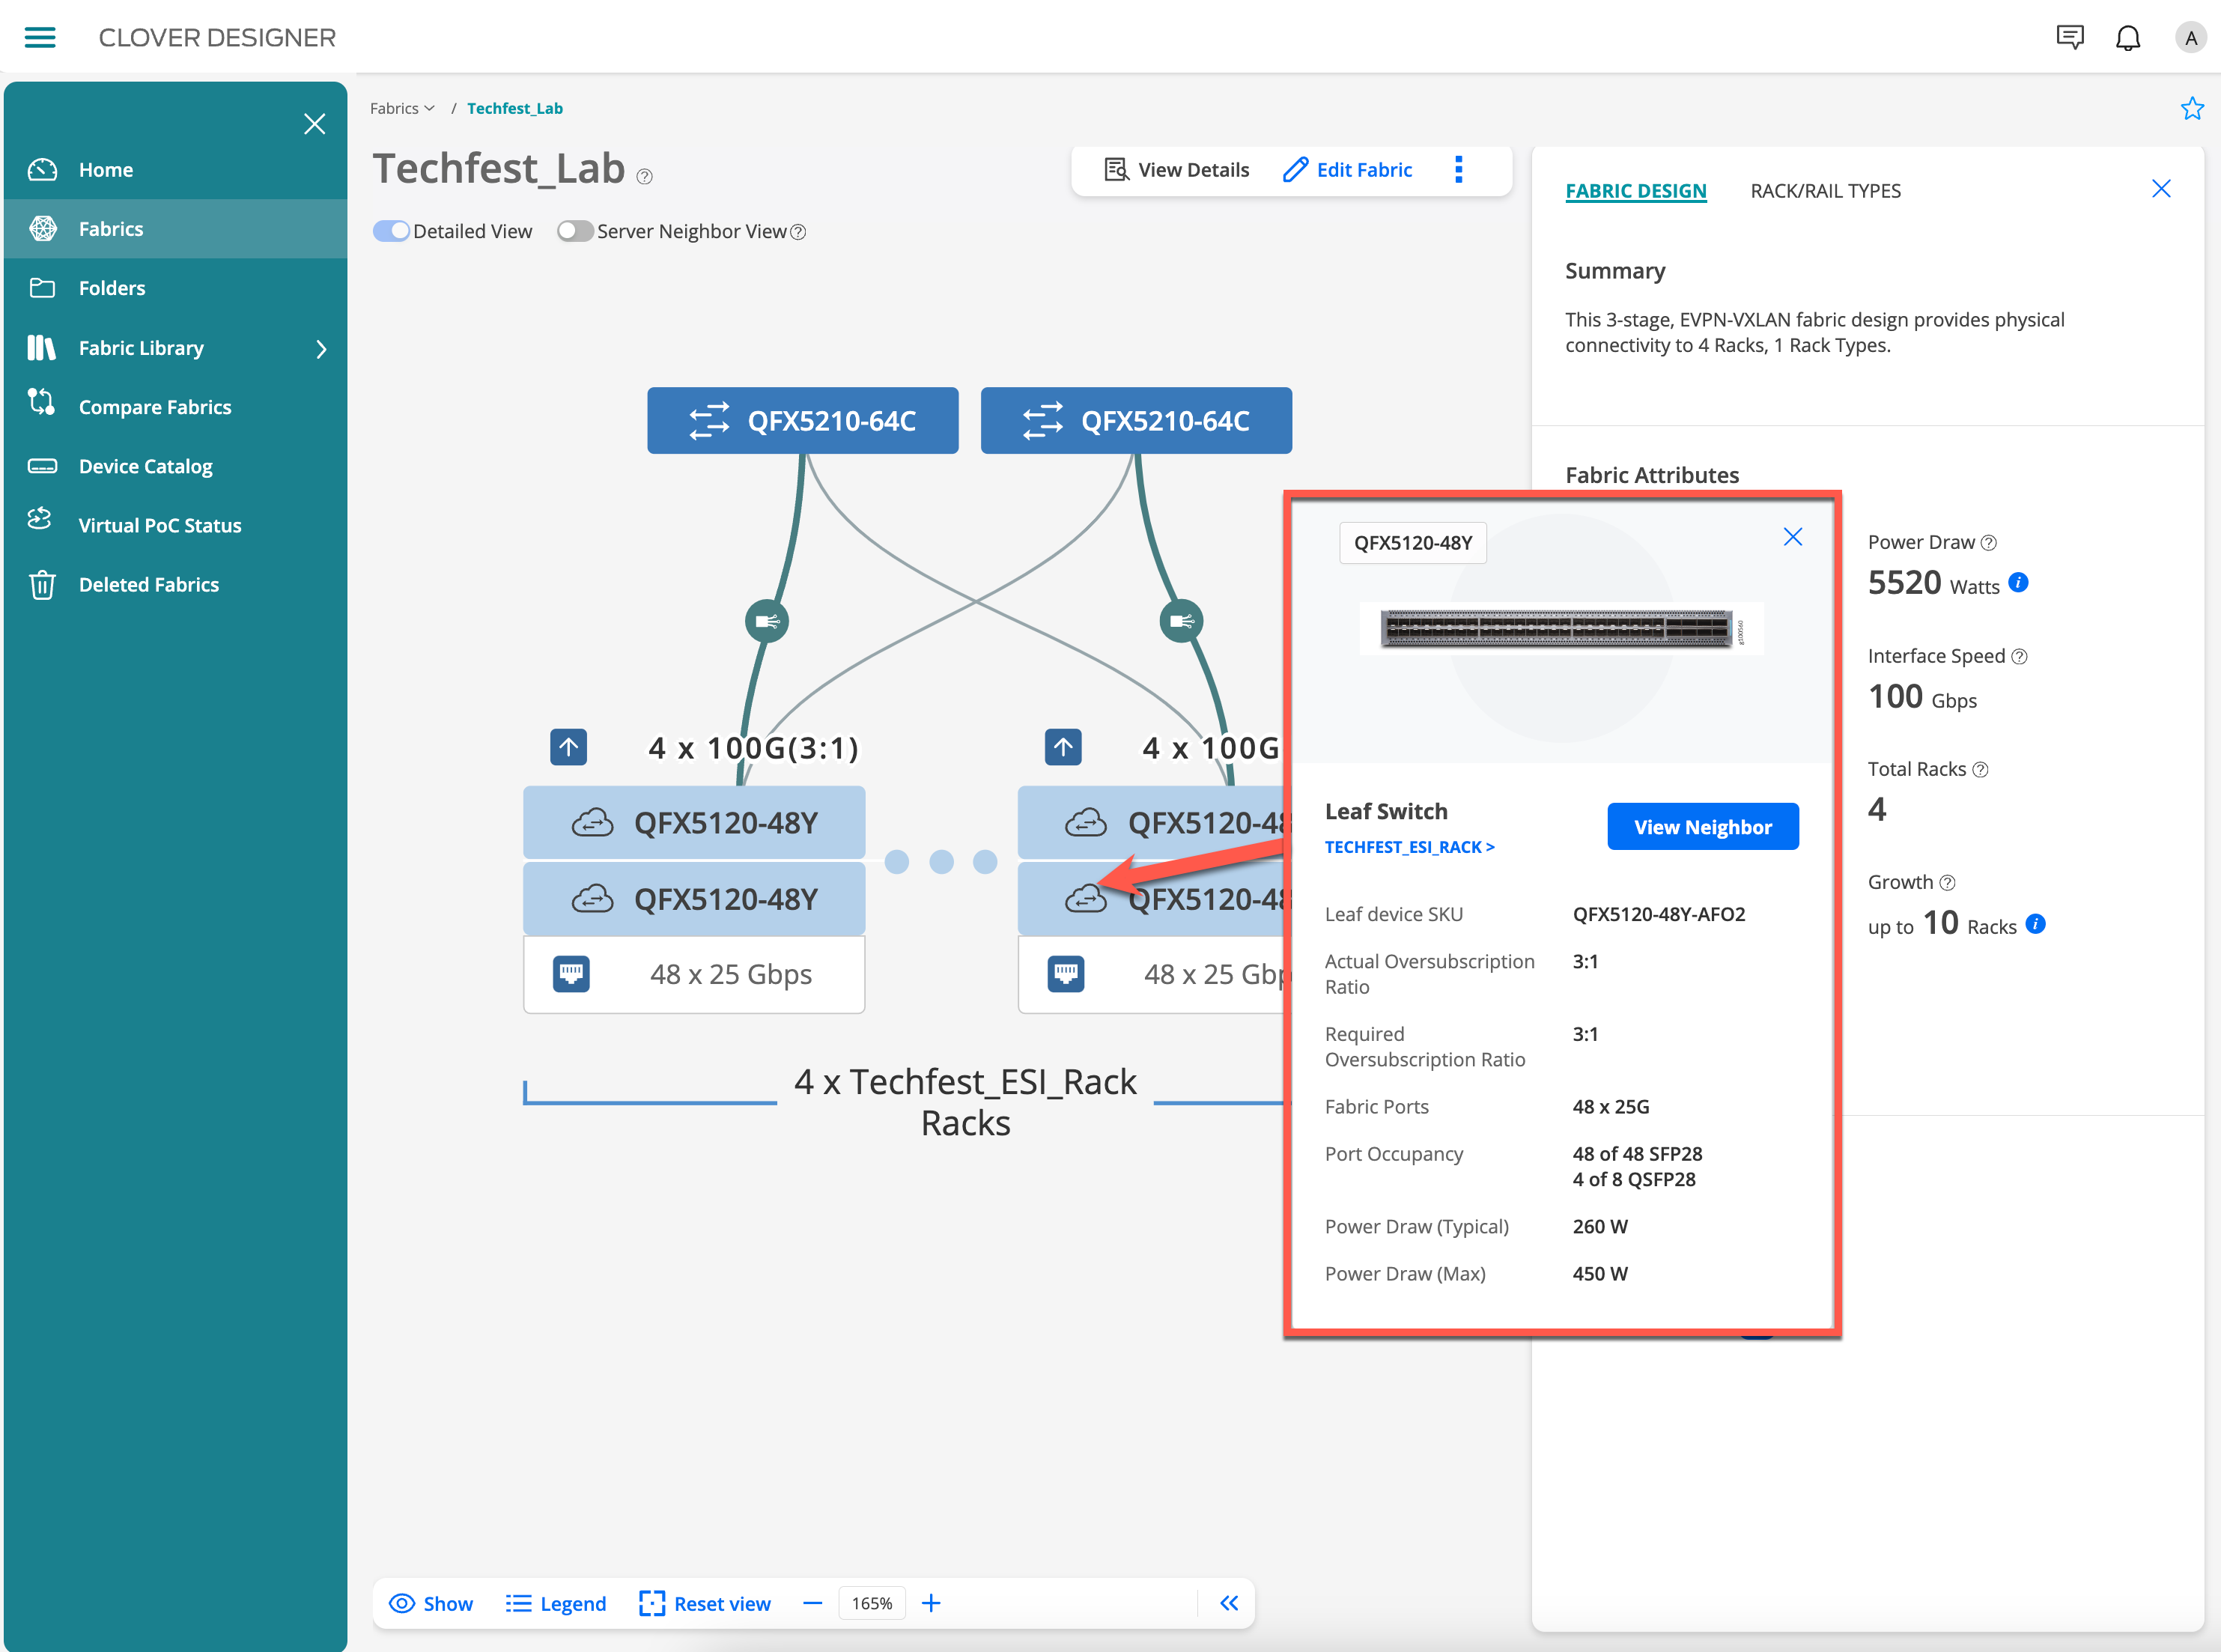
View Design Details
Click on View Details to review the design specifics. This provides a comprehensive overview of the design elements.
Navigate to Bill of Materials from the More menu to see the detailed cost breakdown.
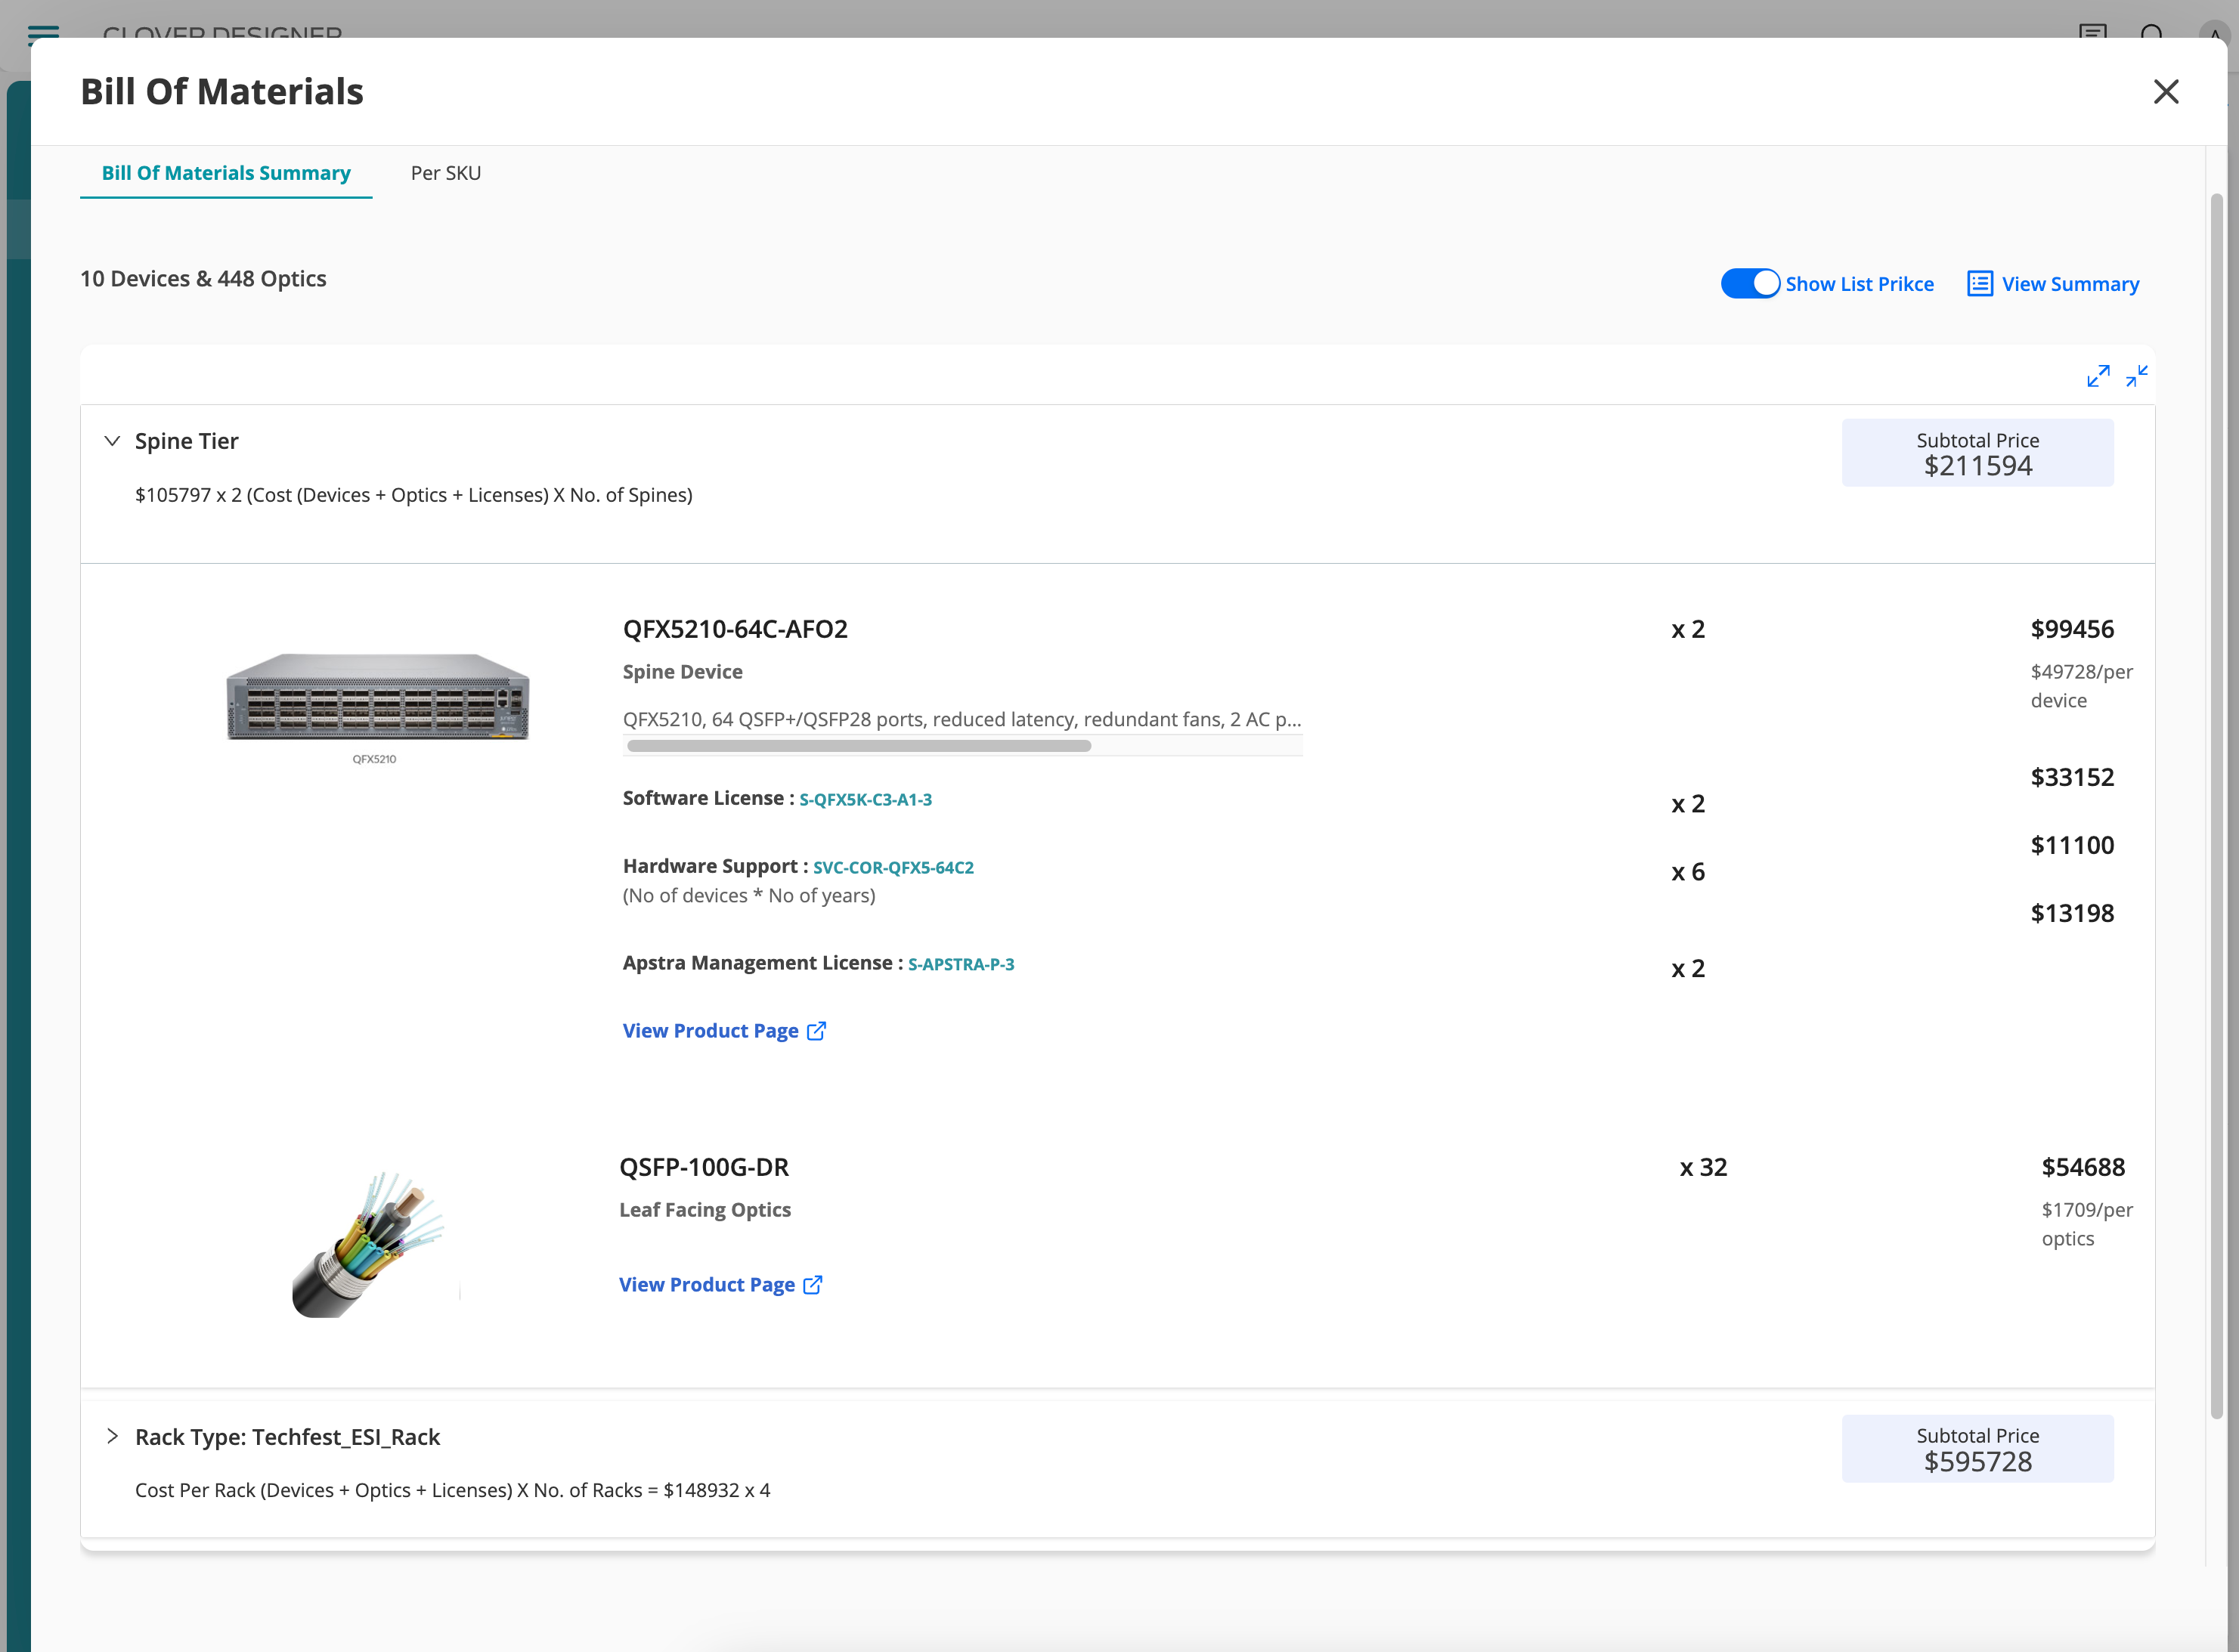
Helpful Tip: Reviewing the BoM before exporting can help identify any discrepancies or areas for cost optimisation.
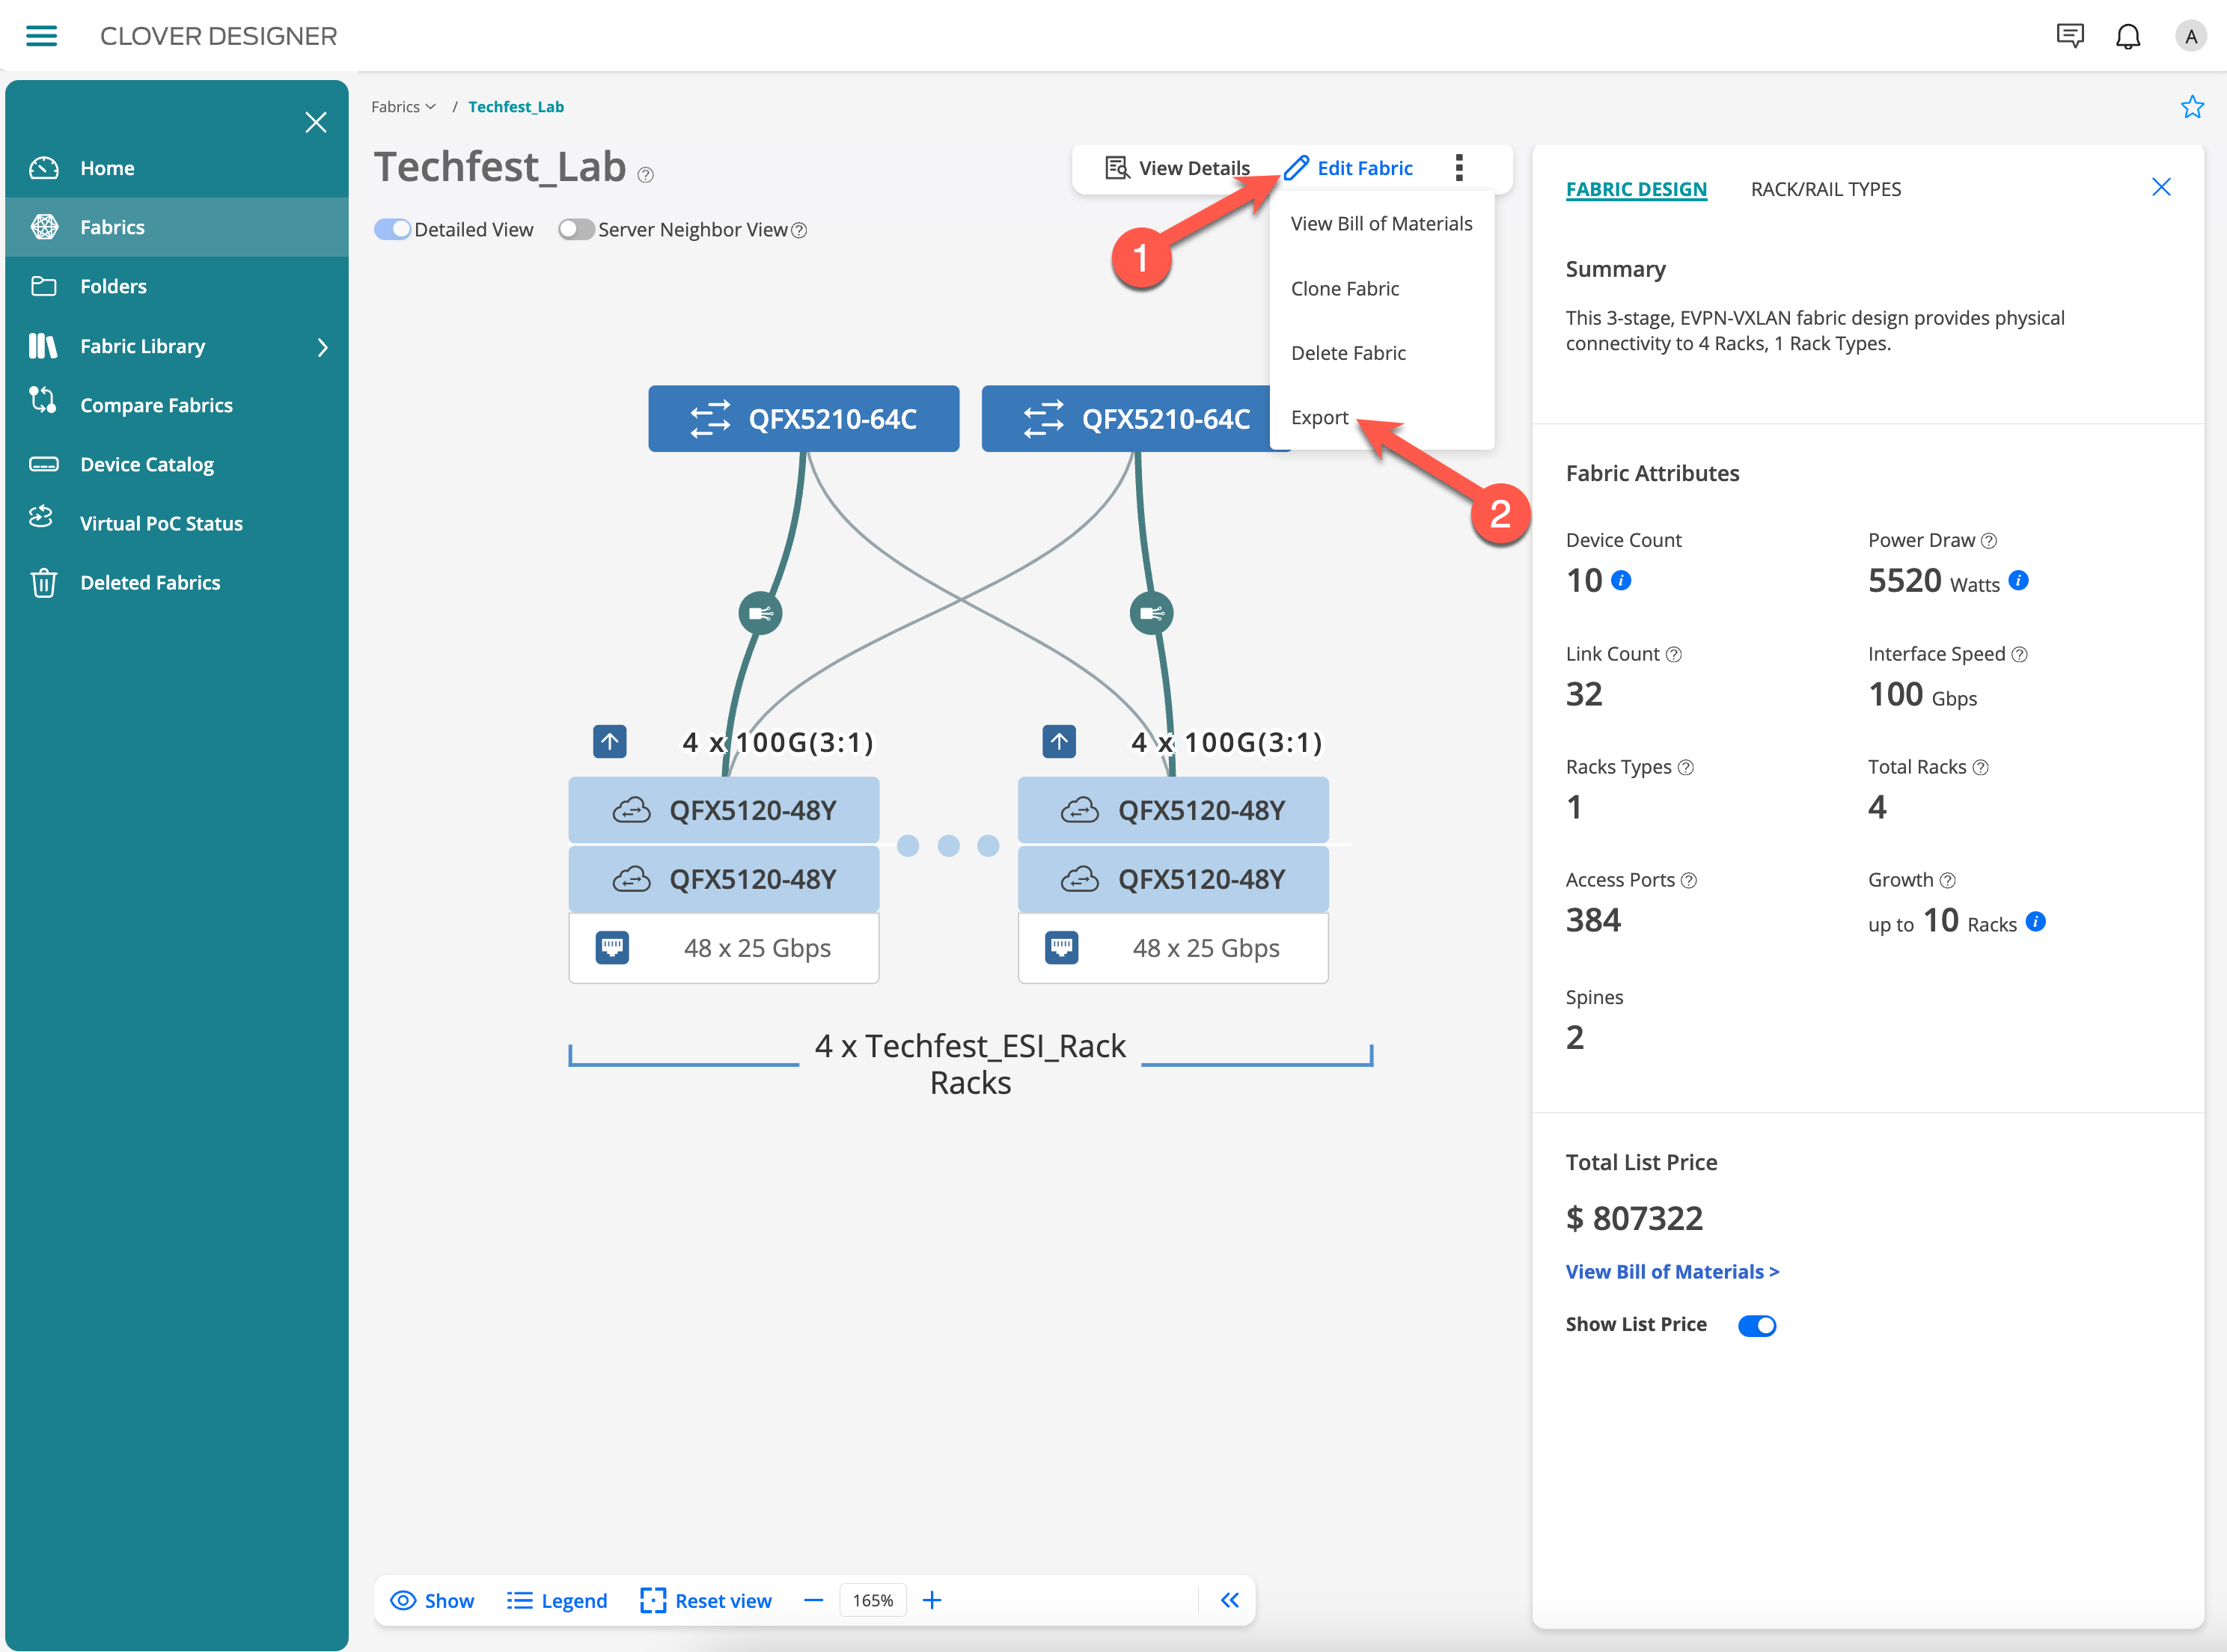
Export Files
Click on Export and select the desired format (PDF, PPT, Excel) to create shareable documents.

Update the file name as needed and download the file, ensuring all stakeholders have access to the same information.
Helpful Tip: Customise the export by including or excluding specific sections. This can tailor the document to different audiences, focusing on technical details for engineers or cost summaries for management.
4. Configure Apstra Blueprint with your Clover Design
Now that you have your design, Clover can program its Apstra Blueprint. It uses terraform in the background. If you like to use terraform file on your own, proceed to the next lab in this guide.
Have your Apstra instance ready:
Ensure you have a running Apstra instance accessible via a public IP/URL (e.g., one launched in Cloudlabs). Make sure it’s accessible from public Internet.
Workflow to configure Apstra Blueprint:
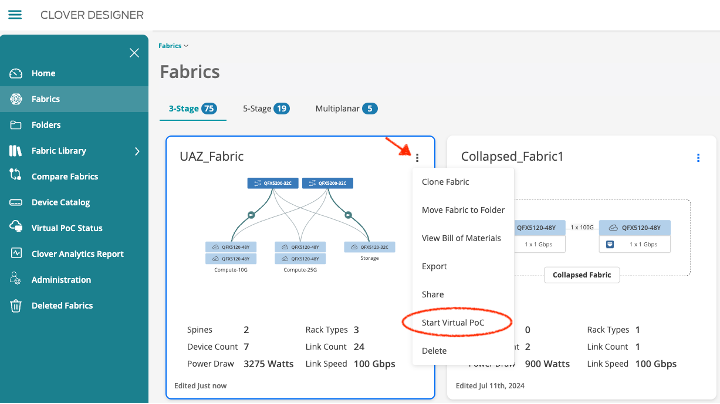
Go to the Fabrics summary page.
Click the three dots in the upper right hand corner, on the card for fabric you want to create an Apstra blueprint for.
Select “Start Virtual PoC.”
Customize Blueprint Parameters:
On the next screen, provide your Apstra instance details like URL and admin credentials under “Virtual PoC Parameters”
Optionally, you can customize Blueprint parameters under “Rack Types”.
Optionally you can also reduce the topology size under “Rack Types” to accommodate smaller lab infrastructure.
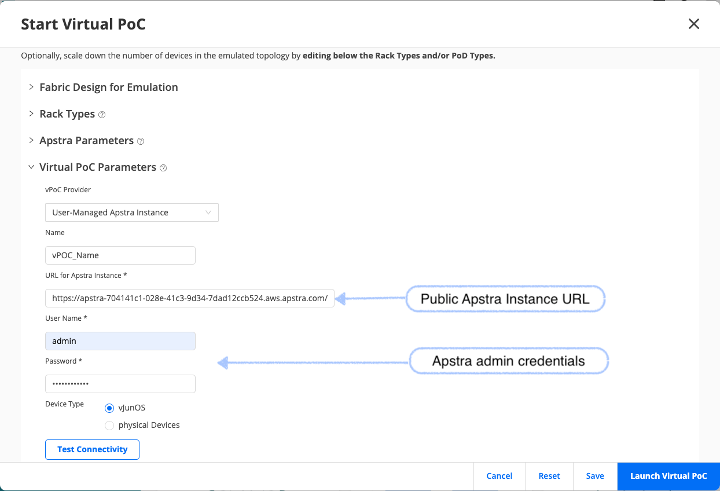
Launch Apstra configuration:
Before configuring the Blueprint, verify connectivity and ensure valid credentials for your Apstra instance.
You can now click “Launch Virtual PoC” to trigger automatic blueprint creation in your Apstra instance. Clover uses Terraform in the background to provision the blueprint in Apstra.
Verify the Deployment:
Check the Apstra UI to ensure resources are created correctly.
Confirm that the blueprint matches the specifications you defined.
Proceed and explore available Apstra features with your blueprint.
Please note, you would need to add actual managed devices to show full power of Apstra, however even without the devices, you should be able to explore and demonstrate day0/day1 capabilities in Apstra.
5. Using Terraform with Apstra
Integrating Terraform with Apstra demonstrates how to automate network configurations, enhancing efficiency and reducing the potential for manual errors. This step shows how to apply the design programmatically, reinforcing the value of infrastructure as code.
Export Terraform File
Click on the Export button and select Terraform. This generates a Terraform configuration file based on your design.
Download the Terraform file generated by Clover.
Helpful Tip: Ensure that your Terraform and Apstra versions are compatible. Refer to the documentation for any version-specific instructions or updates.
Apply Terraform File to Apstra
Ensure you have a running Apstra instance. This is necessary for deploying the design.
In this lab we use this Cloudlabs topology
Modify the Terraform file to include your Apstra instance URL. This customisation ensures that the configuration applies to the correct environment.
Switch this
# url = "https://username:password@127.0.0.1:3832/"For this - its a cloud labs topology
url = "https://admin:FreeWhippet0-@apstra-05f70305-a96a-4c48-afde-1bec6eed8366.aws.apstra.com/"
So that your provider stanza looks like this
	# Apstra Provider Details
provider "apstra" {
	url                     = "https://admin:FreeWhippet0-@apstra-05f70305-a96a-4c48-afde-1bec6eed8366.aws.apstra.com/"
	tls_validation_disabled = true   # optional
	blueprint_mutex_enabled = false
	experimental 			= true
}
Install Terraform using this guide
Run the below commands in your terminal:
terraform init
terraform plan
terraform apply
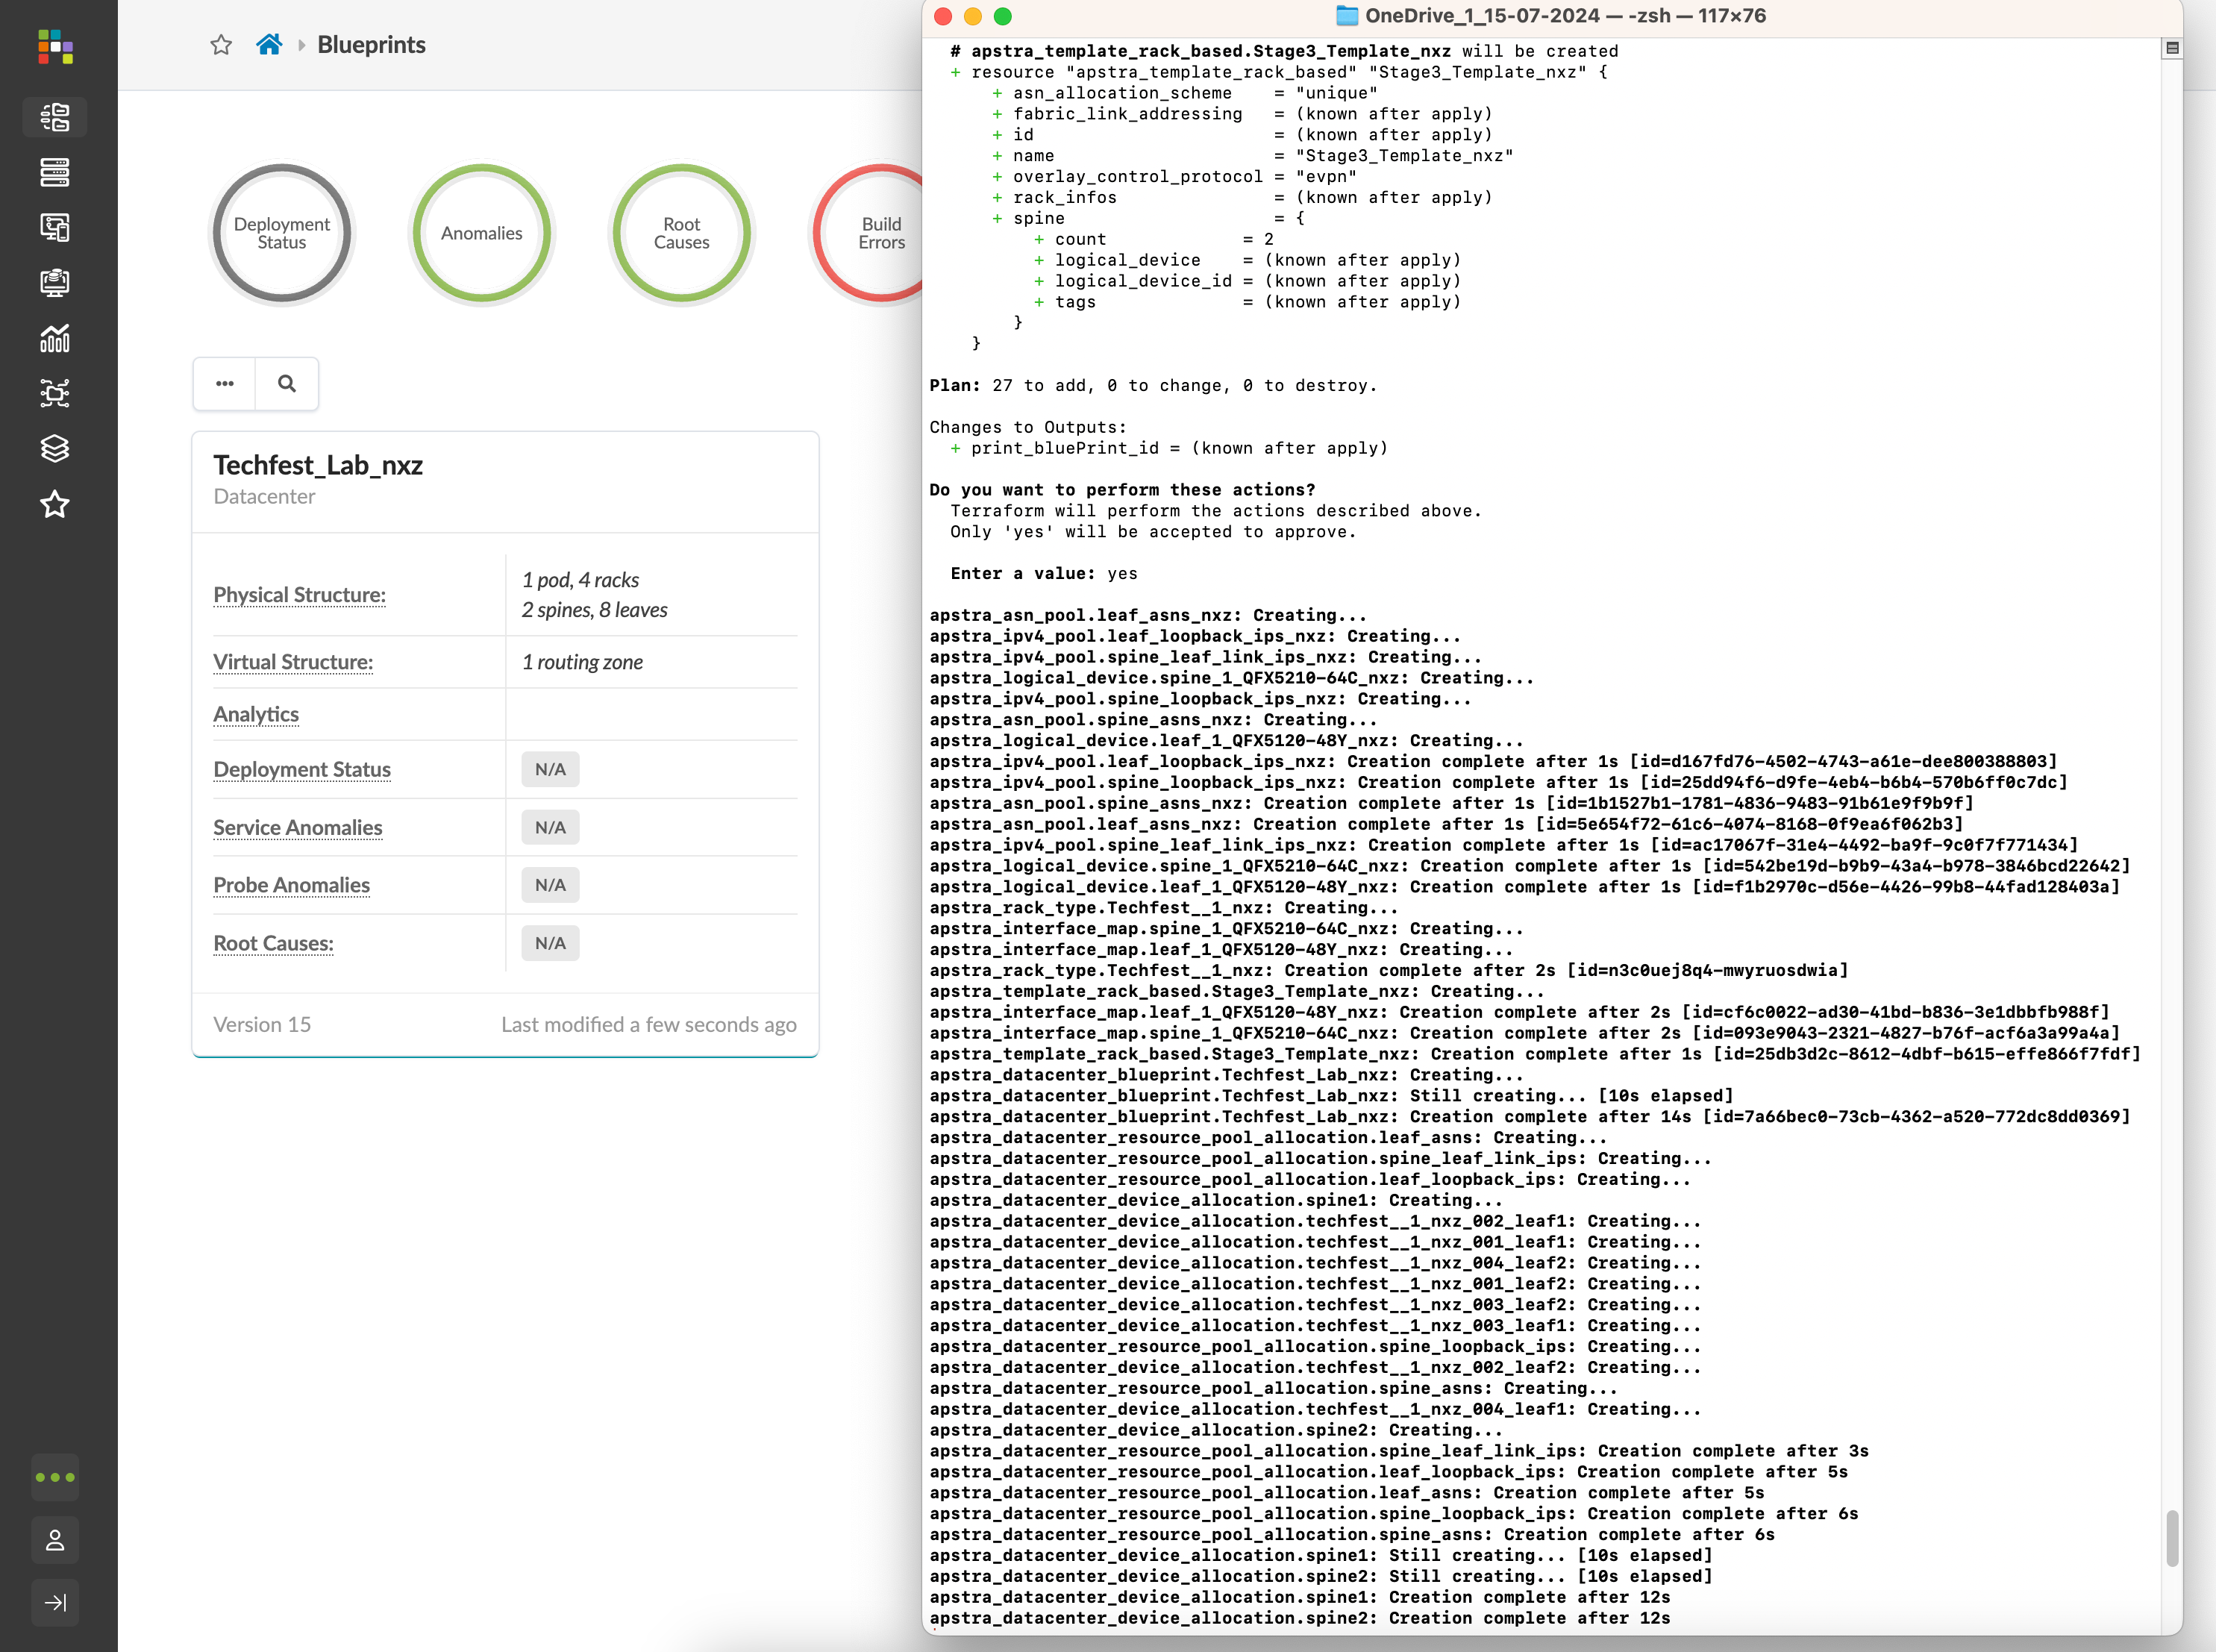
Helpful Tip: Use
terraform planbeforeterraform applyto preview the changes Terraform will make. This helps catch any potential issues before they affect your Apstra environment.
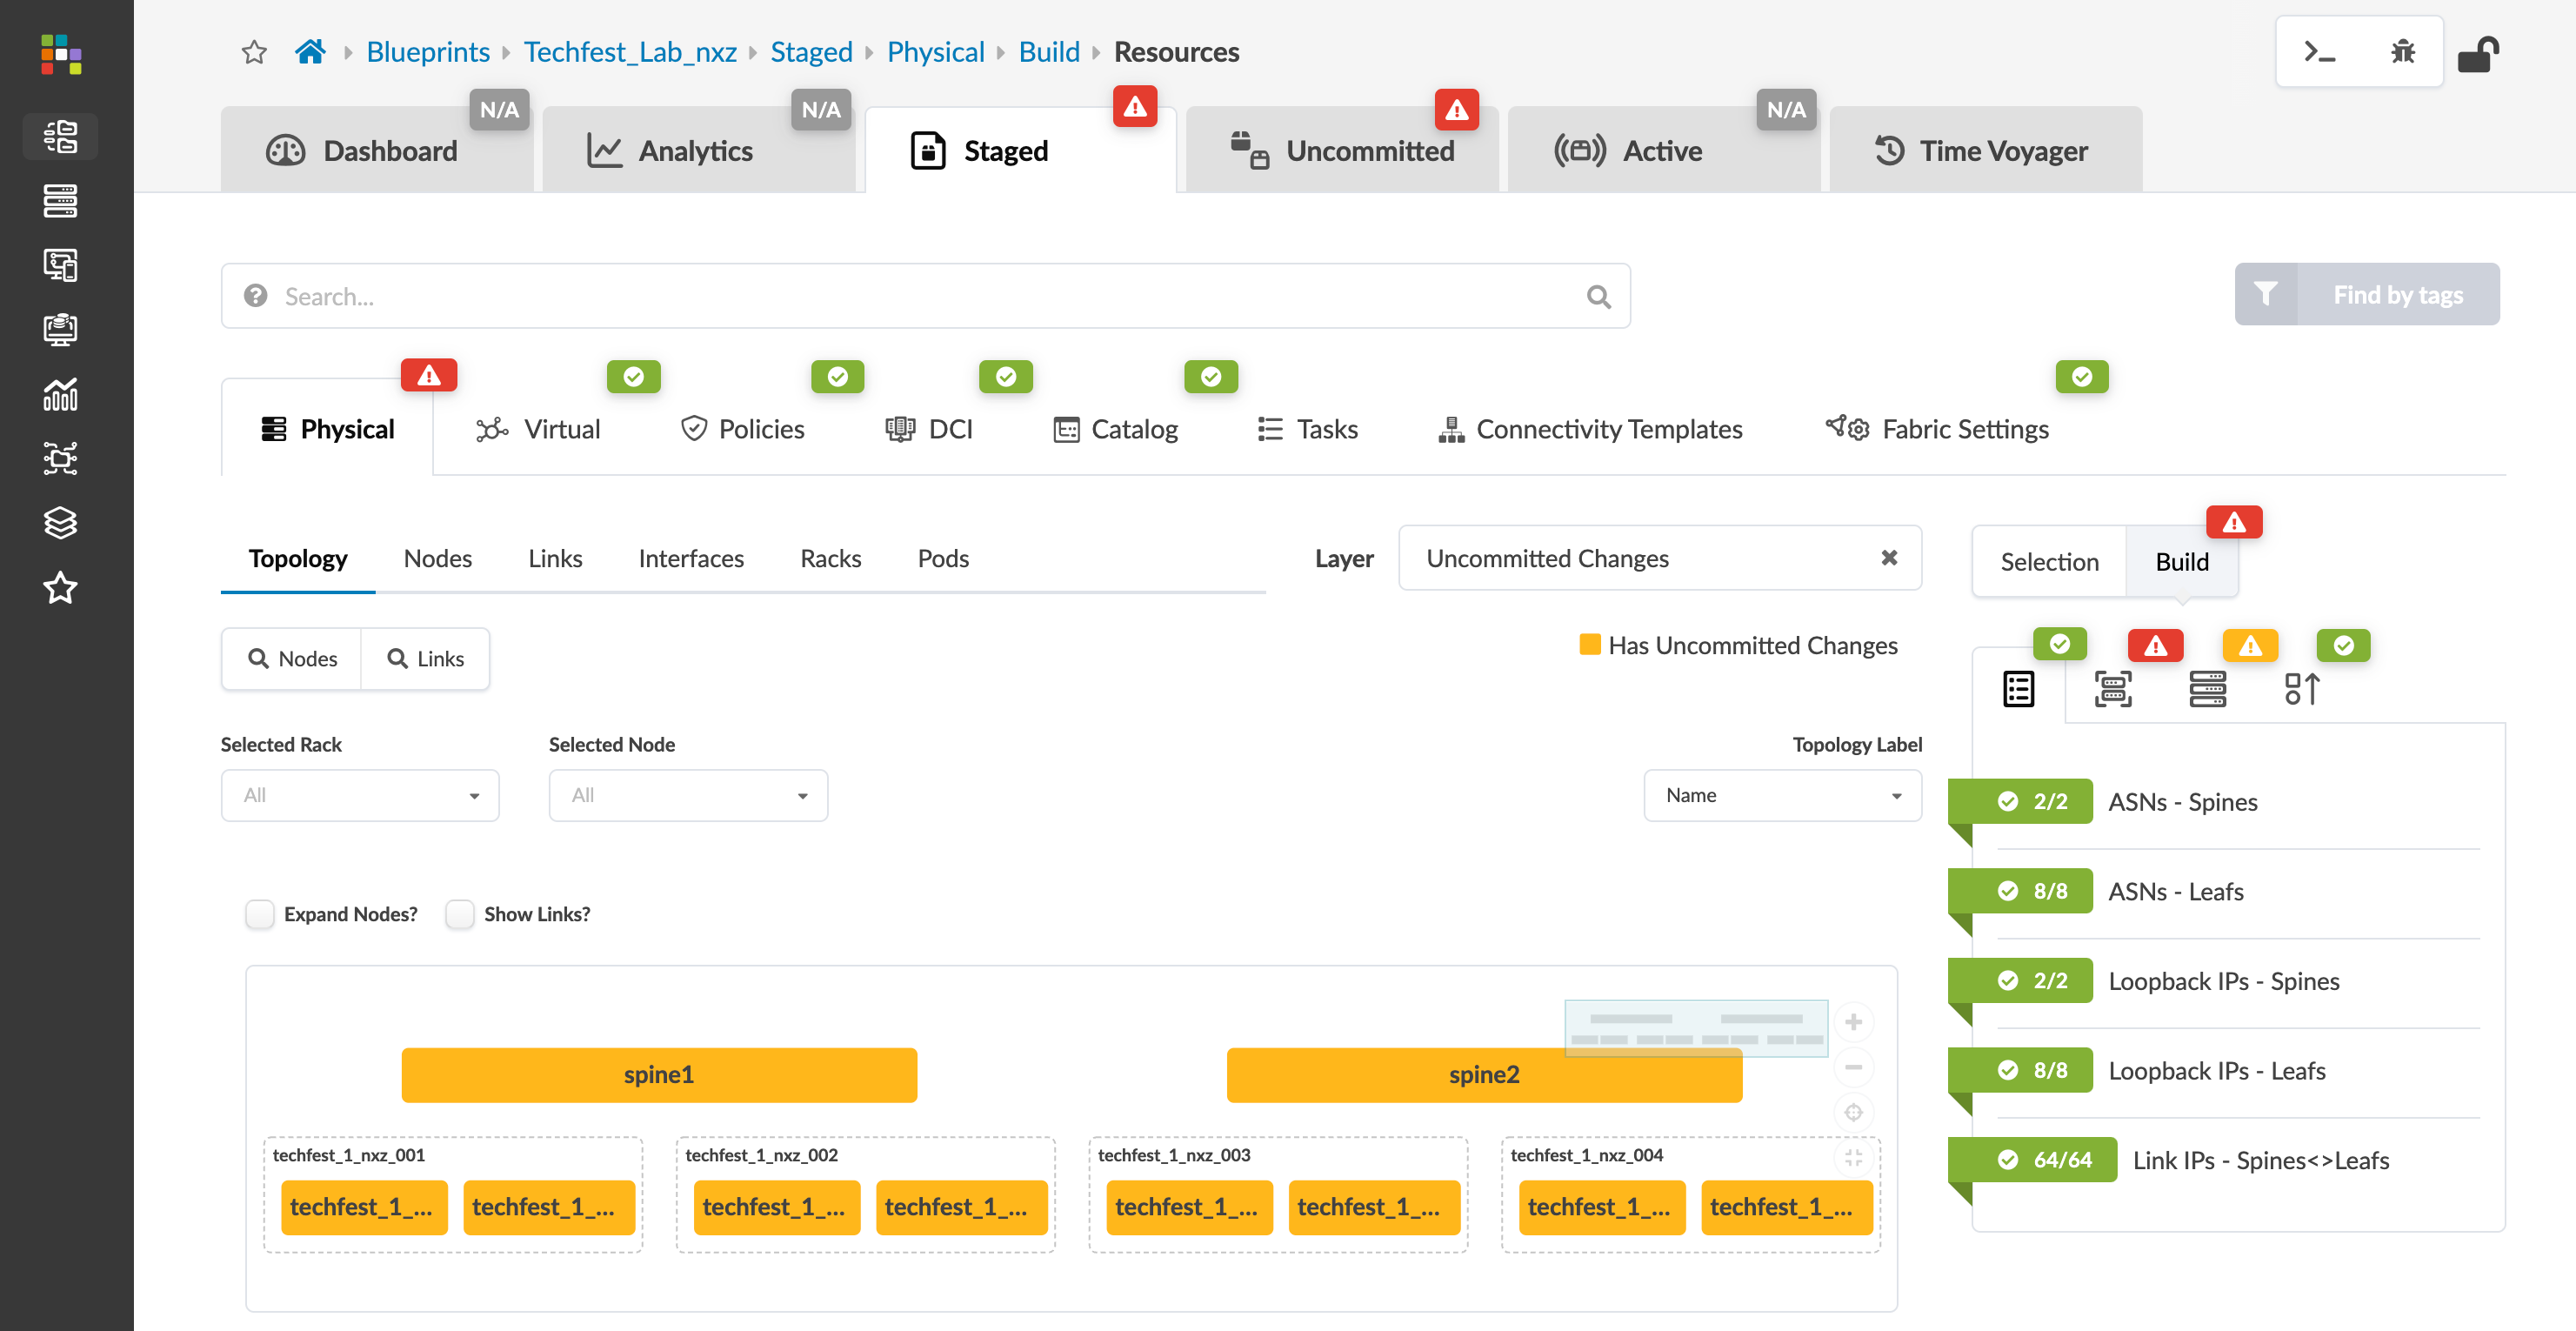
Verify the Deployment
Check the Apstra UI to ensure resources are created correctly.
Confirm that the blueprint matches the specifications you defined.
6. Summary
In this lab, you learned how to:
Create a data centre fabric design using Clover.
Export and review the Bill of Materials and PPT files.
Use Terraform to deploy your design to Apstra.
Recognise the efficiency and value that Clover brings to data centre design.
Feel free to explore further and use the Clover tool to design more complex data centre fabrics. For any issues or feedback, contact clover-support-group@juniper.net.
Helpful Tip: Regularly check for updates to the Clover tool and Terraform provider. New features and improvements can enhance your design and deployment workflows.
7. Latest Release Notes Q2 2024
Clover Accomplishments
Clover usage increased from 600+ to 720+ users in the last quarter.
Nearly 1625+ fabric designs have been created using Clover.
Partner users have grown from 190+ to 260+.
Introduced support for Collapsed Fabric design.
Added support for fabric comparison based on key parameters.
Added support for Terraform export for AI/ML Fabrics.
Users can now share their custom devices along with their fabrics with other users.
Users can now specify a spine width.
Clover now provides an option to directly connect the DC Gateway to super spine for specific use cases.
Improved user experience by adding an advanced accordion to the first Clover wizard page to segregate advanced requirements from basic requirements.
Administrators can now define Optics compatibility and cable length as part of the Device catalog.
Administrators can store well-established Fabric designs as Reference fabrics for other users to refer to during their design.
Implemented various bug fixes and feedback over four sprint releases in the last quarter.