
CGNAT Service with Scale-Out Solution
Email contact for feedback/suggestions:
Author of the tool set: Karel Hendrych (khendrych@juniper.net) Lab guide: Dezső Csonka (dcsonka@juniper.net)
Introduction
The purpose of this lab is to demonstrate two key aspects of the CGNAT Service with Scale-Out solution:
Architecting the CGNAT Service with Scale-Out using the MX platform as a symmetrical load balancer and (v)SRX platforms to distribute the CGNAT service.
Fully automating the deployment of the CGNAT Service with Scale-Out solution.
The architecture of the Scale-Out solution relies on the ‘symmetric-consistent-hash’ feature unique to the Juniper MX platform. This feature aggregates multiple next-hop entries into a unified next-hop in both upstream and downstream directions on the MX router’s control plane. These unified next-hops are then programmed into the Packet Forwarding Engine (PFE), ensuring that ECMP (Equal-Cost Multipath) next-hops maintain a consistent order. This optimization enhances packet forwarding efficiency and reliability.
The second aspect is a template based provisioning tool which allows us to provision the complete setup. The manual configuration changes across multiple devices are impractical and error-prone. The objective is to introduce a Python-based tool for on-box operations with the following features:
Junos Configuration Changes: Enable configuration changes from the MX load balancer or any other Junos/PyEZ equipped machine.
Jinja2 Templates: Utilize simple Jinja2 templates for configuring devices.
Validation Workflow: Optionally use a prototype device for validation and verification before bulk changes:
Preview Junos set commands for the prototype device.
Perform a diff of running/candidate configurations on the prototype device.
Load configurations onto the prototype device.
Multi-Device Operation: Operate on multiple devices using sequence modifiers (e.g., sequentially lined up interface IPs, /30 prefixes, BGP ASNs suitable for automation).
Profile-Driven Bulk Configuration: Implement profile-driven bulk configuration deployment.
Flexibility and Expandability: Easily expand with new variables within templates in the code specific to device types; integration with external data sources should be straightforward.
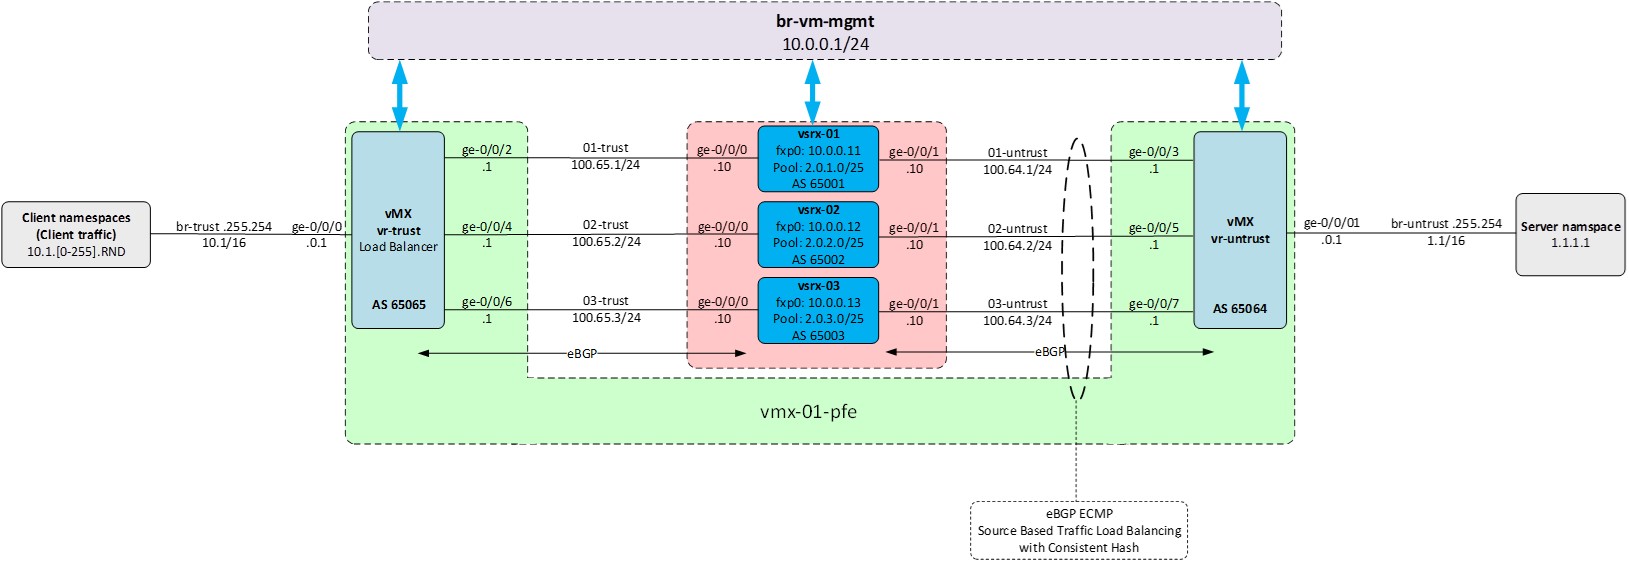
The figure below shows the fully deployed Scale-Out solution.
Step 1: Prepare your POD for the lab
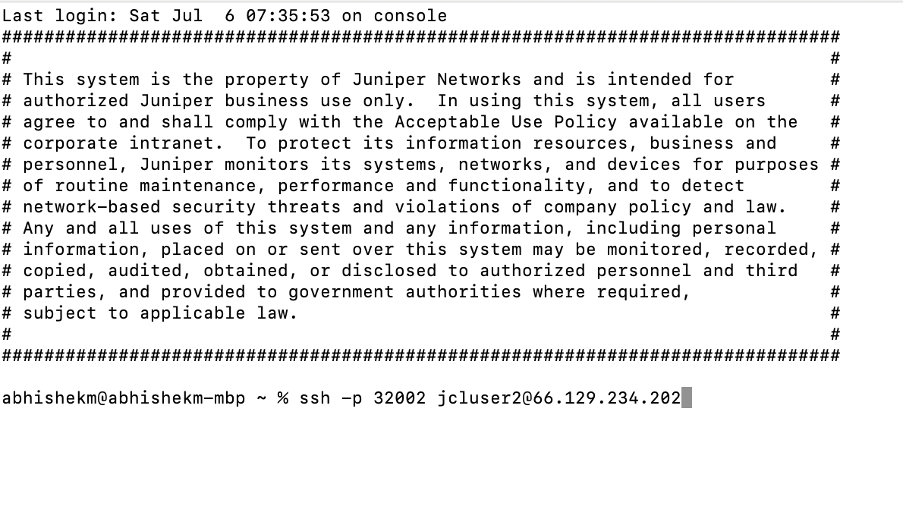
To get started with your assigned POD, use ssh from your terminal emulator program to log into your Jumpstation (HelperVM) using your provided credentials (see below).
Jumpstation (HelperVM) Public IP & Port |
Username |
Password |
POD |
|---|---|---|---|
IP 66.129.234.202 -> Port 32002 |
jcluser1 |
Tech-fesT-24 |
p1 |
IP 66.129.234.202 -> Port 32002 |
jcluser2 |
Tech-fesT-24 |
p2 |
IP 66.129.234.202 -> Port 32002 |
jcluser3 |
Tech-fesT-24 |
p3 |
IP 66.129.234.202 -> Port 32002 |
jcluser4 |
Tech-fesT-24 |
p4 |
Refer to the below screenshot for reference.
Once you are on the Jumpstation (HelperVM), the next step is to log into your assigned POD (p1/p2/p3/p4) and start it with the baseline environment.over. This Upon executing the procedure below, the POD will start within a minute re-initializing restart the POD itself. , yYou will be logged out to the Jumpstation (HelperVM), from where you will need to log into your POD again (a minute). Follow the instructions below.
After completing these steps your POD is ready for executing the lab tasks.
[jcluser2@HelperVM-01012 ~]$ ssh p2
Warning: Permanently added '[100.123.91.1]:1222' (ECDSA) to the list of known hosts.
Linux scale-out-pod-2 6.1.0-21-amd64 #1 SMP PREEMPT_DYNAMIC Debian 6.1.90-1 (2024-05-03) x86_64

Debian GNU/Linux comes with ABSOLUTELY NO WARRANTY, to the extent
permitted by applicable law.
Last login: Wed Jul  3 13:11:52 2024 from 100.123.0.8
root@scale-out-pod-2:~#

root@scale-out-pod-2:~# touch /wipe-startover

Broadcast message from root@scale-out-pod-2 (somewhere) (Sat Jul  6 16:19:01 20

***************** WIPING AND STARTING OVER *****************

client_loop: send disconnect: Broken pipe
[jcluser2@HelperVM-01012 ~]$
[jcluser2@HelperVM-01012 ~]$ ssh p2
Warning: Permanently added '[100.123.91.1]:1222' (ECDSA) to the list of known hosts.
Linux scale-out-pod-2 6.1.0-21-amd64 #1 SMP PREEMPT_DYNAMIC Debian 6.1.90-1 (2024-05-03) x86_64
Debian GNU/Linux comes with ABSOLUTELY NO WARRANTY, to the extent
permitted by applicable law.
Last login: Wed Jun 26 12:25:02 2024 from 192.168.123.1
root@scale-out-pod-2:~#
Step 2: Review the initial network setup and topology
The initial stage of this lab involves an operational vMX instance and three vSRX instances with initial configurations. The vMX functions as the symmetrical load balancer, distributing traffic across the available vSRX instances, while the vSRX instances provide the CGNAT service.
Verify the status of the vMX and the vSRX instances; the RE and PFE instances of the vMX and all three vSRX instances should be up and running:
root@scale-out-pod-2:~# virsh list
Id   Name         State
----------------------------
 1    vmx-01-re    running
 2    vmx-01-pfe   running
 3    vsrx-01      running
 4    vsrx-02      running
 5    vsrx-03      running
Verify the availability of all the necessary Linux bridges connecting the components together. Use the topology diagram as a reference.
• br-trust: connects the clients with the vr-trust side of the vMX (client-facing/inside of the CGNAT topology)
• 0x-trust: connects the “trust” side of the vMX and the individual vSRX instances
• 0x-untrust: connects the “untrust” side of the vMX and the individual vSRX instances
• br-untrust: connects the vr-untrust side of the vMX with the server (internet-facing/outside of the CGNAT topology)
• br-mx-int: needed for the vMX (connection between RE and PFE instances)
• br-vm-mgmt: connecting all management interfaces, fxp0s
Note – in the case of slower execution of the commands above, additional bridges related to traffic generation (described later) may appear.
root@scale-out-pod-2:~# brctl show
bridge name     bridge id               STP enabled     interfaces
01-trust                8000.16fbe279ab1d       no              vnet6
01-untrust              8000.aadf075b2310       no              vnet7
02-trust                8000.0a597f4051d3       no              vnet8
02-untrust              8000.8e852d11e6b3       no              vnet9
03-trust                8000.f6860b09e92f       no              vnet10
03-untrust              8000.727e0962fe23       no              vnet11
04-trust                8000.6a7b35616f7d       no              vnet12
04-untrust              8000.2ac1716d13a1       no              vnet13
br-mx-int               8000.0e43608de0cc       no              vnet1
                                                        vnet3
br-trust                8000.2e5678345345       no              veth_c0_host
                                                        veth_c100_host
                                                        veth_c101_host
                                                        veth_c97_host
                                                        veth_c98_host
                                                        veth_c99_host
                                                        veth_c9_host
                                                        vnet4
br-untrust              8000.6e876f27e61e       no              veth_s1_host
                                                        vnet5
br-vm-mgmt              8000.12710f246226       no              vnet0
                                                        vnet2
Step 3: Review the network configuration of the vMX and the vSRXes
The basic configuration of the vMX and the vSRXes include only the necessary items, the most important of which are:
• root user access
• SSH
• Netconf
• auto-fbf-gen-dev user with the corresponding SSH key
• fxp0 address
The auto-fbf-gen-dev user is used by the python script through Netconf to provision the devices. To facilitate easy management of configuration changes, we utilize group configurations for various functionalities on the vMX as well as on the vSRXes. This approach allows for seamless deployment and removal of functionalities through automation.
The group ‘scale-out-common’ on the vMX contains the initial configuration, including:
• Configuration of ge-0/0/0 and ge-0/0/1 interfaces towards Clients (within vr-trust) and the Server (within vr-untrust).
• BGP policies ensuring consistent load balancing.
• Routing instances vr-trust and vr-untrust, separating the inside and outside networks.
• BGP peering towards vSRX devices within vr-trust and vr-untrust.
Verify the initial configuration of the vMX:
root@scale-out-pod-2:~# ssh m
Last login: Sun Jun 23 06:13:18 2024
--- JUNOS 23.2R2-S1.3 Kernel 64-bit  JNPR-12.1-20240103.68b4802_buil
root@vmx-01:~ # cli
root@vmx-01> show configuration |display set |except group
set version 23.2R2-S1.3
set system host-name vmx-01
set system root-authentication encrypted-password "$6$G1w4QKFZ$WySNquQpdh6CdTlKwiNlbjBBKj0zX.f4QjPo/gdCH0HcNAAw01xJApxegZkRXsWyM/Ybaes.hPnA4ssruBXXE."
set system root-authentication ssh-ed25519 "ssh-ed25519 AAAAC3NzaC1lZDI1NTE5AAAAIDZe6LVPxg+eu49sdLm0skoruTt8QEfe9NkjdgFYnKrT root@scale-out-pod"
set system scripts language python3
set system login user auto-fbf-gen-dev uid 2000
set system login user auto-fbf-gen-dev class super-user
set system login user auto-fbf-gen-dev authentication ssh-rsa "ssh-rsa AAAAB3NzaC1yc2EAAAADAQABAAABAQCke26gPYh0xSeSlfA4uko8yafSq++dsTo++L3xl1vnKiSx/Qr1siGRZygGHx0JheVnXzSpmThql8a1c1+g6eG//OgS6Gq2BADOo4CoFBk2jEVCd1sD6vbiX0KKJDEk0W5e644OsCUqAHvKyg0V0laWN1CqOTS1uVFtXJ8VKG0QcN3CCdnK4VZx7ehQT/OjmqRnHis+Eh7Ehc6apaog0w1f25MuR2fDSmm8jzWGkErsFy1TpI5cWuOF1q8prshGR30wG7Nnhlth8ErFy43uzPw9ojOZkqOH5KGEf4X6ujureq3UHm32y7dzM3qrpeHZrzq6Tp1pHWo8AKm2FcklebeT root@vmx-01"
set system services ssh root-login allow
set system services ssh sftp-server
set system services netconf ssh
set system syslog file messages any any
set system syslog file messages archive size 1m
set system ntp server 10.0.0.1
set chassis fpc 0 lite-mode
set interfaces fxp0 unit 0 family inet address 10.0.0.10/24
set snmp community public

root@vmx-01> show configuration groups scale-out-common
interfaces {
    ge-0/0/0 {
        unit 0 {
            family inet {
                address 10.1.0.1/16;
            }
        }
    }
    ge-0/0/1 {
        unit 0 {
            family inet {
                address 1.1.0.1/16;
            }
        }
    }
}
forwarding-options {
    enhanced-hash-key {
        source-destination-only-loadbalancing {
            family inet {
                prefix-length 32;
            }
        }
    }
}
policy-options {
    policy-statement consistent-hash-trust {
        from {
            route-filter 0.0.0.0/0 exact;
        }
        then {
            load-balance consistent-hash;
        }
    }
    policy-statement ecmp {
        term vr-trust {
            from instance vr-trust;
            then {
                load-balance source-ip-only;
            }
        }
    }
    policy-statement export-bgp-vsrx-trust {
        term t10 {
            from interface ge-0/0/0.0;
            then accept;
        }
        term t100 {
            then reject;
        }
    }
    policy-statement export-bgp-vsrx-untrust {
        term t10 {
            from {
                route-filter 0.0.0.0/0 exact;
            }
            then {
                next-hop self;
                accept;
            }
        }
        term t100 {
            then reject;
        }
    }
}
routing-instances {
    vr-trust {
        instance-type virtual-router;
        routing-options {
            autonomous-system 65065;
            multipath;
        }
        protocols {
            bgp {
                group vsrx-trust {
                    type external;
                    import consistent-hash-trust;
                    export export-bgp-vsrx-trust;
                    multipath;
                }
                bfd-liveness-detection {
                    minimum-interval 500;
                    multiplier 5;
                }
            }
        }
        interface ge-0/0/0.0;
    }
    vr-untrust {
        instance-type virtual-router;
        routing-options {
            autonomous-system 65064;
            static {
                route 0.0.0.0/0 discard;
            }
        }
        protocols {
            bgp {
                group vsrx-untrust {
                    type external;
                    export export-bgp-vsrx-untrust;
                }
                bfd-liveness-detection {
                    minimum-interval 500;
                    multiplier 5;
                }
            }
        }
        interface ge-0/0/1.0;
    }
}
routing-options {
    forwarding-table {
        export ecmp;
    }
}
Open a new terminal window to your POD through the Jumpstation (HelperVM) and log into vsrx-01 (ssh s1). You can repeat this process for each of the vSRX instances.
Review the vSRX initial configurations on all the three vsrx instances (ssh s1/s2/s3):
root@scale-out-pod-2:~# ssh s1
Warning: Permanently added 'vsrx-01' (ED25519) to the list of known hosts.
--- JUNOS 22.4R3-S2.11 Kernel 64-bit XEN JNPR-12.1-20240313.333b213_buil
root@vsrx-01:~ # cli
root@vsrx-01> show configuration |display set
set version 22.4R3-S2.11
set system host-name vsrx-01
set system root-authentication encrypted-password "$6$DCcfIWjh$xcIpb6dyWSwBfxLeIV.QUyzRBSwYAYpyoJbE5k5dLiimPJNwXoh4NUi8Yp6yWsCy.mhU9037q8EGoTrtho3d40"
set system root-authentication ssh-ed25519 "ssh-ed25519 AAAAC3NzaC1lZDI1NTE5AAAAIDZe6LVPxg+eu49sdLm0skoruTt8QEfe9NkjdgFYnKrT root@scale-out-pod"
set system login user auto-fbf-gen-dev uid 2000
set system login user auto-fbf-gen-dev class super-user
set system login user auto-fbf-gen-dev authentication ssh-rsa "ssh-rsa AAAAB3NzaC1yc2EAAAADAQABAAABAQCke26gPYh0xSeSlfA4uko8yafSq++dsTo++L3xl1vnKiSx/Qr1siGRZygGHx0JheVnXzSpmThql8a1c1+g6eG//OgS6Gq2BADOo4CoFBk2jEVCd1sD6vbiX0KKJDEk0W5e644OsCUqAHvKyg0V0laWN1CqOTS1uVFtXJ8VKG0QcN3CCdnK4VZx7ehQT/OjmqRnHis+Eh7Ehc6apaog0w1f25MuR2fDSmm8jzWGkErsFy1TpI5cWuOF1q8prshGR30wG7Nnhlth8ErFy43uzPw9ojOZkqOH5KGEf4X6ujureq3UHm32y7dzM3qrpeHZrzq6Tp1pHWo8AKm2FcklebeT root@vmx-01"
set system services ssh root-login deny-password
set system services ssh sftp-server
set system services ssh client-alive-interval 120
set system services netconf ssh
set system time-zone Europe/Amsterdam
set system name-server 10.0.0.1
set system syslog file messages any any
set system syslog file messages archive size 5m
set system syslog file messages archive files 5
set system ntp server 10.0.0.1
set interfaces fxp0 unit 0 family inet address 10.0.0.11/24
set routing-options static route 0.0.0.0/0 next-hop 10.0.0.1
Step 4: Review the provisioning tool and the corresponding profiles and templates on the vMX
We use two types of scripts in this lab on the vMX in order simplify provisioning and operation of the Scale-Out CGNAT solution:
• Template-based configuration/provisioning related commands
• Operational status commands
The templating tool allows us to provision the setup based on device specific templates being able to modify predefined parameters via sequence numbersinput data (e.g., sequence).. Templating tool can also execute Python RPCs passed via Jinja template when needed for bulk operations across scale-out swarm.
The tailored operational status commands enable us to monitor the status of the setup from a single point, providing information about each node without needing to move across individual network components. Additionally, we can centrally enable, disable, or modify certain parameters and functionalities within the setup.
Remember, in this particular lab, the vMX is the central point of operations. We provision, operate, and observe all aspects of the CGNAT Scale-Out solution from this device (although templating tool can operate off-box too).
Review the provisioning and operational status scripts on your vMX:
Template Configuration Commands
root@vmx-01> op template-ops ?
Possible completions:
  <[Enter]>            Execute this command
  <name>               Argument name
  detail               Display detailed output
  device-type          device type defines template variables, enables diff/push [vsrx|srx4600|mx|ptx]
  diff-target          SRX device name to retrieve diff between candidate and running config
  exec-template        with push-taget process template as Python code (any argument)
  help                 Print help, pass any argument
  invoke-debugger      Invoke script in debugger mode
  list-profile         list push target profiles from auto_fbf_gen_dev_conf.py (any argument)
  list-template        list available Jinja2 template files (any argument)
  push-target          SRX device name for template push
  push-target-profile  push to multiple SRX devices using profile [profile-name|# from list]
  seq                  device sequence number 1-n for template seeding (or more complex data enclosed in " ")
  show-profile         show details of push target profile [all|profile-name|# from list]
  show-template        show contents of specific template [template-name|# from list ]
  template             name of j2 template
  |                    Pipe through a command


Operational Status Commands:
root@vmx-01> op scale-out ?
Possible completions:
  <[Enter]>            Execute this command
  <name>               Argument name
  detail               Display detailed output
  invoke-debugger      Invoke script in debugger mode
  quiet-stdout         Disable stdout except for event/timed runs, pass any argument
  srx-clear-session    Clear sessions according to settings  ["NH1 NHx"|group|all]
  srx-counter-info     Print SRX counter information ["NH1 NHx"|group|all]
  srx-counter-info-clear  Reset SRX counters from info view ["NH1 NHx"|group|all]
  srx-ip-lookup        Provide instance name based on actual filter or NAT pool [IPv4/IPv6 prefix]
  srx-isolate-off      Enable defined interfaces ["NH1 NHx"|group|all]
  srx-isolate-on       Disable(!) defined interfaces ["NH1 NHx"|group|all]
  srx-load             Print SRX devices KPIs ["NH1 NHx"|group|all]
  srx-nat-info         Print source NAT pool information ["NH1 NHx"|group|all]
  srx-nat-info-clear   Reset NAT statistics counters ["NH1 NHx"|group|all]
  srx-nat-pool-expand  Add prefix to existing pool on SRX device [NHx:pool-name:prefix][force][wipe] - see help]
  srx-nat-pool-reduce  Remove prefix from existing pool on SRX device [NHx:pool-name:prefix]
  srx-snmp-load        Load SNMP SRX KPI/monitoring objects, pass any argument
  srx-state-check-off  Disable SYN and SEQ check ["NH1 NHx"|group|all]
  srx-state-check-on   Enable SYN and SEQ check ["NH1 NHx"|group|all]
  srx-sysinfo          Print SRX device information ["NH1 NHx"|group|all]
  |                    Pipe through a command
Review the profiles that could be used for provisioning the setup.
The first thing we would like to do is to add vsrx-01 to the setup, therefore we would look into the profile 13 - add_srx_1- which would fully configure the vsrx-01 as well as the vMX for the CGNAT service.
root@vmx-01> op template-ops list-profile all
------------------------------------------------------------------------------------------
|   # |  push target profile  |                       comment                            |
------------------------------------------------------------------------------------------
|   1 |               lic_all |  clear and install license all                           |
------------------------------------------------------------------------------------------
|   2 |     group_cleanup_all |  delete groups and apply-groups all                      |
------------------------------------------------------------------------------------------
|   3 |              reboot_1 |  reboot vsrx-01                                          |
------------------------------------------------------------------------------------------
|   4 |              reboot_2 |  reboot vsrx-02                                          |
------------------------------------------------------------------------------------------
|   5 |              reboot_3 |  reboot vsrx-03                                          |
------------------------------------------------------------------------------------------
|   6 |            shutdown_1 |  shutdown vsrx-01                                        |
------------------------------------------------------------------------------------------
|   7 |            shutdown_2 |  shutdown vsrx-02                                        |
------------------------------------------------------------------------------------------
|   8 |            shutdown_3 |  shutdown vsrx-03                                        |
------------------------------------------------------------------------------------------
|   9 |          shutdown_all |  shutdown all                                            |
------------------------------------------------------------------------------------------
|  10 |       storage_cleanup |  cleans-up storage all                                   |
------------------------------------------------------------------------------------------
|  11 |               version |  print version info all                                  |
------------------------------------------------------------------------------------------
|  12 |                 alarm |  print alarms all                                        |
------------------------------------------------------------------------------------------
|  13 |             add_srx_1 |  add MX/SRX config 1                                     |
------------------------------------------------------------------------------------------
|  14 |             add_srx_2 |  add MX/SRX config 2                                     |
------------------------------------------------------------------------------------------
|  15 |             add_srx_3 |  add MX/SRX config 3                                     |
------------------------------------------------------------------------------------------
|  16 |             del_srx_1 |  del MX/SRX config 1                                     |
------------------------------------------------------------------------------------------
|  17 |             del_srx_2 |  del MX/SRX config 2                                     |
------------------------------------------------------------------------------------------
|  18 |             del_srx_3 |  del MX/SRX config 3                                     |
------------------------------------------------------------------------------------------
|  19 |        update_srx_all |  update srx config all                                   |
Configuration template profiles are used to configure all components involved in a given provisioning step. For example, if I want to add an SRX to the CGNAT Scale-Out topology, I will need to add configuration statements to both the MX and the SRX. The configuration template profile will then be composed of all the configuration templates necessary for the given provisioning setup.
By looking into the add_srx_1 provisioning profile, we see the following:
• This profile configures two devices: vsrx-01 and vmx-01.
• Sequence number 1 will be used to calculate and derive the corresponding IP addressing, AS numbering and interface numbering on both devices as well as the NAT-pool on the vSRX. This could have been complex data structure too.
• Device type is meant for different template seeding by using sequence.
• Each device is going to use its own device template, cgn_srx_add and cgn_mx_add, respectively.
root@vmx-01> op template-ops show-profile add_srx_1
----------------------------------------------------------------------------------------
|  push target profile |  device  | device-type |   sequence   |   template   |  exec  |
----------------------------------------------------------------------------------------
|            add_srx_1 |  vsrx-01 |        vsrx |            1 |  cgn_srx_add |   N    |
|                      |   vmx-01 |          mx |            1 |   cgn_mx_add |   N    |
By looking into the corresponding provisioning templates (which are stored on the vMX in the form of Jinja2 templates), we see the set commands combined with the sequence number variables. The python script in the background will translate the sequence number to the appropriate parameters in the Jinja2 template and the configuration is pushed to the appropriate device(s).
As we can see, each provisioning template generates the corresponding configurations under a dedicated group name, facilitating easy maintenance of the configuration hierarchy, making adding and deleting configurations straightforward.
root@vmx-01> op template-ops show-template cgn_mx_add
#
########################### BEGIN cgn_mx_add #######################################
#
delete groups scale-out-srx-{{ seq_0x }}
set groups scale-out-srx-{{ seq_0x }} interfaces ge-0/0/{{ trust_int }} unit 0 family inet address 100.65.{{ seq }}.1/24
set groups scale-out-srx-{{ seq_0x }} interfaces ge-0/0/{{ untrust_int }} unit 0 family inet address 100.64.{{ seq }}.1/24
set groups scale-out-srx-{{ seq_0x }} routing-instances vr-trust protocols bgp group vsrx-trust neighbor 100.65.{{ seq }}.10 peer-as {{ aut_sys }}
set groups scale-out-srx-{{ seq_0x }} routing-instances vr-trust interface ge-0/0/{{ trust_int }}.0
set groups scale-out-srx-{{ seq_0x }} routing-instances vr-untrust protocols bgp group vsrx-untrust neighbor 100.64.{{ seq }}.10 peer-as {{ aut_sys }}
set groups scale-out-srx-{{ seq_0x }} routing-instances vr-untrust interface ge-0/0/{{ untrust_int }}.0
set apply-groups scale-out-srx-{{ seq_0x }}
#
############################# END  cgn_mx_add ########################################

root@vmx-01> op template-ops show-template cgn_srx_add
#
############################### BEGIN cgn_srx_add #######################################
#
delete groups scale-out-srx
delete groups auto-fbf

set groups auto-fbf
set groups auto-fbf security nat source pool pool-1 address 2.0.{{ seq }}.0/25
set groups auto-fbf routing-instances vr-cgn routing-options static route 2.0.{{ seq }}.0/25 discard

set groups scale-out-srx security log mode stream
set groups scale-out-srx security log stream pod-host host 10.1.255.254
set groups scale-out-srx security log stream pod-host host routing-instance vr-cgn
set groups scale-out-srx security log stream pod-host source-address 100.65.{{ seq }}.10
set groups scale-out-srx security log profile profile-1 stream-name pod-host
set groups scale-out-srx security log profile profile-1 category session field-name source-address
set groups scale-out-srx security log profile profile-1 category session field-name source-port
set groups scale-out-srx security log profile profile-1 category session field-name destination-address
set groups scale-out-srx security log profile profile-1 category session field-name destination-port
set groups scale-out-srx security log profile profile-1 category session field-name protocol-id
set groups scale-out-srx security log profile profile-1 category session field-name nat-source-address
set groups scale-out-srx security log profile profile-1 category session field-name nat-source-port
set groups scale-out-srx security log profile profile-1 category session field-name reason
set groups scale-out-srx security log profile profile-1 category session field-name elapsed-time
set groups scale-out-srx security log profile profile-1 default-profile activate
set groups scale-out-srx security alg h323 disable
set groups scale-out-srx security alg mgcp disable
set groups scale-out-srx security alg msrpc disable
set groups scale-out-srx security alg sunrpc disable
set groups scale-out-srx security alg rtsp disable
set groups scale-out-srx security alg sccp disable
set groups scale-out-srx security alg talk disable
set groups scale-out-srx security alg tftp disable
set groups scale-out-srx security nat source pool pool-1 routing-instance vr-cgn
set groups scale-out-srx security nat source address-persistent
set groups scale-out-srx security nat source rule-set source from zone trust
set groups scale-out-srx security nat source rule-set source to zone untrust
set groups scale-out-srx security nat source rule-set source rule source-1 match source-address 0.0.0.0/0
set groups scale-out-srx security nat source rule-set source rule source-1 match destination-address 0.0.0.0/0
set groups scale-out-srx security nat source rule-set source rule source-1 then source-nat pool pool-1
set groups scale-out-srx security policies from-zone trust to-zone untrust policy permit match source-address any
set groups scale-out-srx security policies from-zone trust to-zone untrust policy permit match destination-address any
set groups scale-out-srx security policies from-zone trust to-zone untrust policy permit match application any
set groups scale-out-srx security policies from-zone trust to-zone untrust policy permit then permit
set groups scale-out-srx security policies from-zone trust to-zone untrust policy permit then log session-close
deactivate groups scale-out-srx security policies from-zone trust to-zone untrust policy permit then log
set groups scale-out-srx security policies global policy final-touch match source-address any
set groups scale-out-srx security policies global policy final-touch match destination-address any
set groups scale-out-srx security policies global policy final-touch match application any
set groups scale-out-srx security policies global policy final-touch then deny
set groups scale-out-srx security zones security-zone untrust host-inbound-traffic system-services ping
set groups scale-out-srx security zones security-zone untrust host-inbound-traffic protocols bgp
set groups scale-out-srx security zones security-zone untrust host-inbound-traffic protocols bfd
set groups scale-out-srx security zones security-zone untrust interfaces ge-0/0/1.0
set groups scale-out-srx security zones security-zone untrust screen untrust
set groups scale-out-srx security zones security-zone trust tcp-rst
set groups scale-out-srx security zones security-zone trust host-inbound-traffic system-services ping
set groups scale-out-srx security zones security-zone trust host-inbound-traffic protocols bgp
set groups scale-out-srx security zones security-zone trust host-inbound-traffic protocols bfd
set groups scale-out-srx security zones security-zone trust interfaces ge-0/0/0.0
set groups scale-out-srx security flow tcp-session strict-syn-check
set groups scale-out-srx security screen ids-option untrust icmp flood threshold 10000
set groups scale-out-srx security screen ids-option untrust tcp syn-flood destination-threshold 10000
set groups scale-out-srx security screen ids-option untrust udp flood threshold 10000
set groups scale-out-srx interfaces ge-0/0/0 unit 0 family inet address 100.65.{{ seq }}.10/24
set groups scale-out-srx interfaces ge-0/0/1 unit 0 family inet address 100.64.{{ seq }}.10/24
set groups scale-out-srx policy-options policy-statement export-bgp-trust term t10 from route-filter 0.0.0.0/0 exact
set groups scale-out-srx policy-options policy-statement export-bgp-trust term t10 then accept
set groups scale-out-srx policy-options policy-statement export-bgp-trust term t100 then reject
set groups scale-out-srx policy-options policy-statement export-bgp-untrust term t10 from route-filter 2.0.0.0/8 orlonger
set groups scale-out-srx policy-options policy-statement export-bgp-untrust term t10 then accept
set groups scale-out-srx policy-options policy-statement export-bgp-untrust term t100 then reject
set groups scale-out-srx routing-instances vr-cgn instance-type virtual-router
set groups scale-out-srx routing-instances vr-cgn routing-options autonomous-system {{ aut_sys }}
set groups scale-out-srx routing-instances vr-cgn protocols bgp group vmx-01-trust type external
set groups scale-out-srx routing-instances vr-cgn protocols bgp group vmx-01-trust export export-bgp-trust
set groups scale-out-srx routing-instances vr-cgn protocols bgp group vmx-01-trust peer-as 65065
set groups scale-out-srx routing-instances vr-cgn protocols bgp group vmx-01-trust neighbor 100.65.{{ seq }}.1
set groups scale-out-srx routing-instances vr-cgn protocols bgp group vmx-01-untrust type external
set groups scale-out-srx routing-instances vr-cgn protocols bgp group vmx-01-untrust export export-bgp-untrust
set groups scale-out-srx routing-instances vr-cgn protocols bgp group vmx-01-untrust peer-as 65064
set groups scale-out-srx routing-instances vr-cgn protocols bgp group vmx-01-untrust neighbor 100.64.{{ seq }}.1
set groups scale-out-srx routing-instances vr-cgn protocols bgp bfd-liveness-detection minimum-interval 500
set groups scale-out-srx routing-instances vr-cgn protocols bgp bfd-liveness-detection multiplier 5
set groups scale-out-srx routing-instances vr-cgn interface ge-0/0/0.0
set groups scale-out-srx routing-instances vr-cgn interface ge-0/0/1.0
set apply-groups scale-out-srx
set apply-groups auto-fbf
#
############################### END  cgn_srx_add ########################################
#
Step 5: Provision vsrx-01 to the Scale-Out setup
At this stage, we will provision and add the first vSRX instance to the Scale-Out setup, completing the end-to-end CGNAT service.
Before proceeding, we can check the connectivity status of the CGNAT service. With an end-to-end provisioned CGNAT service, we should have visibility and a route to the outside world—in this case, to our server with the IP address 1.1.1.1. Let’s verify whether we have visibility to the server through the current network construct. At this stage we should not have connectivity due to the fact that the corresponding configurations neither on the vMX nor on the vSRX(es) are in place.
root@vmx-01> show route table vr-trust.inet.0

vr-trust.inet.0: 2 destinations, 2 routes (2 active, 0 holddown, 0 hidden)
@ = Routing Use Only, # = Forwarding Use Only
+ = Active Route, - = Last Active, * = Both

10.1.0.0/16        *[Direct/0] 1w2d 12:44:40
                    >  via ge-0/0/0.0
10.1.0.1/32        *[Local/0] 1w2d 12:44:40
                       Local via ge-0/0/0.0

root@vmx-01> ping 1.1.1.1 routing-instance vr-trust
PING 1.1.1.1 (1.1.1.1): 56 data bytes
ping: sendto: No route to host
ping: sendto: No route to host
ping: sendto: No route to host
To verify all functionality, including CGNAT with consistent load balancing, low volume background traffic between the Clients and the Server is generated. This traffic originates from Linux network namespaces with randomized source addresses (10.1.[0-255].RND -> 1.1.1.1). We simulate 256 clients.
Verify the status of the background traffic:
root@scale-out-pod-2:~# tcpdump -n -i br-trust -c 100
tcpdump: verbose output suppressed, use -v[v]... for full protocol decode
listening on br-trust, link-type EN10MB (Ethernet), snapshot length 262144 bytes
01:27:32.059572 IP 10.1.210.52.52852 > 1.1.1.1.1024: UDP, length 700
01:27:32.059653 IP 10.1.119.200.52854 > 1.1.1.1.1024: UDP, length 700
01:27:32.059797 IP 10.1.61.71.52850 > 1.1.1.1.1024: UDP, length 700
01:27:32.059920 IP 10.1.67.174.52849 > 1.1.1.1.1024: UDP, length 700
01:27:32.059920 IP 10.1.32.63.52850 > 1.1.1.1.1024: UDP, length 700
01:27:32.059991 IP 10.1.243.184.52851 > 1.1.1.1.1024: UDP, length 700
< snip >
100 packets captured
256 packets received by filter
0 packets dropped by kernel
Now we are ready to add vsrx-01 to the topology. We use the appropriate configuration profile to push the configurations to the vSRX as well as the vMX.
root@vmx-01> op template-ops list-profile all
------------------------------------------------------------------------------------------
|   # |  push target profile  |                       comment                            |
------------------------------------------------------------------------------------------
|   1 |             lic_all   |  clear and install license all                           |
------------------------------------------------------------------------------------------
|   2 |     group_cleanup_all |  delete groups and apply-groups all                      |
< snip >
|  12 |                 alarm |  print alarms all                                        |
------------------------------------------------------------------------------------------
|  13 |             add_srx_1 |  add MX/SRX config 1                                     |
------------------------------------------------------------------------------------------
|  14 |             add_srx_2 |  add MX/SRX config 2                                     |


root@vmx-01> op template-ops push-target-profile add_srx_1
------------------------------------------------------------------------------------------
|    device    |        template operation status message                                |
------------------------------------------------------------------------------------------
|    vmx-01    |   cgn_mx_add template commit completed (-del cmds), j2+set-cmd archived |
------------------------------------------------------------------------------------------
|   vsrx-01    |   cgn_srx_add template commit completed (-del cmds), j2+set-cmd archived|
------------------------------------------------------------------------------------------
As we can see, after pushing the add_srx_1 profile, both the vMX and the vSRX received their configurations from the corresponding template. Consequently, the respective configurations will appear on each device, embedded into the scale-out-srx-01 and scale-out-srx groups.
root@vmx-01> show configuration groups ?
Possible completions:
  <[Enter]>            Execute this command
  <group_name>         Group name
  op-compile           Group name
  op-scale-out         Group name
  op-template-ops      Group name
  scale-out-common     Group name
  scale-out-srx-01     Group name
  |                    Pipe through a command

root@vsrx-01> show configuration groups ?
Possible completions:
  <[Enter]>            Execute this command
  <group_name>         Group name
  auto-fbf             Group name
  scale-out-srx        Group name
  |                    Pipe through a command

root@vmx-01> show configuration groups scale-out-srx-01 |display set
set groups scale-out-srx-01 interfaces ge-0/0/2 unit 0 family inet address 100.65.1.1/24
set groups scale-out-srx-01 interfaces ge-0/0/3 unit 0 family inet address 100.64.1.1/24
set groups scale-out-srx-01 routing-instances vr-trust protocols bgp group vsrx-trust neighbor 100.65.1.10 peer-as 65001
set groups scale-out-srx-01 routing-instances vr-trust interface ge-0/0/2.0
set groups scale-out-srx-01 routing-instances vr-untrust protocols bgp group vsrx-untrust neighbor 100.64.1.10 peer-as 65001
set groups scale-out-srx-01 routing-instances vr-untrust interface ge-0/0/3.0

root@vsrx-01> show configuration groups scale-out-srx |display set
# Check it on the vsrx-01
At this stage we should see that the vsrx-01 is fully operational in the setup. BGP peering should be established between the vsrx-01, vr-trust, and vr-untrust instances. Bidirectional traffic should flow between the clients and the server, and we should observe these sessions on the vSRX.
root@vmx-01> show bgp summary
Threading mode: BGP I/O
Default eBGP mode: advertise - accept, receive - accept
Groups: 2 Peers: 2 Down peers: 0
Peer                     AS      InPkt     OutPkt    OutQ   Flaps Last Up/Dwn State|#Active/Received/Accepted/Damped...
100.64.1.10           65001         73         71       0       0       31:14 Establ
  vr-untrust.inet.0: 1/1/1/0
100.65.1.10           65001         73         72       0       0       31:18 Establ
  vr-trust.inet.0: 1/1/1/0

root@vsrx-01> show bgp summary
Threading mode: BGP I/O
Default eBGP mode: advertise - accept, receive - accept
Groups: 2 Peers: 2 Down peers: 0
Peer                     AS      InPkt     OutPkt    OutQ   Flaps Last Up/Dwn State|#Active/Received/Accepted/Damped...
100.64.1.1            65064         84         82       0       0       36:19 Establ
  vr-cgn.inet.0: 1/1/1/0
100.65.1.1            65065         84         82       0       0       36:23 Establ
  vr-cgn.inet.0: 1/1/1/0

vmx-01                            Seconds: 4                   Time: 23:55:43

Interface    Link  Input packets        (pps)     Output packets        (pps)
 ge-0/0/0      Up     1824840171       (2992)          5265512          (2)
 ge-0/0/1      Up              2          (0)          6896387       (2989)
 ge-0/0/2      Up           5394          (2)          6901422       (2991)
 ge-0/0/3      Up        6902025       (2992)             4766          (1)

root@vsrx-01> show security monitoring
                  Flow session   Flow session     CP session     CP session
FPC PIC CPU Mem        current        maximum        current        maximum
  0   0   5  67         183812         524288            N/A            N/A

root@vmx-01> show route table vr-trust.inet.0

vr-trust.inet.0: 5 destinations, 5 routes (5 active, 0 holddown, 0 hidden)
@ = Routing Use Only, # = Forwarding Use Only
+ = Active Route, - = Last Active, * = Both

0.0.0.0/0          *[BGP/170] 00:00:02, localpref 100
                      AS path: 65001 65064 I, validation-state: unverified
                    >  to 100.65.1.10 via ge-0/0/2.0
10.1.0.0/16        *[Direct/0] 1w2d 13:05:38
                    >  via ge-0/0/0.0
10.1.0.1/32        *[Local/0] 1w2d 13:05:38
                       Local via ge-0/0/0.0
100.65.1.0/24      *[Direct/0] 00:00:09
                    >  via ge-0/0/2.0
100.65.1.1/32      *[Local/0] 00:00:09
                       Local via ge-0/0/2.0

root@vmx-01> ping 1.1.1.1 routing-instance vr-trust
PING 1.1.1.1 (1.1.1.1): 56 data bytes
64 bytes from 1.1.1.1: icmp_seq=0 ttl=62 time=9.157 ms
64 bytes from 1.1.1.1: icmp_seq=1 ttl=62 time=3.066 ms
64 bytes from 1.1.1.1: icmp_seq=2 ttl=62 time=3.912 ms
^C
--- 1.1.1.1 ping statistics ---
3 packets transmitted, 3 packets received, 0% packet loss
round-trip min/avg/max/stddev = 3.066/5.378/9.157/2.694 ms
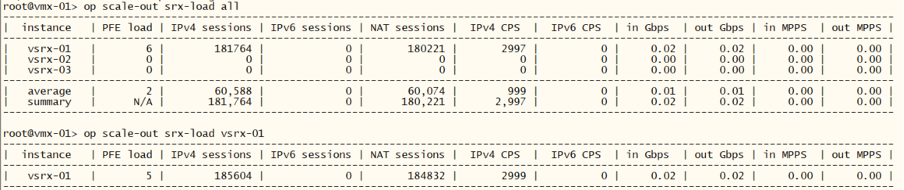
We can now use the monitoring capability of the templating tool. We will get information about PFE load, number of sessions, CPS, MPPS etc.
root@vmx-01> op scale-out ?
Possible completions:
  <[Enter]>            Execute this command
  <name>               Argument name
  detail               Display detailed output
  invoke-debugger      Invoke script in debugger mode
  quiet-stdout         Disable stdout except for event/timed runs, pass any argument
  srx-clear-session    Clear sessions according to settings  ["NH1 NHx"|group|all]
  srx-counter-info     Print SRX counter information ["NH1 NHx"|group|all]
  srx-counter-info-clear  Reset SRX counters from info view ["NH1 NHx"|group|all]
  srx-ip-lookup        Provide instance name based on actual filter or NAT pool [IPv4/IPv6 prefix]

  srx-isolate-off      Enable defined interfaces ["NH1 NHx"|group|all]
  srx-isolate-on       Disable(!) defined interfaces ["NH1 NHx"|group|all]
  srx-load             Print SRX devices KPIs ["NH1 NHx"|group|all]
  srx-nat-info         Print source NAT pool information ["NH1 NHx"|group|all]
  srx-nat-info-clear   Reset NAT statistics counters ["NH1 NHx"|group|all]
  srx-nat-pool-expand  Add prefix to existing pool on SRX device [NHx:pool-name:prefix][force][wipe] - see help]

  srx-nat-pool-reduce  Remove prefix from existing pool on SRX device [NHx:pool-name:prefix]

  srx-snmp-load        Load SNMP SRX KPI/monitoring objects, pass any argument
  srx-state-check-off  Disable SYN and SEQ check ["NH1 NHx"|group|all]
  srx-state-check-on   Enable SYN and SEQ check ["NH1 NHx"|group|all]
  srx-sysinfo          Print SRX device information ["NH1 NHx"|group|all]
  |                    Pipe through a command
root@vmx-01> op scale-out srx-load all

root@vmx-01> op scale-out srx-load vsrx-01
Step 6: Provision vsrx-02 and vsrx-03 to the Scale-Out setup
At this stage we are provisioning the remaining vSRXes to the Scale-Out setup.
You can login to vsrx-02 and vsrx-03 from your POD and check the configuration, the NAT related statistics, number of active sessions on the platform etc. Wait until each BGP sessions get into establ” state.
root@vmx-01> op template-ops push-target-profile add_srx_2
----------------------------------------------------------------------------------------
|    device    |        template operation status message                              |
----------------------------------------------------------------------------------------
|    vmx-01    | cgn_mx_add template commit completed (-del cmds), j2+set-cmd archived |
----------------------------------------------------------------------------------------
|   vsrx-02    | cgn_srx_add template commit completed (-del cmds), j2+set-cmd archived |
----------------------------------------------------------------------------------------

root@vmx-01> op template-ops push-target-profile add_srx_3
----------------------------------------------------------------------------------------
|    device    |        template operation status message                              |
----------------------------------------------------------------------------------------
|    vmx-01    | cgn_mx_add template commit completed (-del cmds), j2+set-cmd archived |
----------------------------------------------------------------------------------------
|   vsrx-03    | cgn_srx_add template commit completed (-del cmds), j2+set-cmd archived |

root@vmx-01> show bgp summary
Threading mode: BGP I/O
Default eBGP mode: advertise - accept, receive - accept
Groups: 2 Peers: 6 Down peers: 0
Peer                     AS      InPkt     OutPkt    OutQ   Flaps Last Up/Dwn State|#Active/Received/Accepted/Damped...
100.64.1.10           65001        129        127       0       0       56:53 Establ
  vr-untrust.inet.0: 1/1/1/0
100.64.2.10           65002          7          6       0       0        1:45 Establ
  vr-untrust.inet.0: 1/1/1/0
100.64.3.10           65003          7          6       0       0        1:27 Establ
  vr-untrust.inet.0: 1/1/1/0
100.65.1.10           65001        130        128       0       0       56:57 Establ
  vr-trust.inet.0: 1/1/1/0
100.65.2.10           65002          8          6       0       0        1:49 Establ
  vr-trust.inet.0: 0/1/1/0
100.65.3.10           65003          7          5       0       0        1:31 Establ
  vr-trust.inet.0: 0/1/1/0

root@vmx-01> op scale-out srx-load all

root@vsrx-03> show security monitoring
                  Flow session   Flow session     CP session     CP session
FPC PIC CPU Mem        current        maximum        current        maximum
  0   0   2  68          63364         524288            N/A            N/A

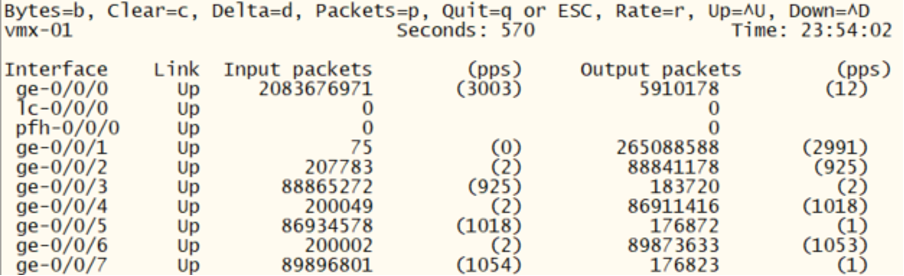
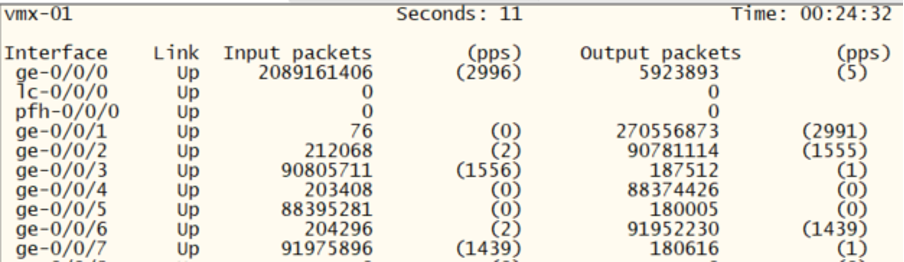
Verify the traffic by inspecting the interface counters on the vMX:
root@vmx-01> monitor interface traffic
Step 7: Node isolation on/off
At this stage we fully provisioned the Scale-Out setup, let’s discover how we can “isolate” or disconnect a particular node from the setup and how to add it back to the topology.
First lets see some tech information about the installed components.
root@vmx-01> op scale-out srx-sysinfo all
 Isolate vsrx-02 and check the BGP summary. We see that the corresponding BGP session is down in both routing-instances:
root@vmx-01> op scale-out srx-isolate-on "vsrx-02"
-------------------------------------------------------
|  instance   | old isolate state | new isolate state |
-------------------------------------------------------
|   vsrx-02   |   not isolated    |     isolated      |

root@vmx-01> show bgp summary
Threading mode: BGP I/O
Default eBGP mode: advertise - accept, receive - accept
Groups: 2 Peers: 6 Down peers: 2
Peer                     AS      InPkt     OutPkt    OutQ   Flaps Last Up/Dwn State|#Active/Received/Accepted/Damped...
100.64.1.10           65001       3330       3286       0       0  1d 1:01:40 Establ
  vr-untrust.inet.0: 1/1/1/0
100.64.2.10           65002          0          0       0       1        1:00 Connect
100.64.3.10           65003       3208       3164       0       0  1d 0:06:14 Establ
  vr-untrust.inet.0: 1/1/1/0
100.65.1.10           65001       3330       3286       0       0  1d 1:01:44 Establ
  vr-trust.inet.0: 1/1/1/0
100.65.2.10           65002          0          0       0       1          59 Connect
100.65.3.10           65003       3208       3164       0       0  1d 0:06:18 Establ
  vr-trust.inet.0: 0/1/1/0
We can see that the particular vSRX is in “isolated” state and only vsrx-01 and vsrx-03 is forwarding traffic and the load between the two remaining node is evenly distributed:
root@vmx-01> op scale-out srx-sysinfo all

root@vmx-01> op scale-out srx-load all

root@vmx-01> monitor interface traffic
Examine the corresponding configurations of both the vMX and the vSRX to understand what ‘isolation’ entails.
root@vmx-01> show configuration routing-instances vr-trust |display inheritance no-comments
instance-type virtual-router;
routing-options {
    autonomous-system 65065;
    multipath;
}
protocols {
    bgp {
        group vsrx-trust {
            type external;
            import consistent-hash-trust;
            export export-bgp-vsrx-trust;
            multipath;
            neighbor 100.65.1.10 {
                peer-as 65001;
            }
            neighbor 100.65.2.10 {
                peer-as 65002;
            }
            neighbor 100.65.3.10 {
                peer-as 65003;
            }
        }
        bfd-liveness-detection {
            minimum-interval 500;
            multiplier 5;
        }
    }
}
interface ge-0/0/0.0;
interface ge-0/0/2.0;
interface ge-0/0/4.0;
interface ge-0/0/6.0;

root@vmx-01> show configuration interfaces |display inheritance no-comments
ge-0/0/4 {
    unit 0 {
        family inet {
            address 100.65.2.1/24;
        }
    }
}
ge-0/0/5 {
    unit 0 {
        family inet {
            address 100.64.2.1/24;
        }
    }
}

root@vsrx-02> show configuration routing-instances |display inheritance no-comments
vr-cgn {
    instance-type virtual-router;
    routing-options {
        autonomous-system 65002;
        static {
            route 2.0.2.0/25 discard;
        }
    }
    protocols {
        bgp {
            group vmx-01-trust {
                type external;
                export export-bgp-trust;
                peer-as 65065;
                neighbor 100.65.2.1;
            }
            group vmx-01-untrust {
                type external;
                export export-bgp-untrust;
                peer-as 65064;
                neighbor 100.64.2.1;
            }
            bfd-liveness-detection {
                minimum-interval 500;
                multiplier 5;
            }
        }
    }
    interface ge-0/0/0.0;
    interface ge-0/0/1.0;
}

root@vsrx-02> show configuration interfaces |display inheritance no-comments
< snip >
ge-0/0/0 {
    disable;
    unit 0 {
        family inet {
            address 100.65.2.10/24;
        }
    }
}
ge-0/0/1 {
    disable;
    unit 0 {
        family inet {
            address 100.64.2.10/24;
        }
    }
}
Switch off isolation and repeat the following verification commands. Observe how the previously isolated node returns and takes up evenly the traffic load:
root@vmx-01> op scale-out srx-isolate-off "vsrx-02"

root@vmx-01> op scale-out srx-sysinfo all

root@vmx-01> show bgp summary

root@vmx-01> op scale-out srx-load all

root@vmx-01> monitor interface traffic

root@vsrx-02> show configuration interfaces |display inheritance no-comments
Step 8: Deletion of existing node from the setup
At this stage we remove vsrx-01 from the setup and compare the results with the previous step. At the end of this step, we add the node back to the setup.
root@vmx-01> op template-ops push-target-profile del_srx_2
-------------------------------------------------------------------------------------------
|    device    |            template operation status message                             |
-------------------------------------------------------------------------------------------
|    vmx-01    |                cgn_mx_del template commit completed, j2+set-cmd archived |
-------------------------------------------------------------------------------------------
|   vsrx-02    |               cgn_srx_del template commit completed, j2+set-cmd archived |
-------------------------------------------------------------------------------------------
We see that the vsrx-02 is not forwarding the traffic anymore. The traffic is evenly distributed on the remaining two nodes. The corresponding configurations are removed from the vSRX as well as from the vMX. Observe what are the differences in the configurations compared to the previous step.
root@vmx-01> op scale-out srx-load all

root@vmx-01> show configuration routing-instances vr-trust |display inheritance no-comments
instance-type virtual-router;
routing-options {
    autonomous-system 65065;
    multipath;
}
protocols {
    bgp {
        group vsrx-trust {
            type external;
            import consistent-hash-trust;
            export export-bgp-vsrx-trust;
            multipath;
            neighbor 100.65.1.10 {
                peer-as 65001;
            }
            neighbor 100.65.3.10 {
                peer-as 65003;
            }
        }
        bfd-liveness-detection {
            minimum-interval 500;
            multiplier 5;
        }
    }
}
interface ge-0/0/0.0;
interface ge-0/0/2.0;
interface ge-0/0/6.0;

root@vsrx-02> show configuration routing-instances |display inheritance no-comments
vr-cgn {
    routing-options {
        static {
            route 2.0.2.0/25 discard;
        }
    }
}
Add back vsrx-02 to the setup and verify its operation.
root@vmx-01> op template-ops push-target-profile add_srx_2

root@vmx-01> show bgp summary

root@vmx-01> op scale-out srx-load all

root@vmx-01> show configuration routing-instances vr-trust |display inheritance no-comments

root@vsrx-02> show configuration routing-instances |display inheritance no-comments
Step 9: Check what is under the hood
At this stage we fully provisioned the Scale-Out setup, let’s try to understand how the provisioning tool operates. Let’s look at how we turn a template to a real configuration with the help of device type and sequence number. The device type parameter will determine how we use the sequence number and how we turn it into particular configuration values. The sequence number is then used for population the parameters in the template with real values. The steps below will reveal us these details. Check both the vMX as well as the vSRX instances.
root@vmx-01> op template-ops show-template cgn_mx_add
#
########################### BEGIN cgn_mx_add #######################################
#
delete groups scale-out-srx-{{ seq_0x }}
set groups scale-out-srx-{{ seq_0x }} interfaces ge-0/0/{{ trust_int }} unit 0 family inet address 100.65.{{ seq }}.1/24
set groups scale-out-srx-{{ seq_0x }} interfaces ge-0/0/{{ untrust_int }} unit 0 family inet address 100.64.{{ seq }}.1/24
set groups scale-out-srx-{{ seq_0x }} routing-instances vr-trust protocols bgp group vsrx-trust neighbor 100.65.{{ seq }}.10 peer-as {{ aut_sys }}
set groups scale-out-srx-{{ seq_0x }} routing-instances vr-trust interface ge-0/0/{{ trust_int }}.0
set groups scale-out-srx-{{ seq_0x }} routing-instances vr-untrust protocols bgp group vsrx-untrust neighbor 100.64.{{ seq }}.10 peer-as {{ aut_sys }}
set groups scale-out-srx-{{ seq_0x }} routing-instances vr-untrust interface ge-0/0/{{ untrust_int }}.0
set apply-groups scale-out-srx-{{ seq_0x }}
#
############################# END  cgn_mx_add ########################################

root@vmx-01> op template-ops device-type mx template cgn_mx_add seq 1
delete groups scale-out-srx-01
set groups scale-out-srx-01 interfaces ge-0/0/2 unit 0 family inet address 100.65.1.1/24
set groups scale-out-srx-01 interfaces ge-0/0/3 unit 0 family inet address 100.64.1.1/24
set groups scale-out-srx-01 routing-instances vr-trust protocols bgp group vsrx-trust neighbor 100.65.1.10 peer-as 65001
set groups scale-out-srx-01 routing-instances vr-trust interface ge-0/0/2.0
set groups scale-out-srx-01 routing-instances vr-untrust protocols bgp group vsrx-untrust neighbor 100.64.1.10 peer-as 65001
set groups scale-out-srx-01 routing-instances vr-untrust interface ge-0/0/3.0
set apply-groups scale-out-srx-01

root@vmx-01> op template-ops device-type mx template cgn_mx_add seq 2
root@vmx-01> op template-ops show-template cgn_srx_add

root@vmx-01> op template-ops device-type vsrx template cgn_srx_add seq 1
We can compare what are the configuration differences between the generated configuration (based upon the template) and a given device (sequence 1 diff against device otherwise with sequence 2):
root@vmx-01> op template-ops device-type vsrx template cgn_srx_add seq 1 diff-target vsrx-02
[edit groups auto-fbf security nat source pool pool-1 address]
+       2.0.1.0/25;
-       2.0.2.0/25;
[edit groups auto-fbf routing-instances vr-cgn routing-options static]
+       route 2.0.1.0/25 discard;
-       route 2.0.2.0/25 discard;
[edit groups scale-out-srx security log stream pod-host]
-     source-address 100.65.2.10;
+     source-address 100.65.1.10;
[edit groups scale-out-srx interfaces ge-0/0/0 unit 0 family inet]
+        address 100.65.1.10/24;
-        address 100.65.2.10/24;
[edit groups scale-out-srx interfaces ge-0/0/1 unit 0 family inet]
+        address 100.64.1.10/24;
-        address 100.64.2.10/24;
[edit groups scale-out-srx routing-instances vr-cgn routing-options]
-      autonomous-system 65002;
+      autonomous-system 65001;
[edit groups scale-out-srx routing-instances vr-cgn protocols bgp group vmx-01-trust]
+        neighbor 100.65.1.1;
-        neighbor 100.65.2.1;
[edit groups scale-out-srx routing-instances vr-cgn protocols bgp group vmx-01-untrust]
+        neighbor 100.64.1.1;
-        neighbor 100.64.2.1;
Step 10: Modifying NAT pools
In this step we will see how to modify the NAT pool on the individual vSRXes. Execute these steps for expanding the NAT pool on the vsrx-01:
root@vmx-01> op scale-out srx-nat-info all

root@vmx-01> op scale-out srx-nat-pool-expand "vsrx-01 pool-1 2.0.1.128/25"
-----------------------------------------
|  instance   |         status          |
-----------------------------------------
|   vsrx-01   |    NAT pool expanded    |

The above steps would result in config changes on the vsrx-01:
root@vsrx-01> show configuration groups auto-fbf
security {
    nat {
        source {
            pool pool-1 {
                address {
                    2.0.1.0/25;
                    2.0.1.128/25;
                }
            }
        }
    }
}
routing-instances {
    vr-cgn {
        routing-options {
            static {
                route 2.0.1.0/25 discard;
                route 2.0.1.128/25 discard;
            }
        }
    }
}
The result can be checked by diffing the existing configuration with the template
root@vmx-01> op template-ops device-type vsrx template cgn_srx_add seq 1 diff-target vsrx-01
[edit groups auto-fbf security nat source pool pool-1 address]
-       2.0.1.128/25;
[edit groups auto-fbf routing-instances vr-cgn routing-options static]
-       route 2.0.1.128/25 discard;