
Paragon Automation Configuration template lab
Welcome to the hands-on lab!
In this session, you will be given access to one of four unique JCL sandboxes. Each with a distinct set of scenarios to work through the Paragon Automation hands-on lab. Additionally, you will be given access as one of four users:
labuser_1
labuser_2
labuser_3
labuser_4
It is crucial that you adhere to the sandbox and user account assigned to you throughout the entire lab. This ensures that your actions do not interfere with the work of others who will be conducting their exercises in parallel.
Remember, the success of this lab depends on each participant working within their designated environment, so please do not deviate from your assigned sandbox and user.
Let’s have a productive session!
Overview
In Paragon Automation, you can use configuration templates to provision customized configurations throughout the device life-cycle for Juniper Networks devices.
Using configuration templates, superusers and/or network administrators can create customized configurations, preview the configuration templates, and deploy the configuration to one or more devices.
Lab
This document contains the hands on lab related to the Paragon Automation configuration template topic. The lab will be done at the 2024 Tech Summits in:
APAC (Kuala Lumpur, Malaysia) - July
EMEA (Berlin, Germany) - July
AMER (Phoenix, AZ) - Aug
Goals
To understand that configuration templates enable you to create customised configuration and deploy the configuration to one or more devices.
To create a configuration templates.
To deploy a configuration template to a device.
Introduction
The lab is going to be compose of the following equipments:
Paragon Automation cluster
A few vMX devices
ACX device(s).
NOTICE: You are going to work in a shared environment with write access role. Please be careful on the performed actions.
REMEMBER: If you dont follow this steps, you might impact in the job of other colleagues.
PLEASE: Finish all the lab steps, so the network environment is clean for the next user.
Time
The lab will take around 20 to 40 minutes
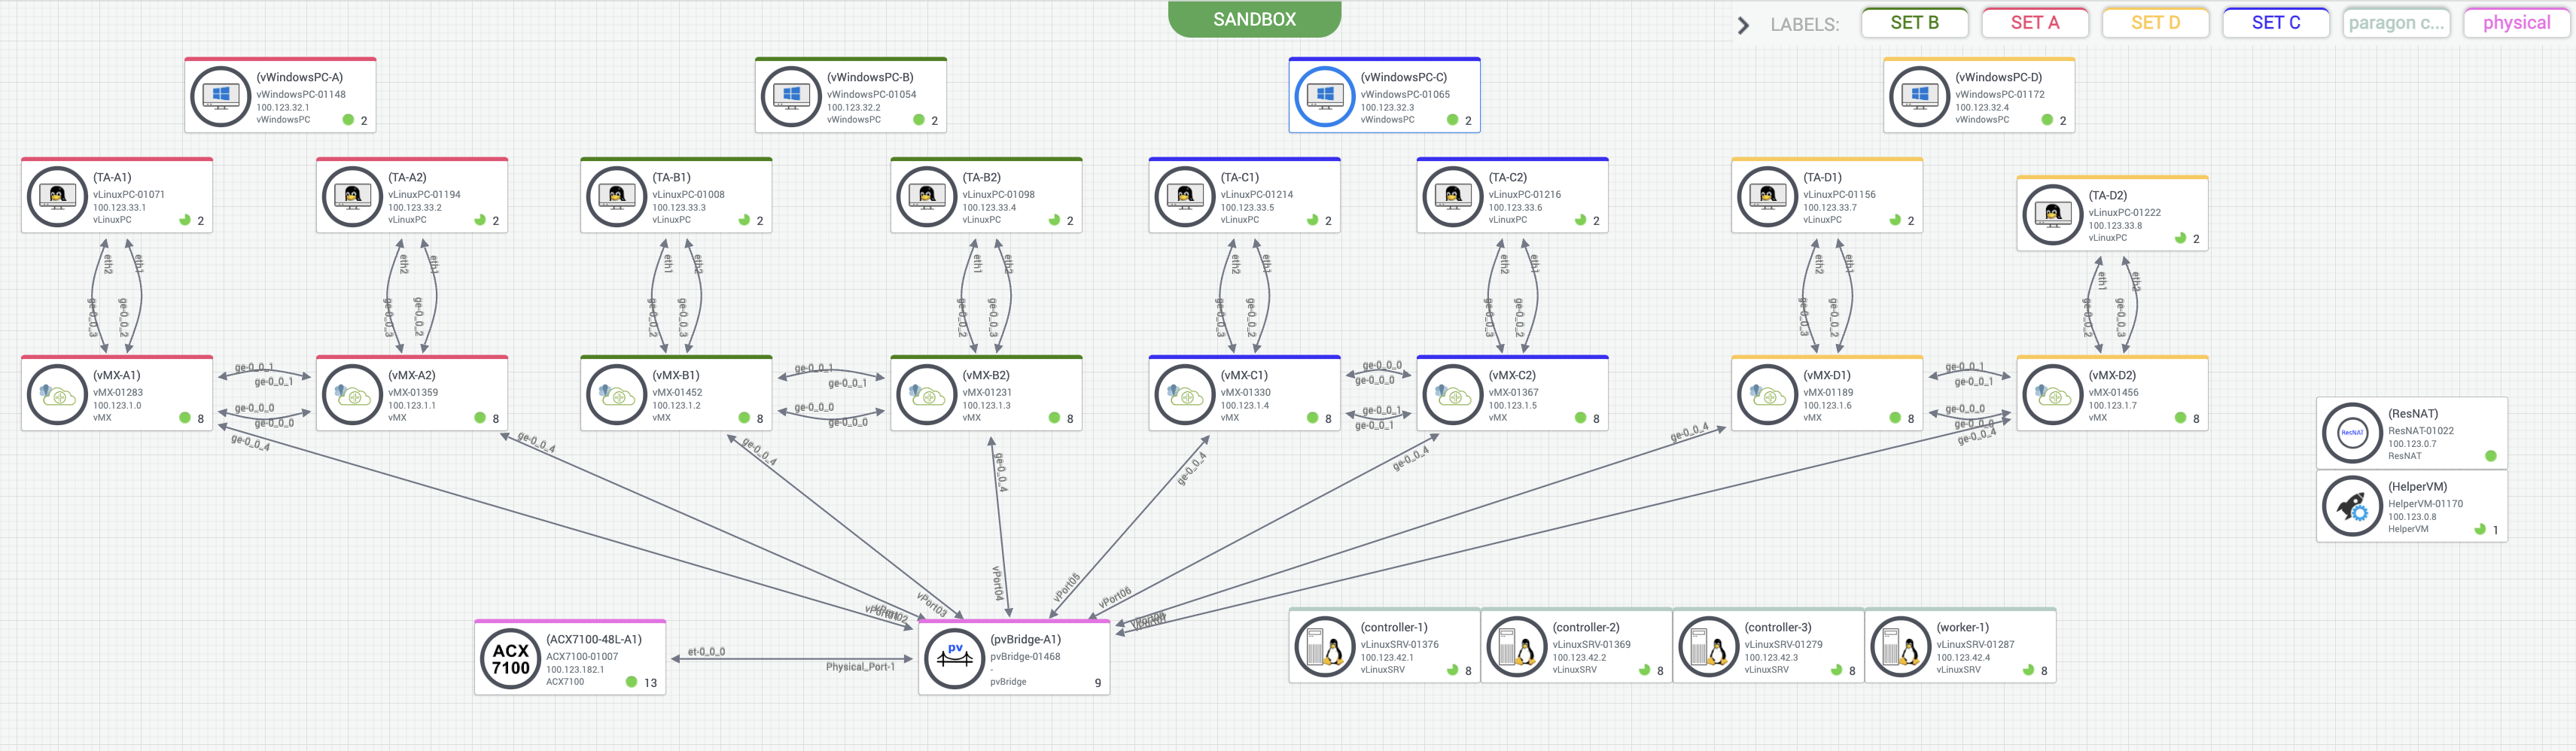
Topology
For this particular lab, we are going to use the following:
Paragon Automation Cluster: This is the main system to orchestrate and manage all the devices. This is the main system to inteceract with.
ACX7100 is the device that needs to be configured.
Steps
It is necessary to get both access to the UI and the CLI of the device that is going to be tested: ACX7100.
Open Paragon Automation UI in your browser to access Product. Login with the
user/passwordprovided having administrative priveleges.

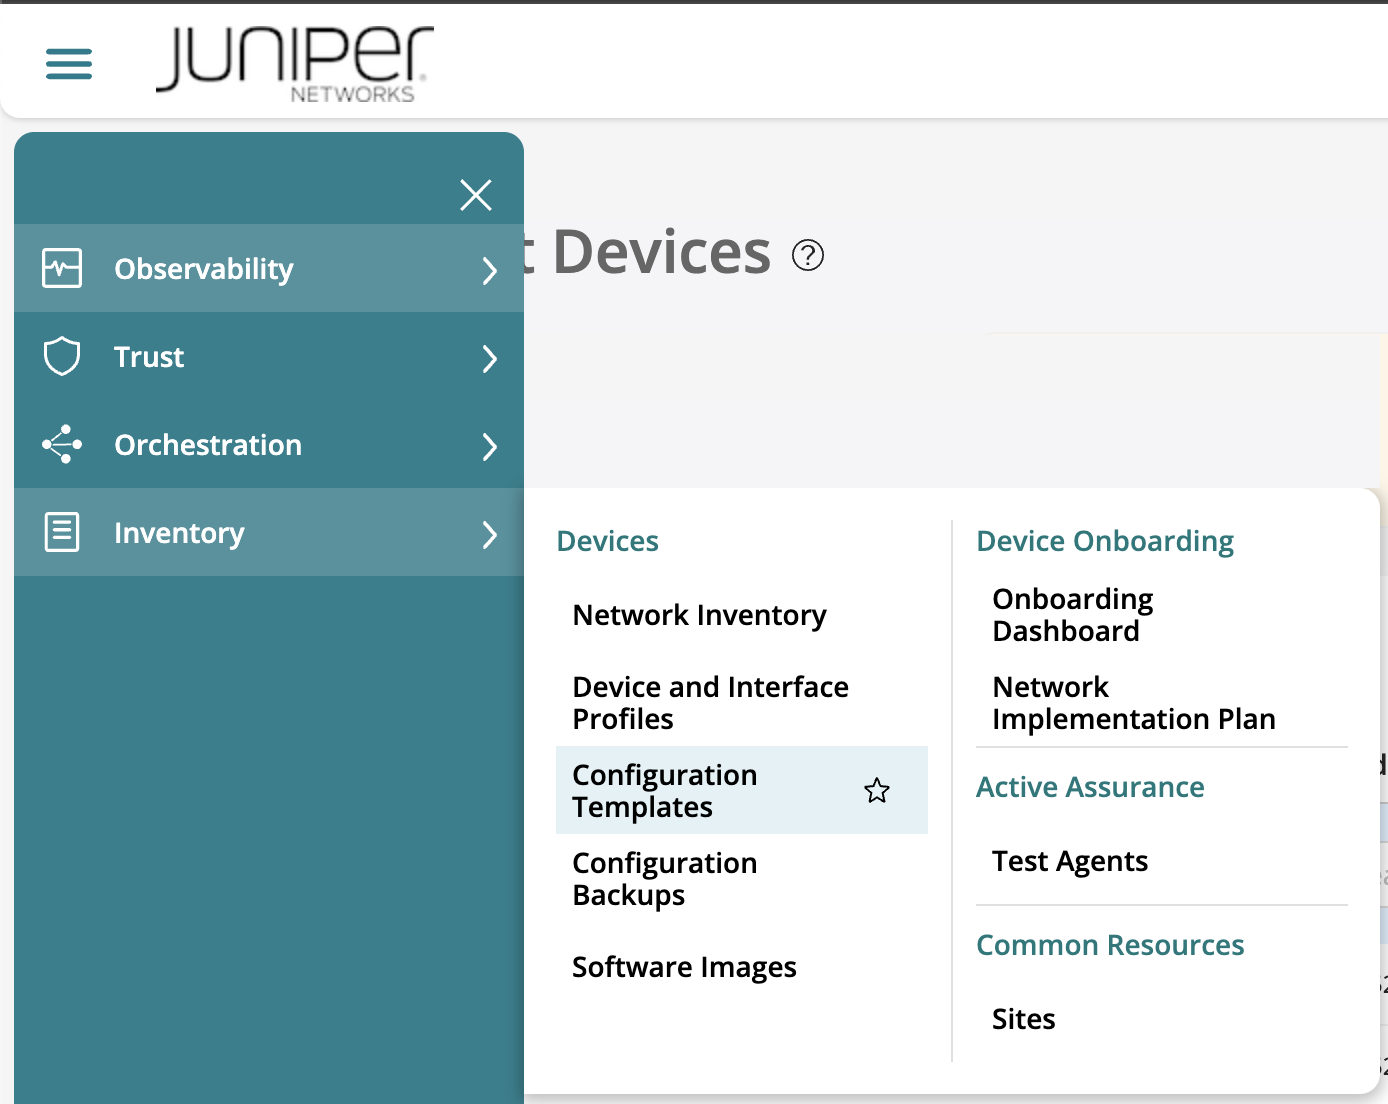
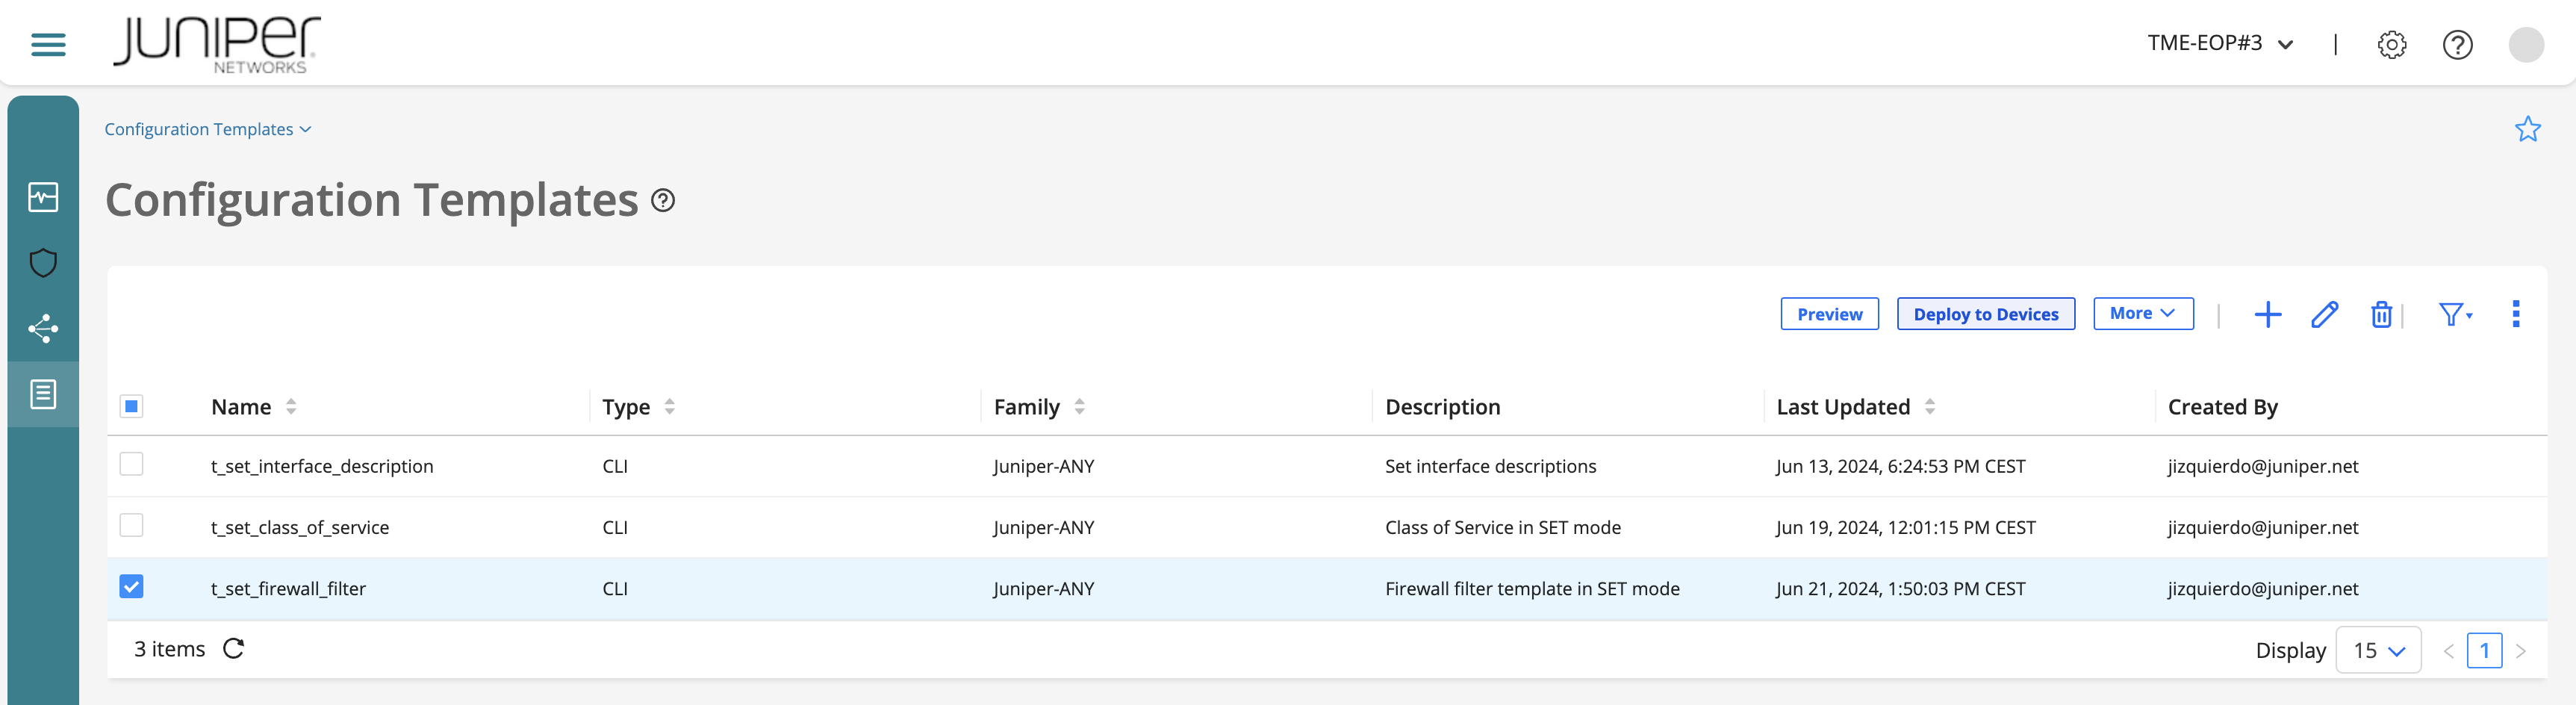
There you can go now to Inventory > Devices > Configuration Templates:
This is the configuration template landing page. From there, you can perform the following tasks:

Add a configuration template.
View details of a configuration template
Preview a configuration template.
Deploy a configuration template on one or more devices.
Edit a configuration template.
Delete a configuration template.
Add
You must either be a Super User or a Network Administrator to add configuration templates.
To add a configuration template:
If you are not yet in the
Configuration Templateslanding page, select Inventory > Devices > Configuration Templates. The Configuration Templates page appears. Else, go to next step.Click the Add icon (+). The Add Configuration Template page appears.
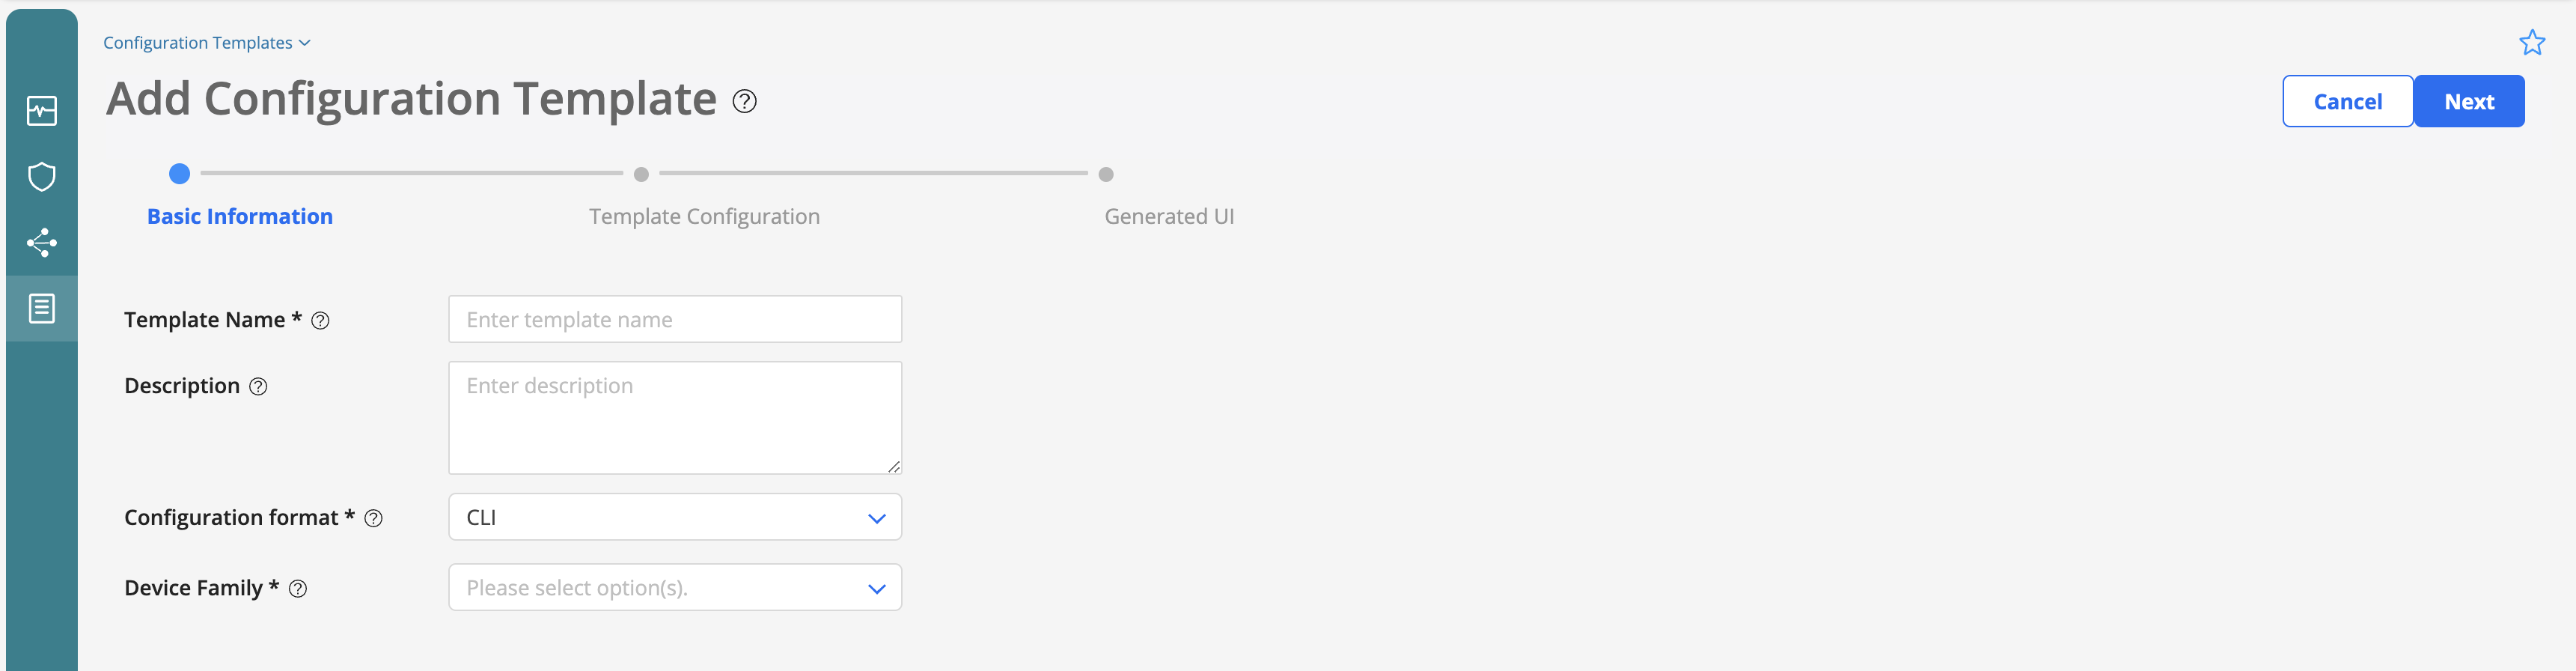
Configure the fields on the Basic Information tab according to the guidelines provided in the following table:
Field |
Description |
|---|---|
Template Name |
Enter a unique name for the configuration template. The name can only contain alphanumeric characters, hyphen, period, and underscore; 64-characters maximum. |
Description |
Enter a description for the configuration template; 255-characters maximum. |
Configuration Format |
Select the output format for the configuration template: CLI (default), NETCONF EDIT, NETCONF RPC, NON EXECUTABLE |
Device Family |
Select a device family for which you are deploying the configuration template: ACX, EX, JUNIPER ANY, MX, NFX, PTX, QFX, SRX. |
NOTE: Fields marked with an asterisk (*) are mandatory.
Name: Give it a name (e.g. firewall_filter_example)
Description: Give a description to the template (e.g. firewall filter configuration template)
Configuration format: Set CLI (default)
Device family: Set ACX
Click Next to go to the Template Configuration tab.
The templates are based on the syntax and semantics of the jinja2 template engine. If you are not familiar with it, do not worry too much now since it is not too complicated. But do not forget to visit jinja2 Template Designer Documentation if you want to learn more about it.
As a summary, you can basically do the following in the editor provided for entering the configuration:
Copy the required configuration stanza from a device and create a template from parameters in the configuration.
Parameterize variables by using double curly braces {{}}.
You can view a couple of sample configurations below or also by clicking the Sample Configuration link. These are a few of the examples available. Simply inspect them, and try to understand what they do and the logic behind it. Nothing else!
First one is to configure interfaces on a device by using set mode which comes from the GUI itself:
configure
{% if interfaces and interfaces | length > 0 %}
{% for interface in interfaces %}
        set interfaces {{interface.name}} vlan-tagging
        {% for ifl in interface.ifls %}
        set interfaces {{interface.name}} unit {{ifl.unit}} vlan-id {{ifl.vlan_id}}
        {% for family in ifl.families %}
            set interfaces {{interface.name}} unit {{ifl.unit}} family {{family.name}} address {{family.address}}
        {% endfor %}
    {% endfor %}
{% endfor %}
{% endif %}
commit
This second sample template XML configuration is to configure interfaces on a device by using NETCONF EDIT and NETCONF RPC:
<edit-config>
<target><candidate /></target>
<default-operation>merge</default-operation>
<config>
<configuration>
<interfaces>
{% for interface in interfaces %}
    <interface>
    <name>{{ interface.name }}</name>
    <vlan-tagging/>
    {% for ifl in interface.ifls %}
    <unit>
    <name>{{ifl.unit}}</name>
    <vlan-id>{{ifl.vlan_id}}</vlan-id>
    <family>
    {% for family in ifl.families %}
        <{{family.name}}>
        <address>
            <name>{{family.address}}</name>
        </address>
        </{{family.name}}>
    {% endfor %}
    </family>
    </unit>
    {% endfor %}
    </interface>
{% endfor %}
</interfaces>
</configuration>
</config>
</edit-config>
Now we are going to create a template based on the below code. Copy the following configuration template related to a firewall filter:
configure
{% for term in fwfilter.terms -%}
{% if term.protocol -%}
set firewall family {{ fwfilter.family }} filter {{ fwfilter.name }} term {{ term.name }} from protocol {{ term.protocol }}
{% endif -%}
{% if term.port -%}
set firewall family {{ fwfilter.family }} filter {{ fwfilter.name }} term {{ term.name }} from destination-port {{ term.port }}
{% endif -%}
{% if term.source_address -%}
set firewall family {{ fwfilter.family }} filter {{ fwfilter.name }} term {{ term.name }} from source-address {{ term.source_address }}
{% endif -%}
set firewall family {{ fwfilter.family }} filter {{ fwfilter.name }} term {{ term.name }} then accept
{% endfor -%}
set firewall family {{ fwfilter.family }} filter {{ fwfilter.name }} term LOG-DENY-ALL then syslog
set firewall family {{ fwfilter.family }} filter {{ fwfilter.name }} term LOG-DENY-ALL then discard
commit
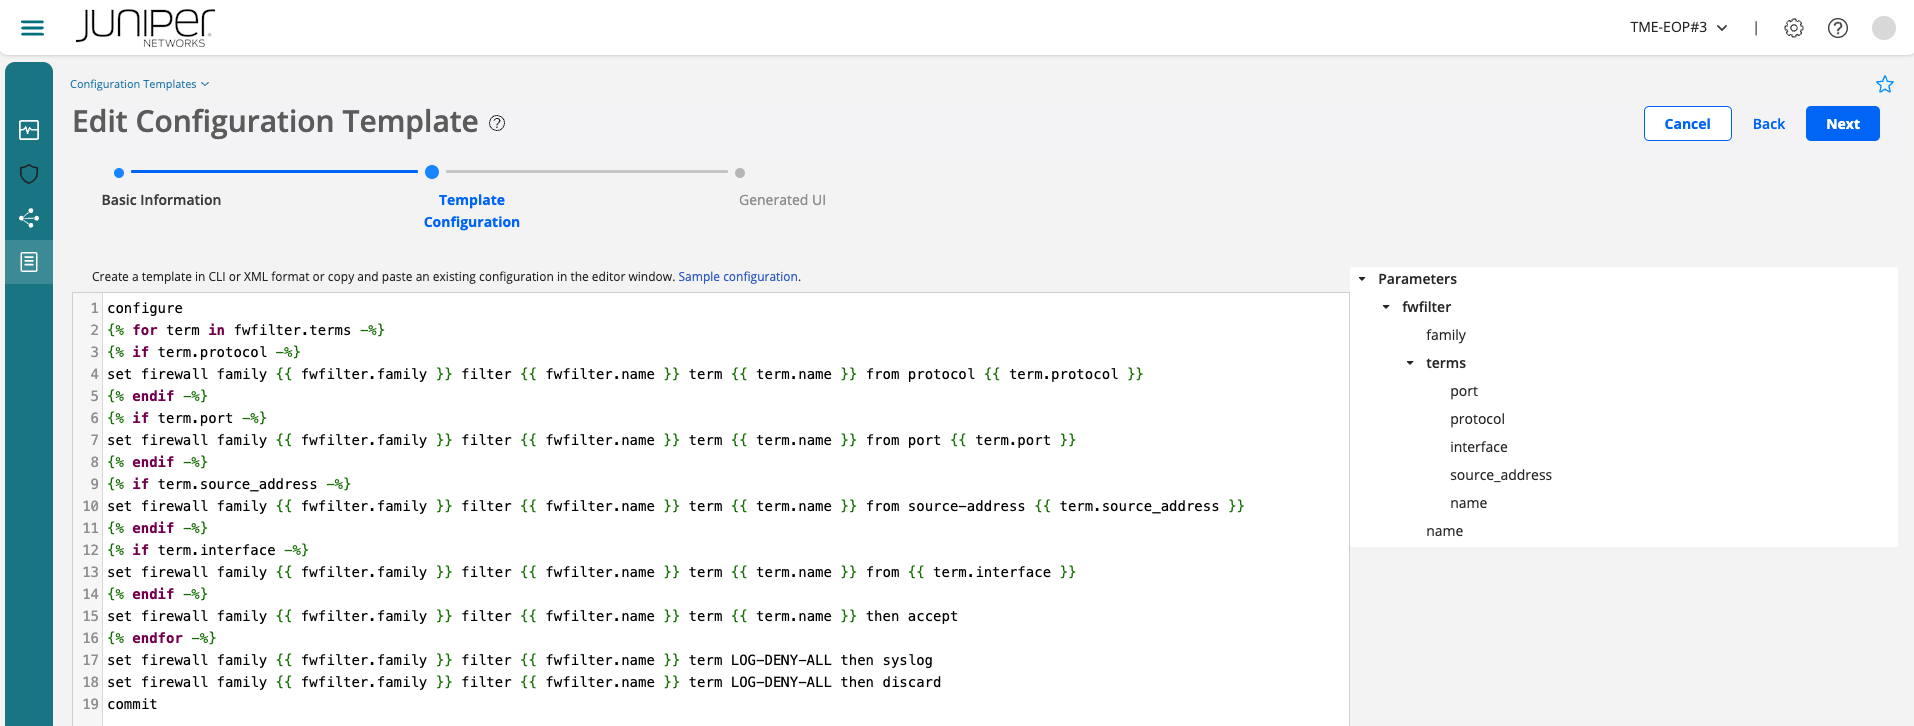
You can see the input parameters on the right hand side based on the jinja variables. Expand such Parameters section to see which parameters are required based on the variables of the template.
Click Next to go to the Generated UI tab. Now you can set and/or view the parameters in the Template Configuration tab in the Generated UI tab.
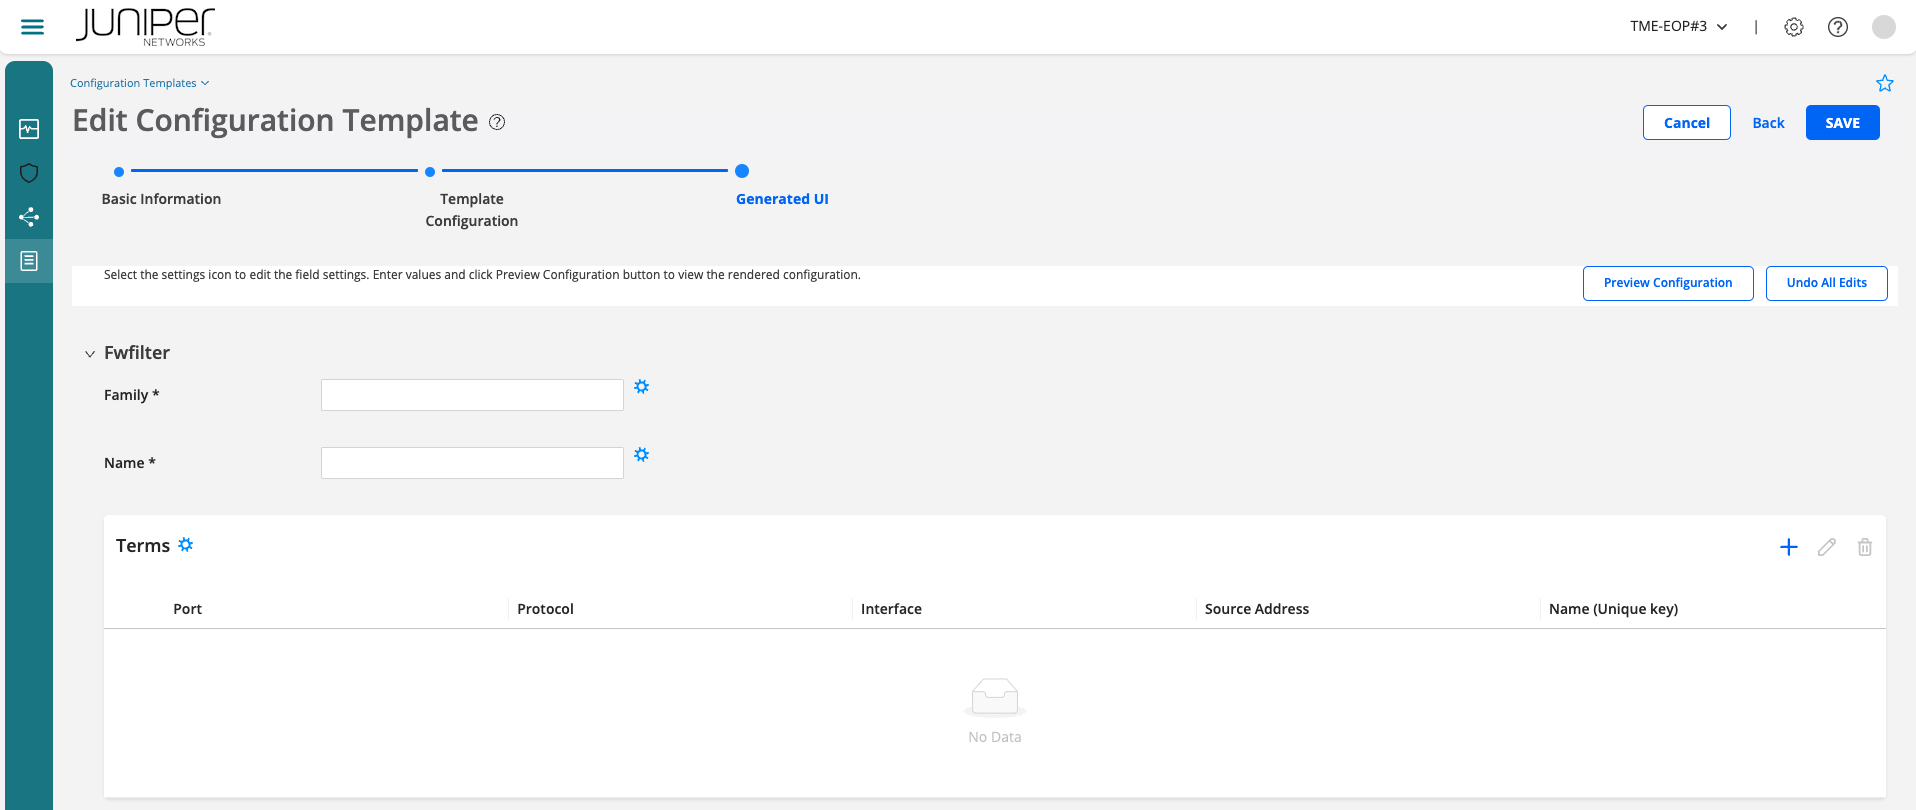
By clicking on each of the field settings icon (gear), you can be define some basic or advanced settings. These will allow you to define how input parameters should be (e.g. data validation and settings management).
Settings |
Guideline |
|---|---|
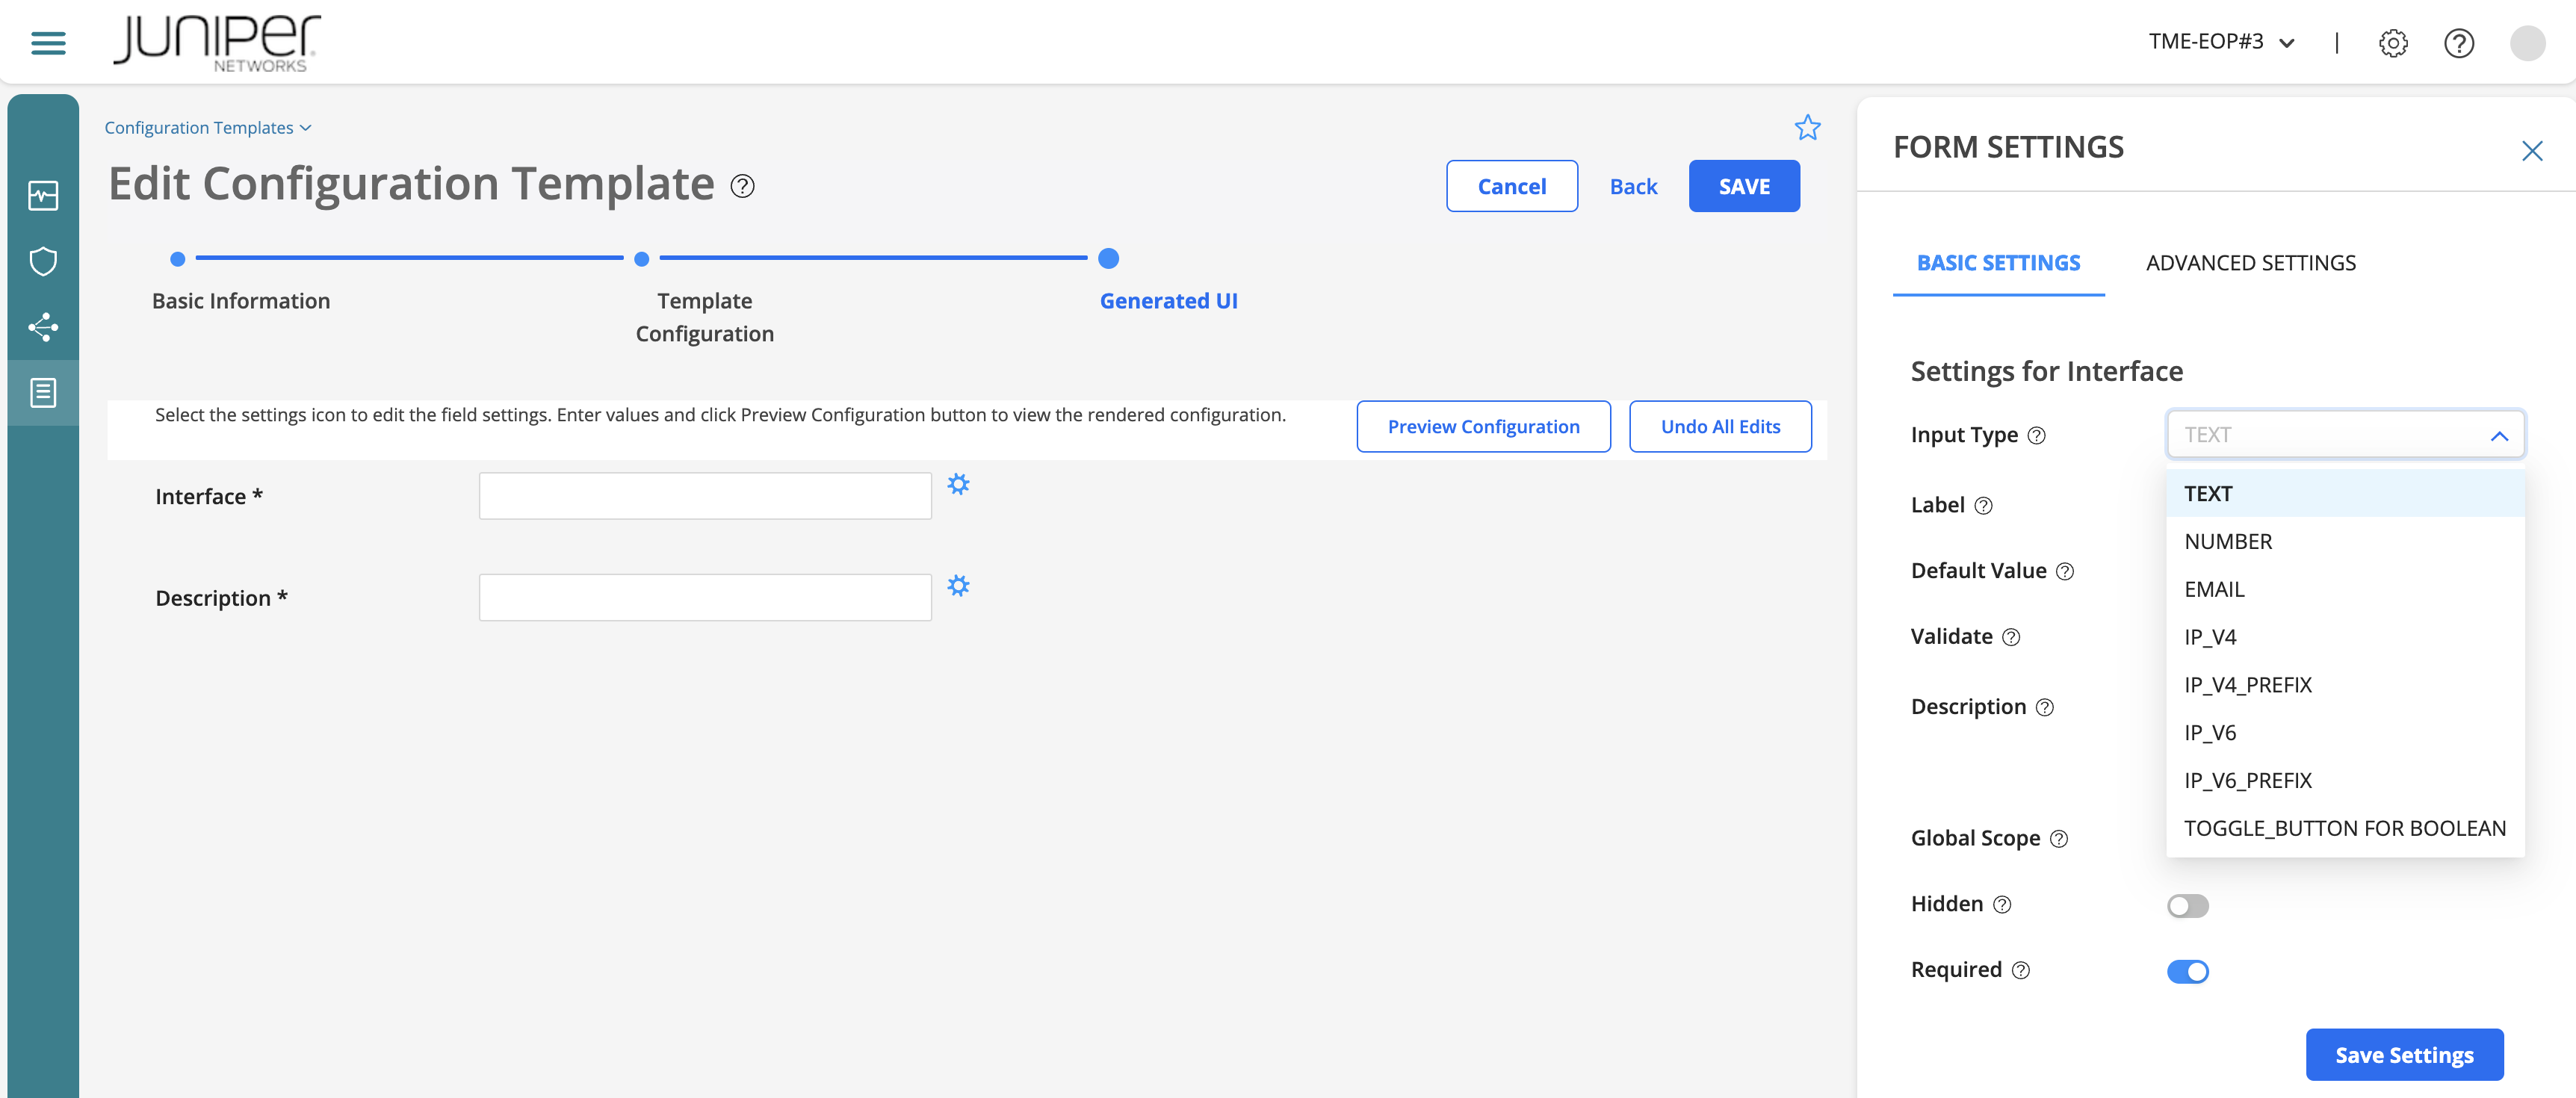
Basic |
Managing input types, basic validations (IPv4, IPv6, boolean), labels, default values, scope, if required or not, range, etc… |
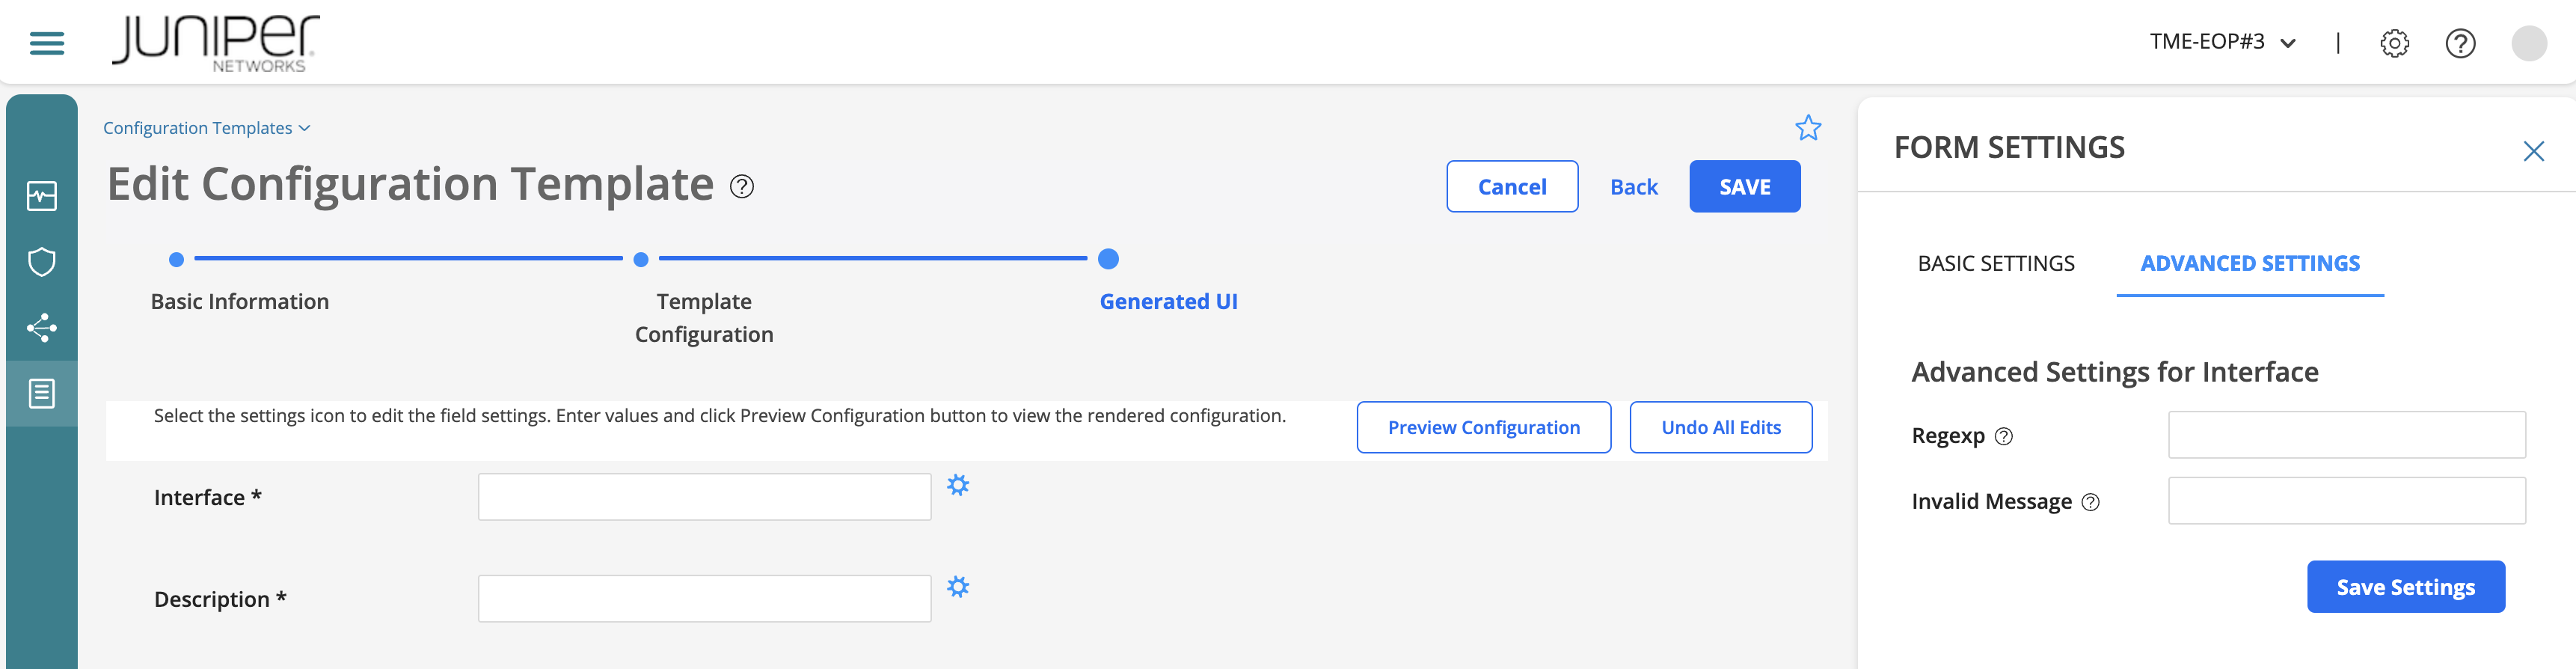
Advanced |
It has 2 fields: A regex (a regex pattern to validate the input value) and an invalid message (message to display on the UI when the input value does not match the specified regular expression). |
These are a couple of examples of the things that could be done. Feel free to play with your template definition and explore the different options there:
Select the input type for the parameter in the configuration template.
Enter the label that you want displayed (on the UI) for the parameter.
Enter a default value for the parameter.
For Text input type, select one or more validation criteria against which the input value will be checked.
Define the scope of the variable. If enabled, it will make the parameter common across all devices to which the configuration template is being deployed. If disabled (by default), the parameter must be specified for each device.
Hide a parameter. Click the toggle button to hide the parameter on the UI when you preview and deploy the template. Typically, this option is used to hide a parameter and display it in the template only when an event is triggered. By default, the toggle button is disabled, which means that the parameter is displayed.
Define if a parameter is required or not. If enabled, it will make the parameter mandatory (marked with an asterisk (*) on the UI).
Form basic settings example
Form advanced settings example
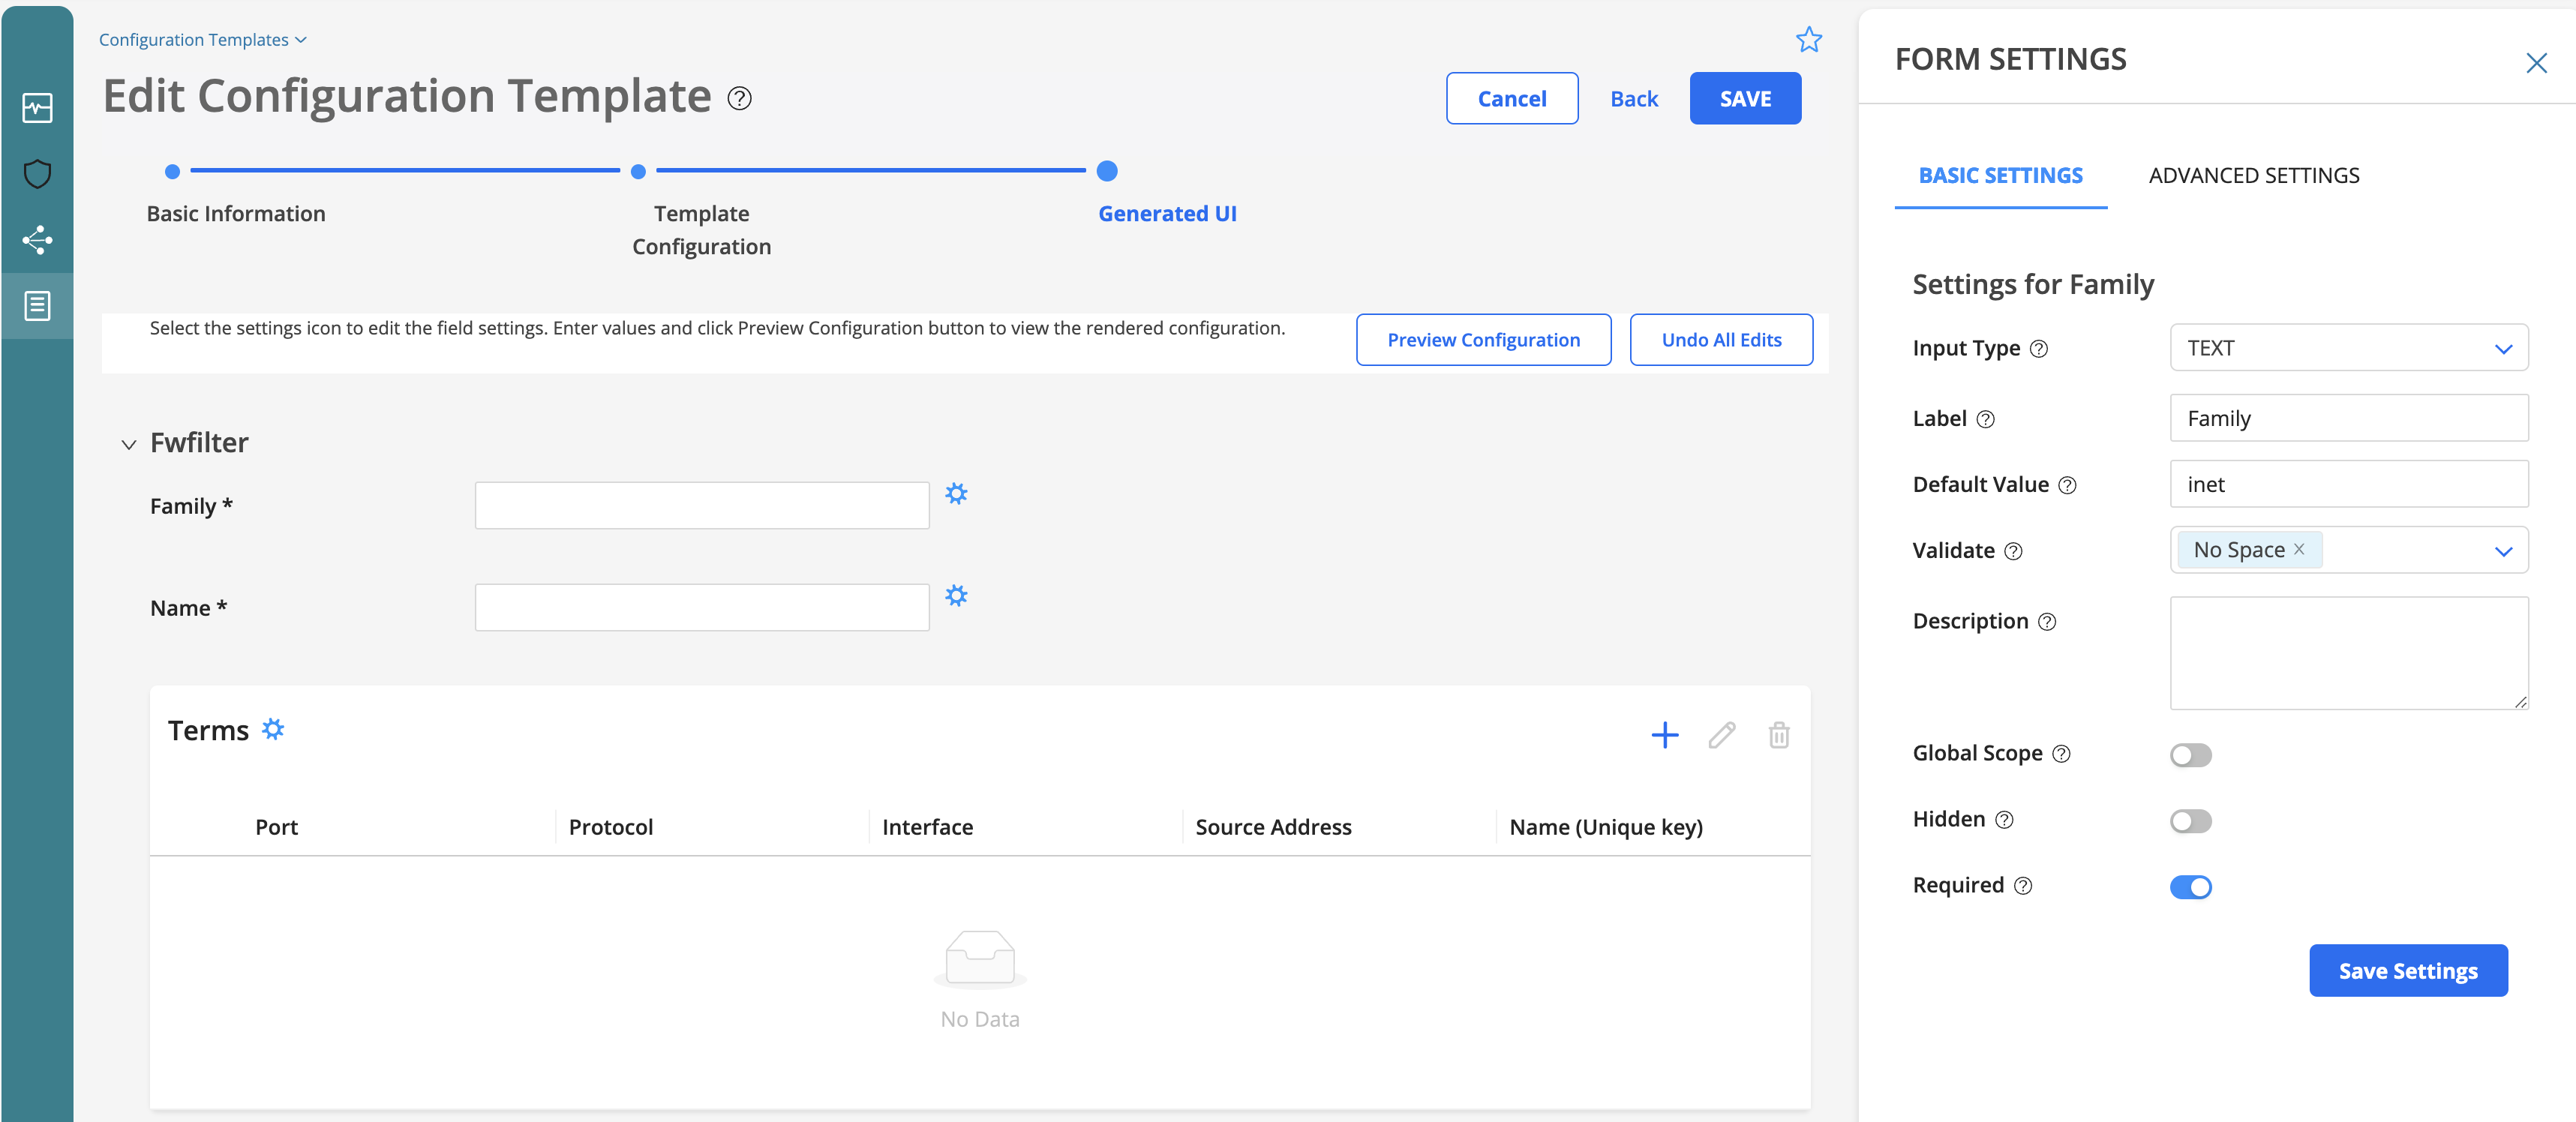
Set your name and family input parameters as TEXT.
Add a default value to the family (e.g. inet) and validate its input with No Space.
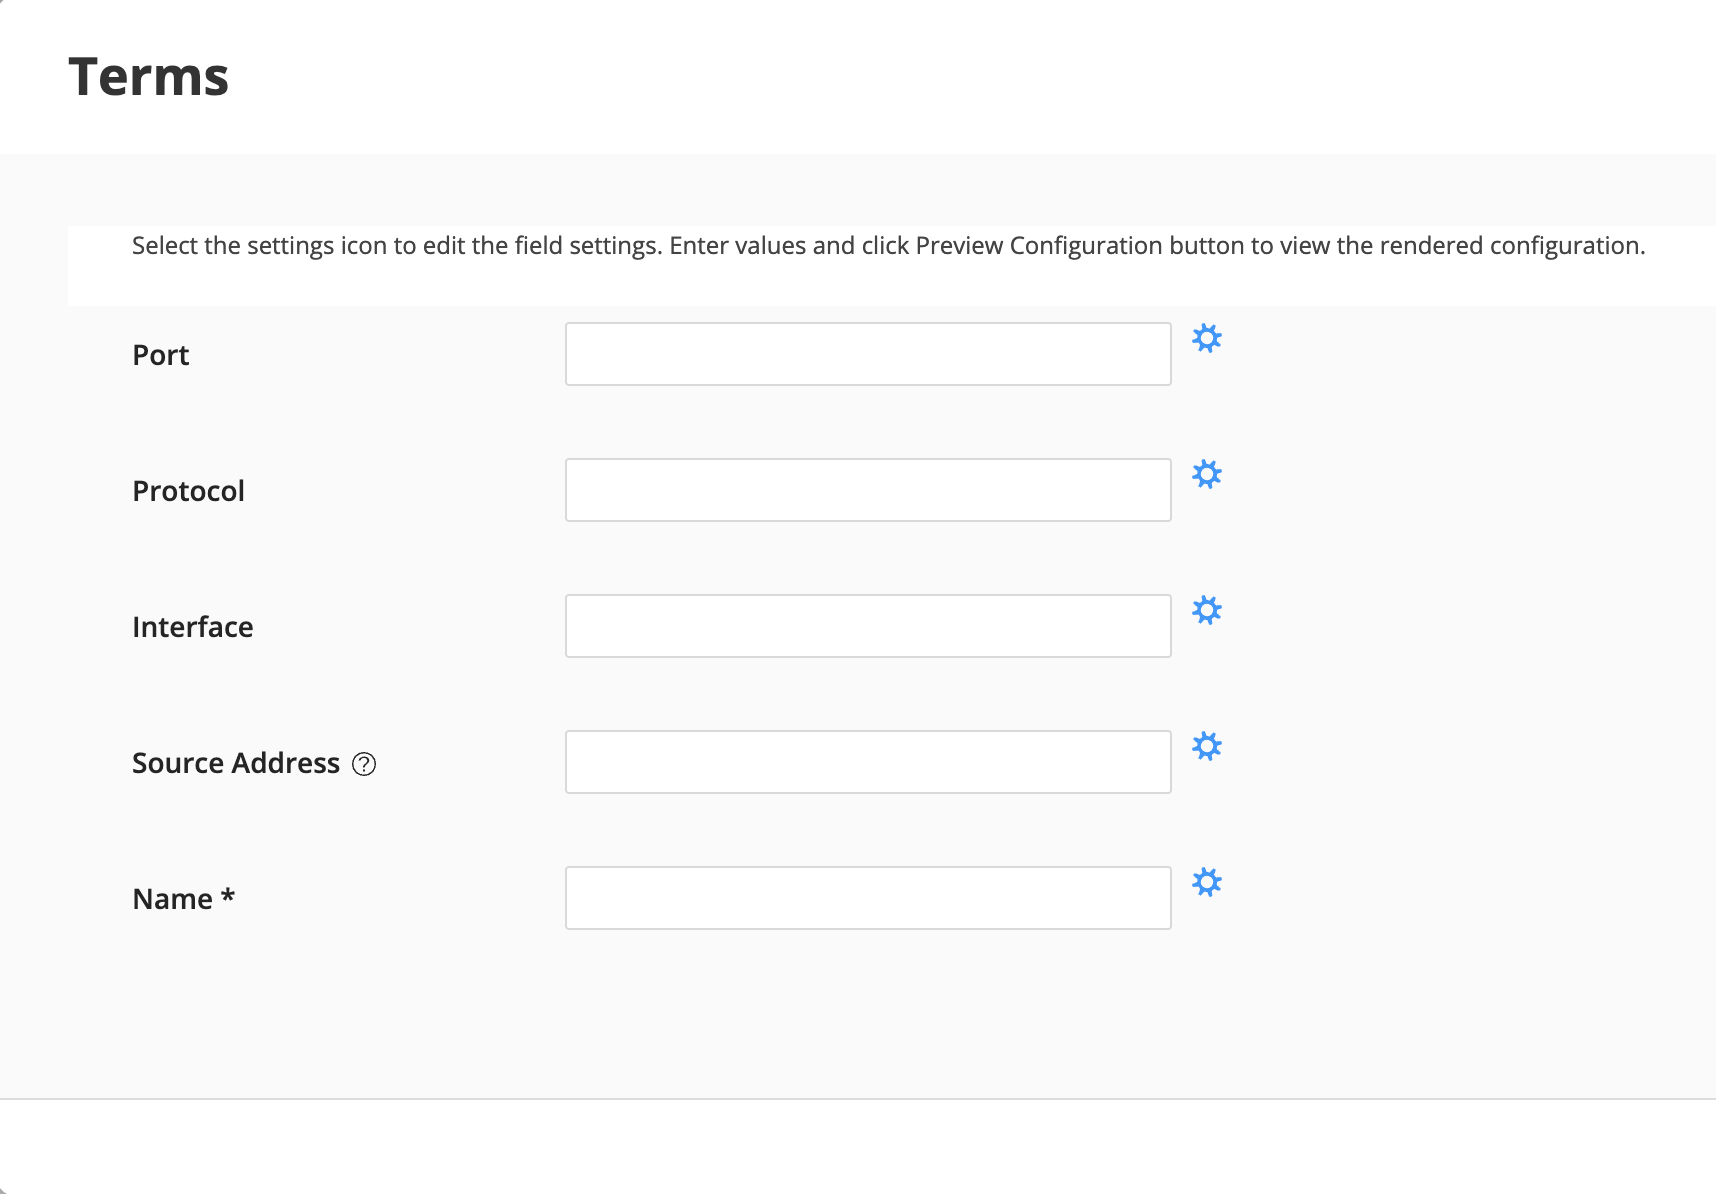
Go to the terms section. Click on the gear and set the key for the terms parameters. Set Name as the key value.
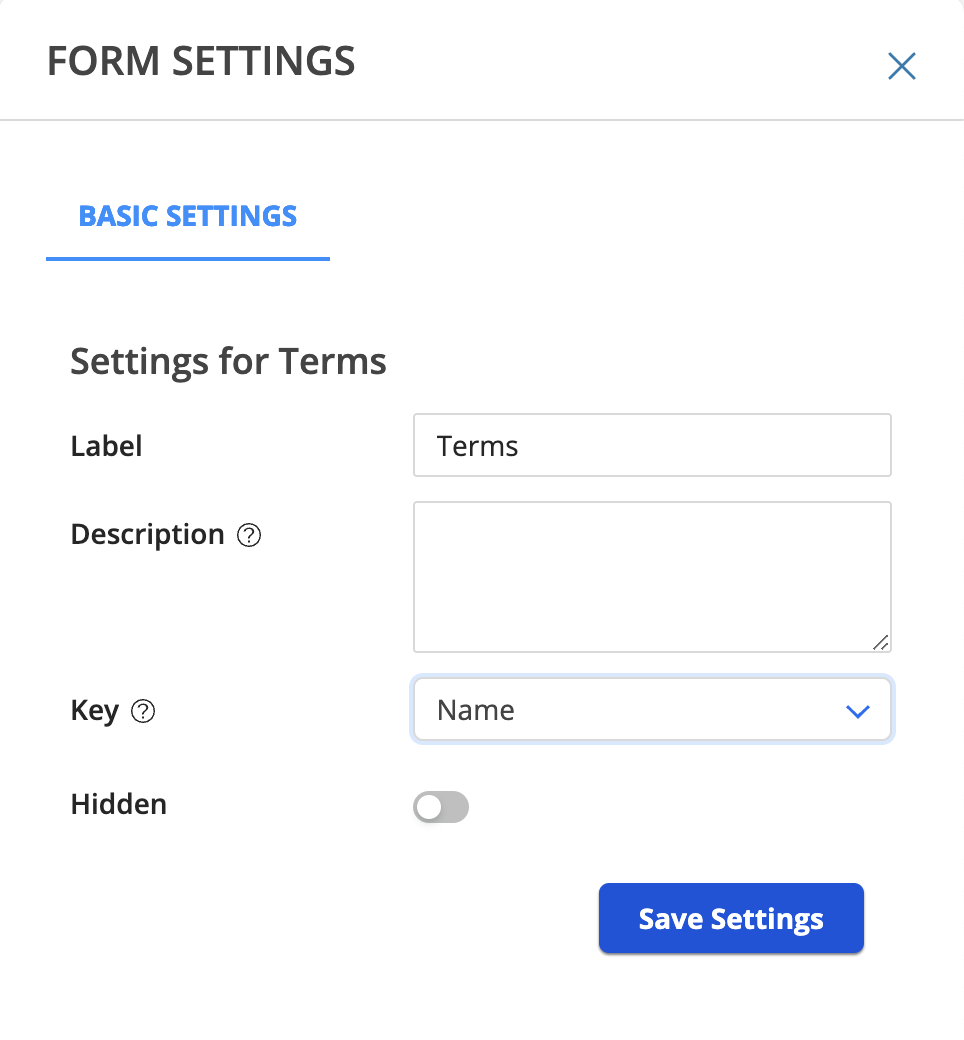
Click on the Add (+) sign and then go each of the parameters in terms field but Name and disable Required toggle button. Click on Save Settings. Then go to Source Address and set Input Type as IP_V4_PREFIX. Click on Save Settings again. Then go to Name and set default value as change_me. Click on Save Settings. Once you have finished configuring each field settings, click on OK.
NOTE: Only name in the terms section (see below screenshot) should have the * (required fields)
Click Save. A message indicating that the Configuration Template successfully added is displayed.
View
Select a configuration template and click More > Details or hover over the configuration template and click the Detailed View icon. The Details of Configuration-Template-Name pane appears. The pane displays two tabs:
GENERAL — Displays the general information about the selected configuration template as listed in below table.
Fields |
Description |
|---|---|
Name |
The name of the configuration template. |
Family |
The device family for which the configuration template is applicable: ACX, EX, JUNIPER ANY, MX, NFX, PTX, QFX, SRX. |
Description |
A description of the configuration template. |
Last Updated |
The date and time when the configuration template was last updated, in the Month DD, YYYY, HH:MM:SS AM/PM TIME ZONE format (e.g. May 8, 2023, 4:29:52 PM IST). |
TEMPLATE — Displays the template you defined in CLI or XML format in the Template Configuration tab.
Preview
You can validate a configuration template before you apply the configuration template on a device. Select the configuration template you want to preview (if there are other templates available you can select one of them. If not, you can preview the one you just created!).
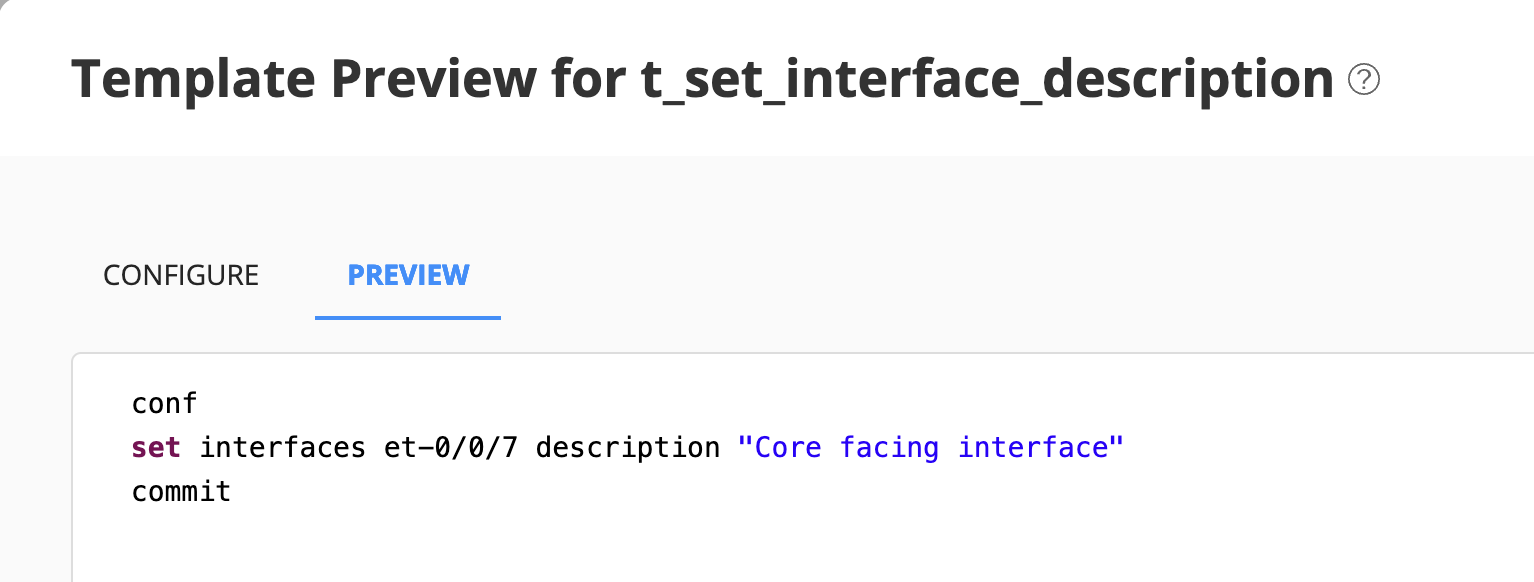
Enter a value for the parameters on the Configure tab and view the generated configuration on the Preview tab.
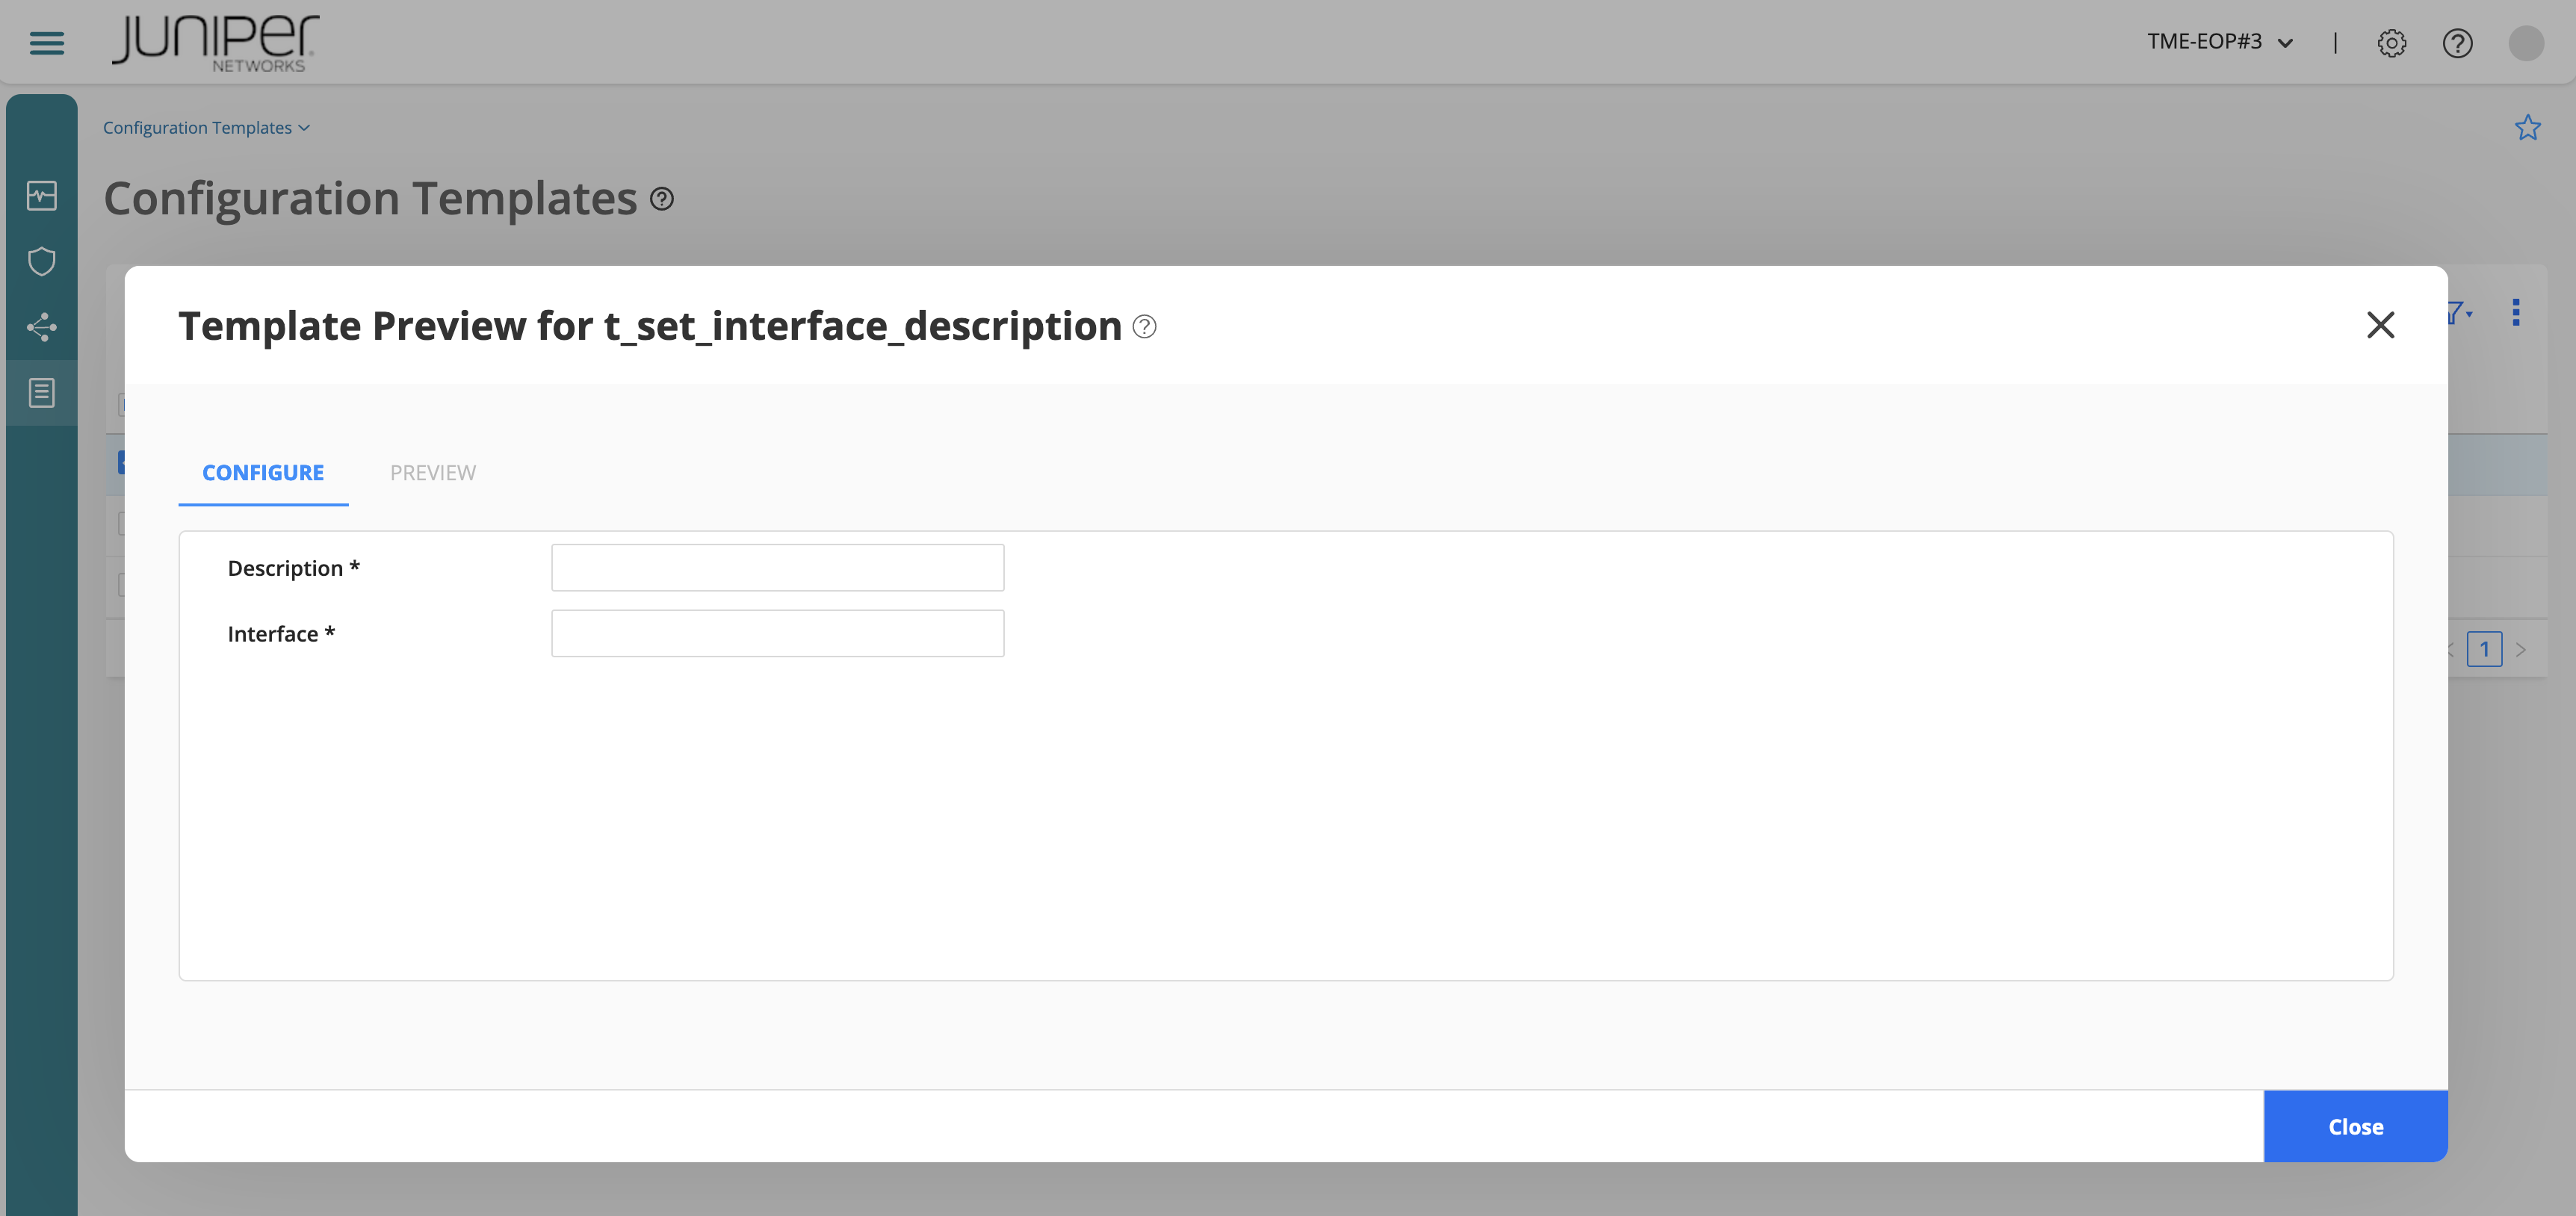
Set the parameters
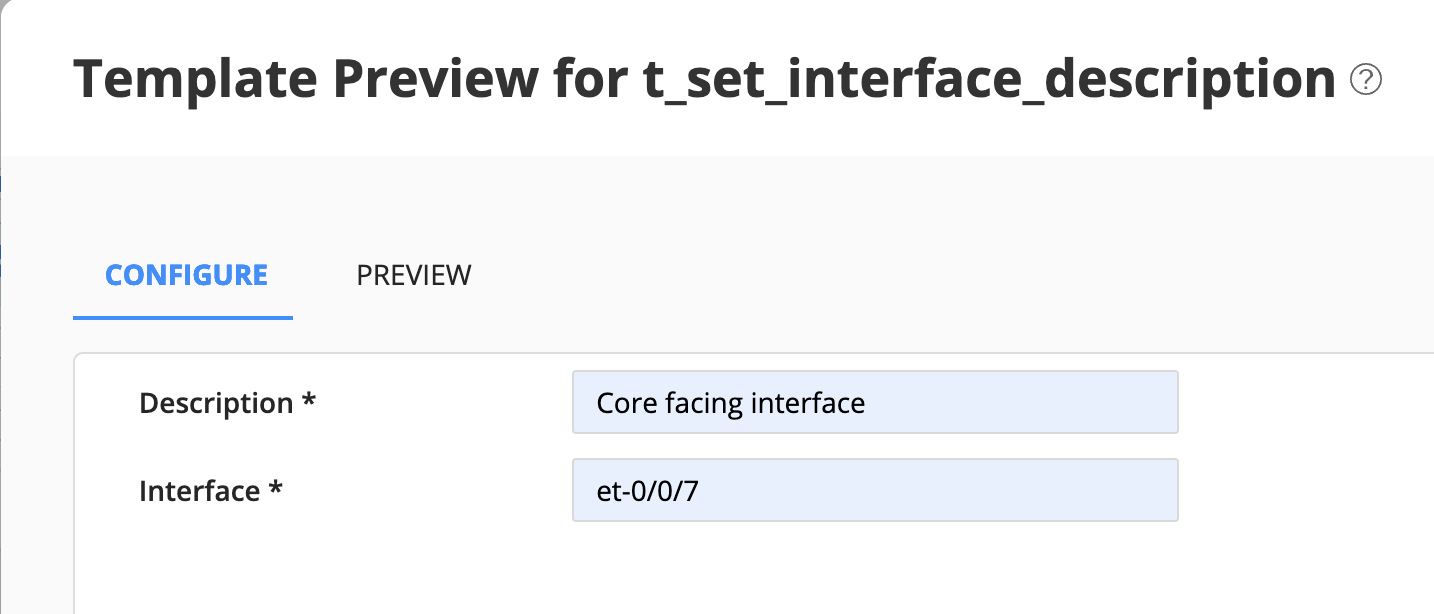
and then preview:
Deploy
Now let’s deploy the configuration related to the firewall filter created a few steps ago. A configuration template can be deployed into one or more devices in an organization. You are going to do this in the device you have been assigned to:
ACX7100
This operation enables you to apply new configurations to devices after a device is onboarded or to deploy additional configurations to a device.
You must either be a Super User or a Network Admin with the privilege to deploy configuration on devices.
To deploy a configuration template to one or more devices:
Select Inventory > Devices > Configuration Templates. The Configuration Templates page appears.
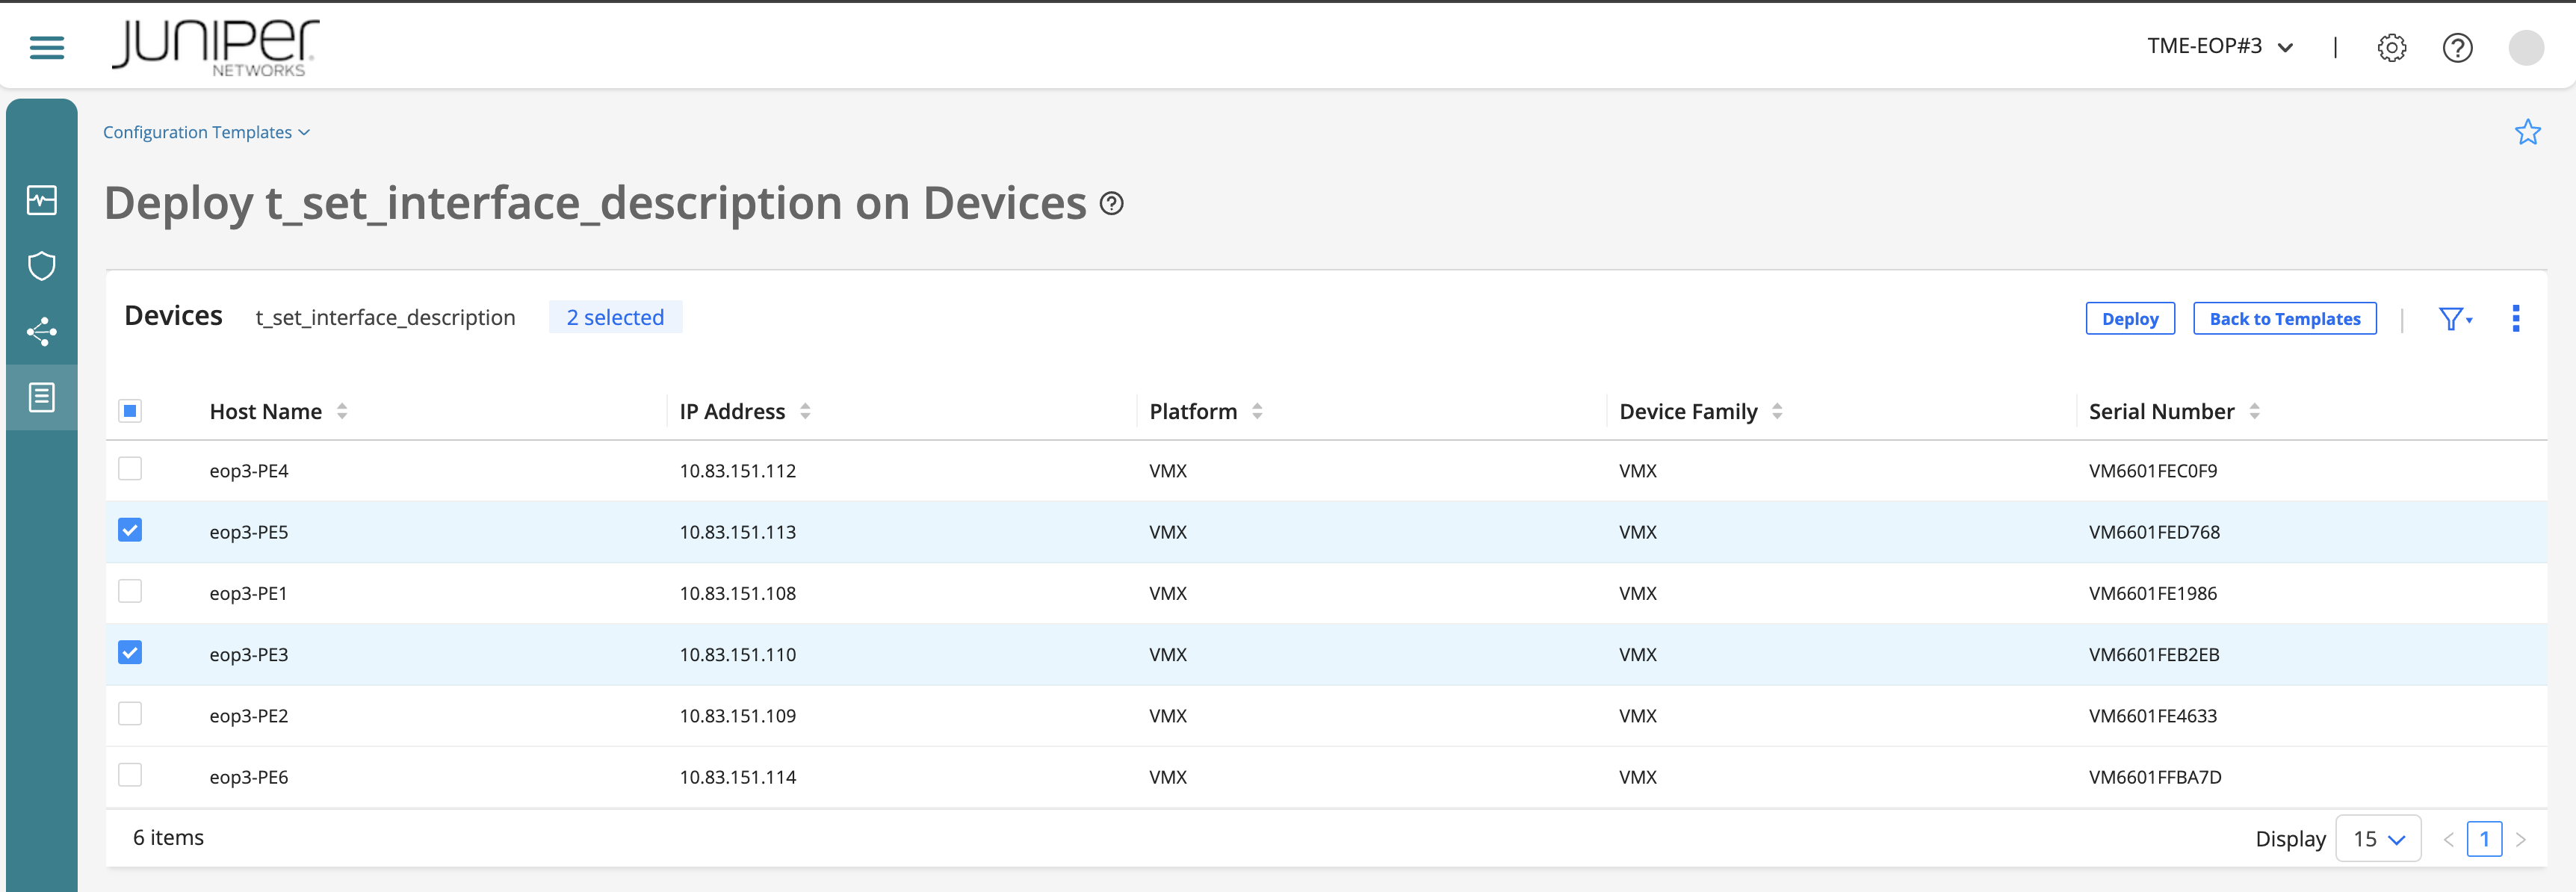
Select the configuration template that you just created related to the firewall filter and click Deploy to Devices. A Deploy template name to Devices page appears listing the devices to which the configuration template can be assigned (it depends on the device family you set your template and the devices you got in your inventory).
Select ACX7100 device and click Deploy. (the picture does not show up the list of devices from your inventory since it had lower quality!)
The Set Configuration Template Parameters page appears.
In the Configure tab, assign values for the parameters.
Add the family (e.g. inet) and name of the firewall filter (e.g. TEST_FWF_${labuser_NUMBER} => TEST_FWF_[1,2,3,4]) so it does not impact with any other user when pushing the configuration to the same device target ACX7100.
Add some terms. Click on the (+) sign to add them one by one.

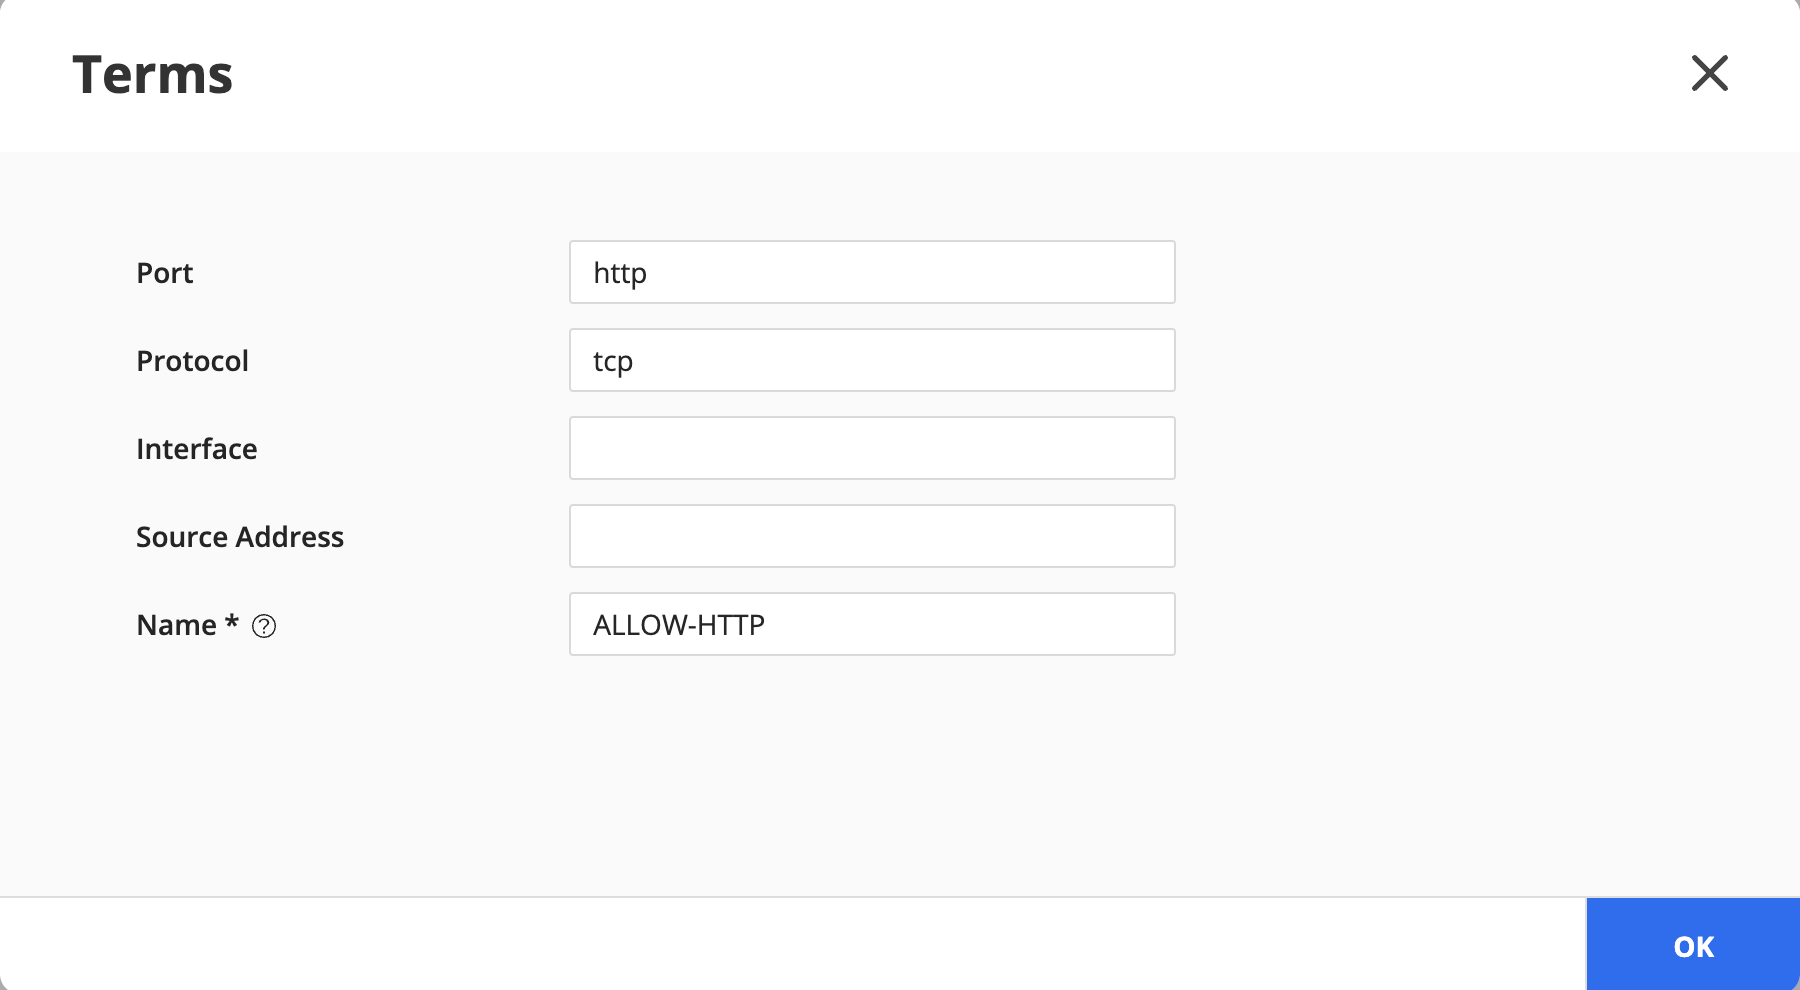
Click on the (+) sign to add a few terms:
Create a term (e.g. ALLOW-HTTP) to allow HTTP traffic:
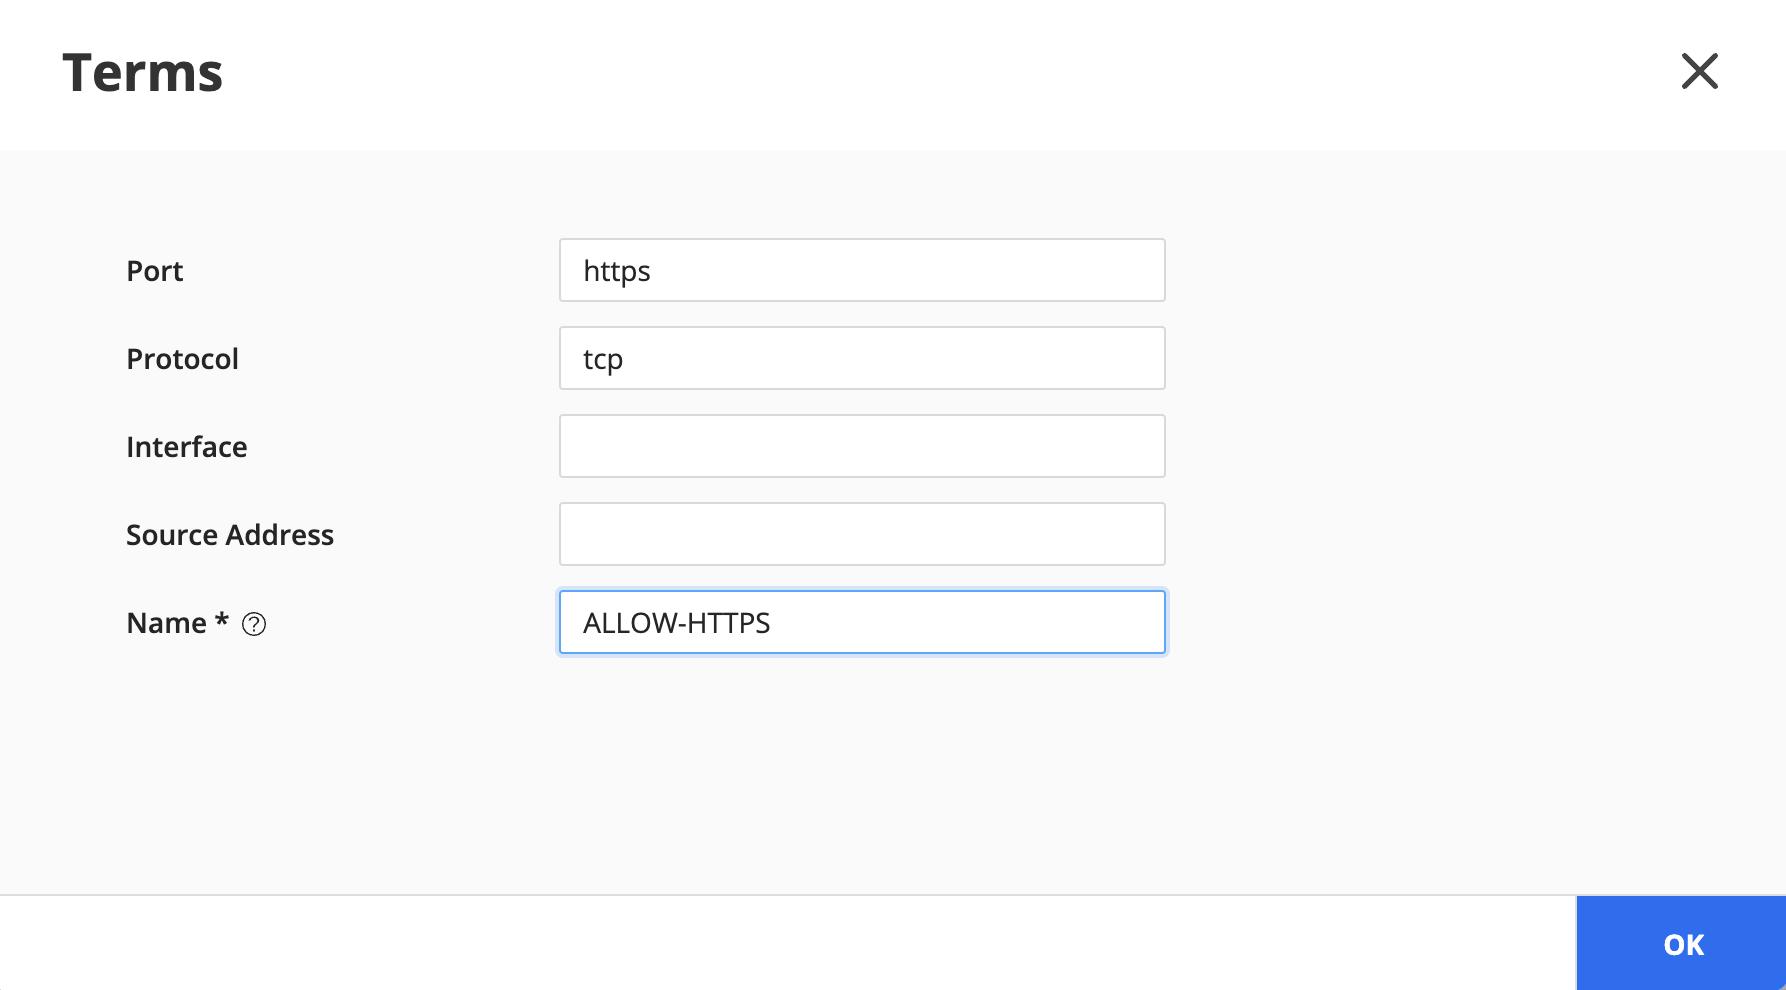
Create a term (e.g. ALLOW-HTTPS) to allow HTTPS traffic:
Create a term (e.g. ALLOW-INTERNAL-NETWORK) to allow internal traffic:

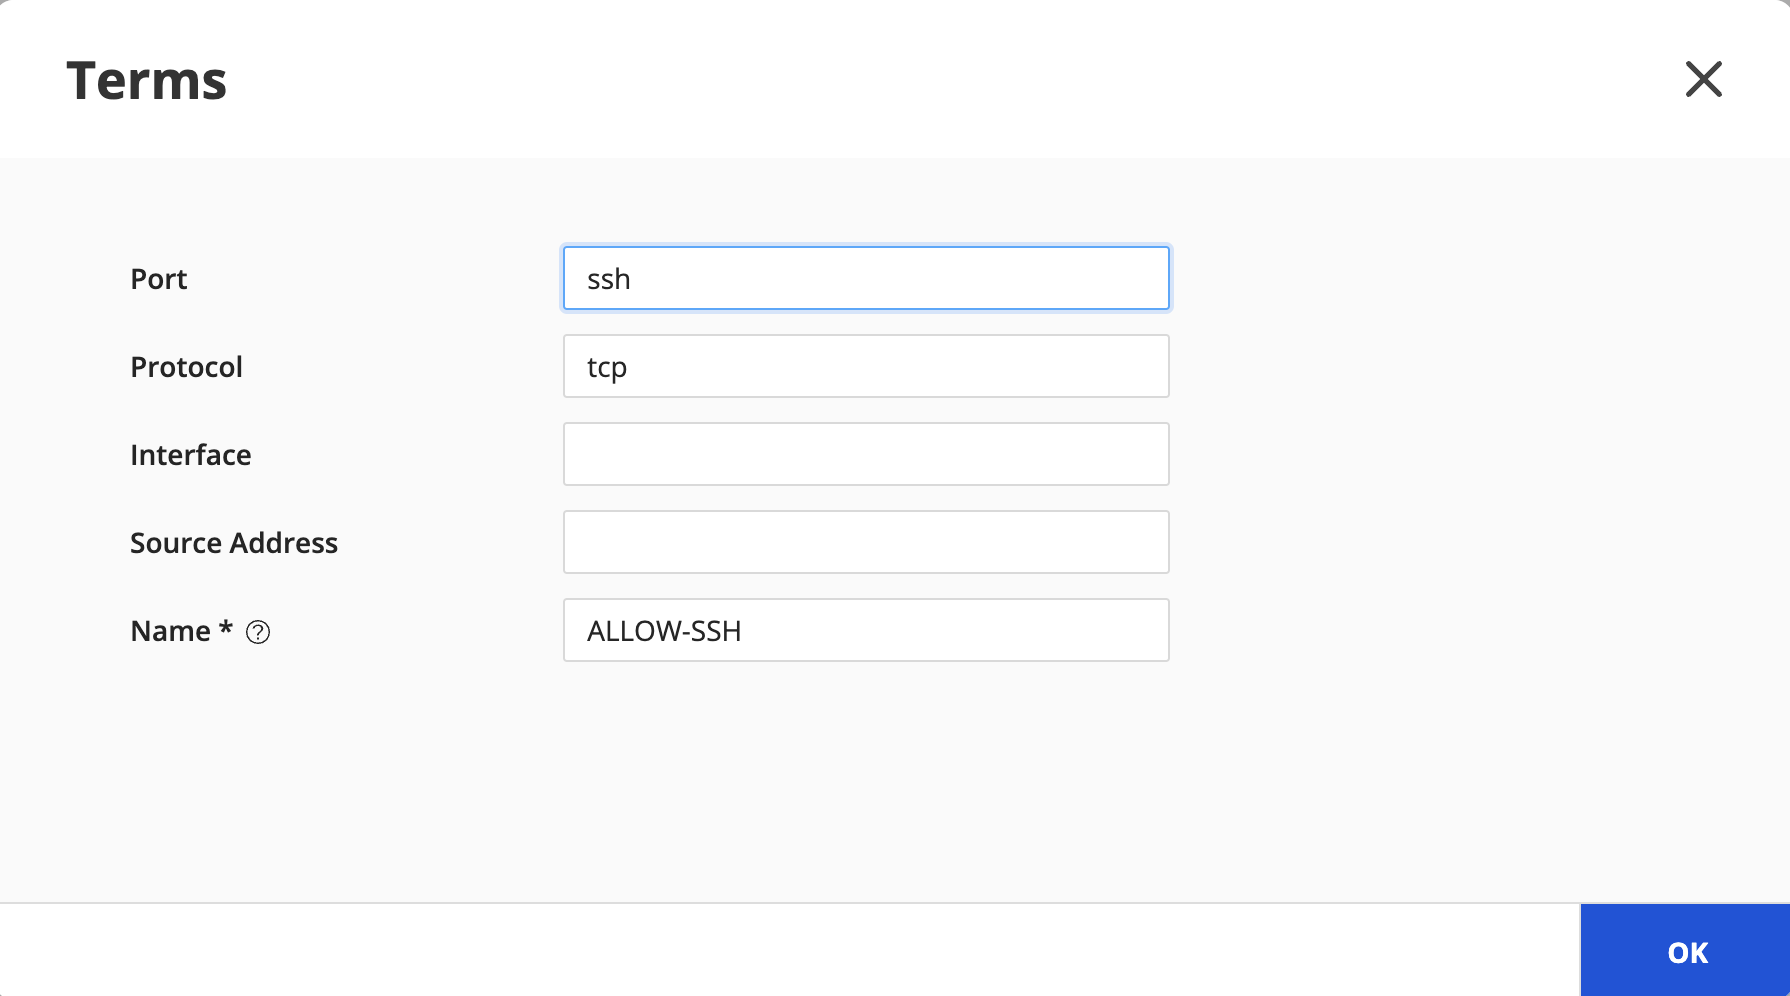
Create a term (e.g. ALLOW-SSH) to allow SSH traffic:
Click Preview to view the piece of configuration generated.
configure
set firewall family inet filter TEST_FWF_3 term ALLOW-HTTP from protocol tcp
set firewall family inet filter TEST_FWF_3 term ALLOW-HTTP from destination-port http
set firewall family inet filter TEST_FWF_3 term ALLOW-HTTP then accept
set firewall family inet filter TEST_FWF_3 term ALLOW-HTTPS from protocol tcp
set firewall family inet filter TEST_FWF_3 term ALLOW-HTTPS from destination-port https
set firewall family inet filter TEST_FWF_3 term ALLOW-HTTPS then accept
set firewall family inet filter TEST_FWF_3 term ALLOW-SSH from protocol tcp
set firewall family inet filter TEST_FWF_3 term ALLOW-SSH from destination-port ssh
set firewall family inet filter TEST_FWF_3 term ALLOW-SSH then accept
set firewall family inet filter TEST_FWF_3 term ALLOW-INTERNAL-NETWORK from source-address 192.168.1.0/24
set firewall family inet filter TEST_FWF_3 term ALLOW-INTERNAL-NETWORK then accept
set firewall family inet filter TEST_FWF_3 term LOG-DENY-ALL then syslog
set firewall family inet filter TEST_FWF_3 term LOG-DENY-ALL then discard
commit
If the configuration is fine, click OK. If not, either you need to change the parameters or edit the template to fix any errors.
Click Deploy. The settings that you entered are saved and you are returned to the Configuration Templates page. A message indicating that the deployment is successful is displayed with a link to the Audit Logs (Administration > Audit Logs) page. You can view the progress of the deploy operation in the Audit Logs page.

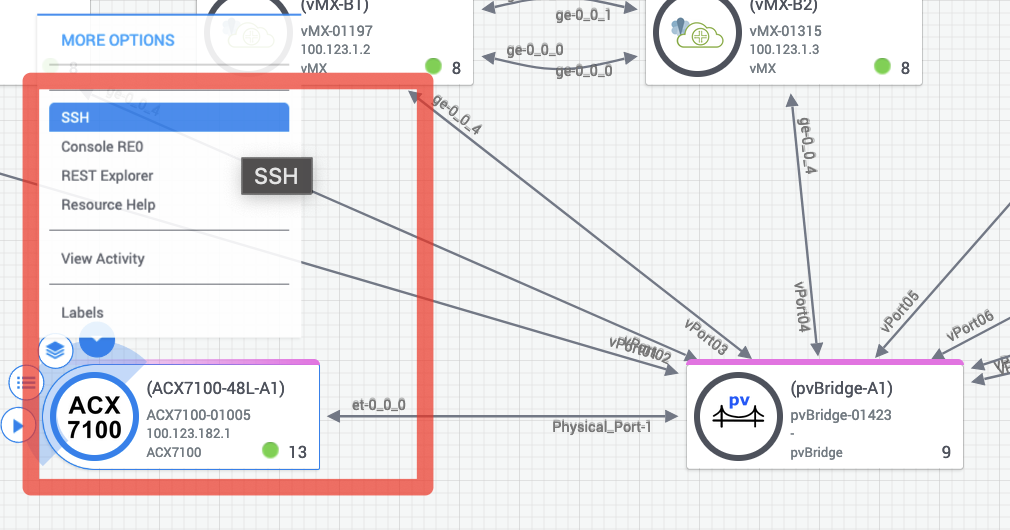
You can connect now via SSH to the ACX7100 device and check its configuration. You should see your piece of configuration being pushed there. Go to the topology in JCL and hover over the ACX7100 icon until it appears the down arrow showing you the different actions you can take on the device. Select SSH and a CLI terminal to the device will be open:
    jcluser@ACX7100-1-48L> show configuration | display set | match filter
    ...
    set firewall family inet filter TEST_FWF_3 term ALLOW-HTTP from protocol tcp
    set firewall family inet filter TEST_FWF_3 term ALLOW-HTTP from destination-port http
    set firewall family inet filter TEST_FWF_3 term ALLOW-HTTP then accept
    set firewall family inet filter TEST_FWF_3 term LOG-DENY-ALL then syslog
    set firewall family inet filter TEST_FWF_3 term LOG-DENY-ALL then discard
    ...

    jcluser@ACX7100-1-48L>
Go to configuration mode and remove the configuration provisioned by your configuration template:
    jcluser@ACX7100-1-48L# delete firewall family inet filter TEST_FWF_3
    jcluser@ACX7100-1-48L# commit
Confirm firewall configuration has been deleted and then, exit the device.
    jcluser@ACX7100-1-48L# show | display set | match firewall

    [edit]
    jcluser@ACX7100-1-48L#
Edit
You cannot edit a configuration template if the configuration template is in the process of being deployed or if you have scheduled the configuration template deployment.
To edit a Configuration Template:
Select Inventory > Devices > Configuration Templates. The Configuration Templates page appears.
Select the configuration template that you want to modify and click the Edit (pencil) icon. The Edit Configuration Template page appears. The fields on this page are same as the fields that you configure in the Add Configuration Template workflow.
Modify the fields as needed. Refer Add a Configuration Template for an explanation of the fields.
Delete
You can delete a configuration template only if the following conditions hold good:
You added (created) the template.
The template is not deployed on a device.
To delete a Configuration Template:
Select Inventory > Devices > Configuration Templates. The Configuration Templates page appears.
Select the configuration template that you want to delete (the one you created a few steps back) and click the Delete (trash can) icon. You are asked to confirm the delete operation.
Click Yes. You are returned to the Configuration Templates page and a pop-up appears indicating whether the deletion was successful or not.
Congratulations! You have finished the lab!
Conclusion
Intent Based Networking (IBN) offers a more sophisticated, automated, and scalable approach to network management. IBN focus on high-level business intents and automated translation into network configurations. It continuously monitors the network’s state and performance to ensure that the defined intents are being met and could dynamically adapt to changes in the network, such as traffic patterns or device failures, to maintain the desired state.
Customized templates, especially when enhanced with advanced templating features like loops, if/else conditions, and variables in Jinja2, provide a powerful and flexible way to manage network configurations. They ensure consistency, reduce errors, and significantly improve the efficiency of deploying and maintaining network devices.
While IBN offers a higher level of automation and dynamic adaptability, customized templates remain a valuable tool for detailed, structured and consistent way of controlled network provisioning and they are particularly advantageous when dealing with features that are still under development in IBN.
Thank you very much!